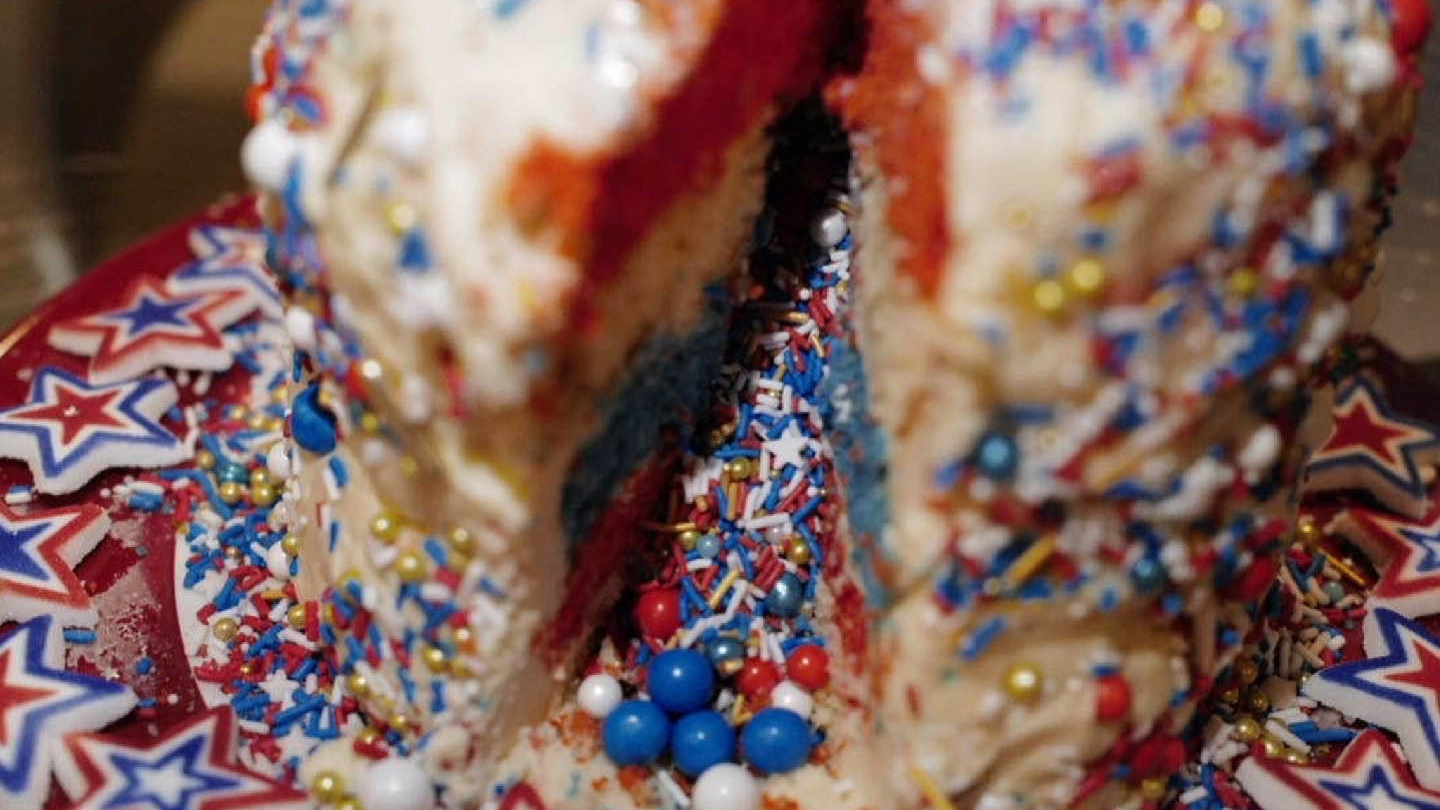
Make a festive gluten-free red, white and blue firecracker surprise cake with six patriotic layers, vanilla buttercream, berries, and a hidden sprinkle center.
Celebrate Independence Day with a spectacular Festive Gluten-Free Red, White and Blue Firecracker Surprise Cake Recipe. This patriotic dessert features six colorful vanilla cake layers, silky buttercream frosting, fresh summer berries, and a hidden center filled with red, white, and blue sprinkles or candies.
When the first slice is removed, the surprise filling tumbles from the center for a playful firecracker effect. The bright layers and festive decorations make this gluten-free cake an impressive centerpiece for Fourth of July parties, Memorial Day gatherings, Veterans Day celebrations, backyard barbecues, picnics, and summer events.
The recipe includes two complete cake options. Option 1 uses a homemade blend of individual gluten-free flours, buttermilk, and sour cream. Option 2 uses gluten-free Measure for Measure flour and whole milk.
Choose only one cake option and follow the corresponding directions. Do not combine the two formulas.
Directions
Directions for Option 1: Homemade Gluten-Free Flour Blend Cake
Follow Steps 1 through 6 if you are making Option 1. Skip the directions for Option 2.
Step 1: Prepare the Cake Pans
Preheat the oven to 350°F. Grease six 6-inch round cake pans and line the bottoms with parchment paper circles.
If you do not have six pans, bake the layers in batches. Allow the pans to cool before greasing, lining, and filling them again.
Step 2: Combine the Homemade Flour Blend
In a medium bowl, whisk together the sweet rice flour, white rice flour, tapioca flour, brown rice flour, xanthan gum, baking powder, baking soda, and kosher salt. Continue whisking until the flours and leavening ingredients are evenly distributed.
Step 3: Cream the Butter and Sugar
Place the softened butter and granulated sugar in a large mixing bowl. Beat for 3 to 5 minutes, or until the mixture becomes pale, light, and fluffy.
Step 4: Add the Eggs and Vanilla
Add the eggs one at a time, beating well after each addition. Scrape down the sides and bottom of the bowl as needed. Mix in the vanilla extract.
Step 5: Finish the Option 1 Batter
Add the dry ingredients to the butter mixture in alternating additions with the buttermilk. Begin and end with the dry ingredients, mixing only until each addition is incorporated.
Fold in the sour cream until the batter is smooth and evenly combined. Do not overmix.
Step 6: Continue to Color the Batter
Proceed to Step 13 to divide and color the Option 1 batter.
Directions for Option 2: Measure for Measure Flour Cake
Follow Steps 7 through 12 if you are making Option 2. Skip the directions for Option 1.
Step 7: Prepare the Cake Pans
Preheat the oven to 350°F. Grease six 6-inch round cake pans and line the bottoms with parchment paper circles.
If you need to bake the layers in batches, allow the pans to cool before preparing and filling them again.
Step 8: Combine the Dry Ingredients
In a medium bowl, whisk together the gluten-free Measure for Measure flour, salt, baking powder, and baking soda. Set the dry mixture aside.
Step 9: Cream the Butter and Sugar
Place the softened butter and granulated sugar in a large mixing bowl. Beat for 3 to 5 minutes, or until pale, light, and fluffy. Scrape down the sides and bottom of the bowl as needed.
Step 10: Add the Egg and Vanilla
Beat the egg into the creamed butter mixture until fully incorporated. Add the vanilla extract and mix until evenly blended.
Step 11: Finish the Option 2 Batter
Add the dry ingredients to the butter mixture in alternating additions with the whole milk. Begin and end with the dry ingredients.
Mix only until the batter is smooth and combined. Avoid overmixing the batter.
Step 12: Continue to Color the Batter
Proceed to Step 13 to divide and color the Option 2 batter.
Directions for Coloring, Baking, Filling, and Decorating
Complete the remaining steps with the batter prepared from your selected cake option.
Step 13: Divide and Color the Batter
Divide the prepared batter evenly among six bowls. For evenly sized cake layers, use a kitchen scale to divide the batter by weight.
Add red gel food coloring to two portions and fold gently until the color is evenly blended. Leave two portions uncolored for the white layers. Add blue gel food coloring to the remaining two portions and fold until evenly blended.
Step 14: Fill the Cake Pans
Transfer each portion of colored or uncolored batter to a prepared cake pan. Use a small offset spatula or the back of a spoon to spread the batter evenly and smooth the top.
Step 15: Bake the Cake Layers
Bake the cake layers for 18 to 22 minutes, or until a toothpick inserted into the center comes out clean.
Let the cakes cool in their pans for 10 minutes. Carefully turn the layers out onto wire racks, remove the parchment paper, and allow the cakes to cool completely before assembling.
Step 16: Prepare the Vanilla Buttercream
Place the softened salted and unsalted butter in a large mixing bowl. Beat until smooth and creamy.
Gradually add the confectioners’ sugar, mixing well after each addition. Add the vanilla extract, salt, and 3 tablespoons of heavy cream.
Continue beating for several minutes, or until the buttercream is light, fluffy, and smooth. If the frosting is too thick to spread, add the remaining heavy cream a little at a time until it reaches the desired consistency.
Step 17: Prepare the Surprise Layers
Set aside two whole cake layers. One will form the bottom of the cake, and the other will seal the top.
Using a round cookie cutter or a small bowl as a guide, cut a circle from the center of each of the remaining four cake layers. Carefully remove the cake centers, keeping the outer rings intact.
Step 18: Begin Assembling the Cake
Place one whole cake layer on a serving plate or cake stand. Spread an even layer of buttercream over the top.
Place one hollow cake layer over the buttercream. Continue stacking the hollow layers in an alternating red, white, and blue pattern, spreading buttercream between each layer. Carefully align the openings to create one continuous cavity through the center of the cake.
Step 19: Add the Surprise Filling
Fill the center cavity almost to the top with your chosen red, white, and blue sprinkles or gluten-free candies.
Do not pack the filling too tightly. Leaving it slightly loose will help it tumble from the cake when the first slice is removed.
Step 20: Seal the Cake
Spread buttercream over the top hollow layer without pushing frosting into the filled cavity. Place the final whole cake layer on top to seal the surprise center.
Check that all six cake layers are aligned before frosting the outside.
Step 21: Apply the Crumb Coat
Spread a thin layer of buttercream over the top and sides of the assembled cake. This crumb coat will trap loose crumbs and create a smooth base for the final frosting layer.
Refrigerate the cake for 20 minutes, or until the crumb coat feels firm.
Step 22: Frost the Cake
Spread a generous final layer of buttercream over the chilled cake. Smooth the top and sides with an offset spatula or cake scraper for a clean, bakery-style finish.
If desired, reserve some buttercream and tint separate portions red and blue. Leave another portion white for piping patriotic buttercream swirls.
Step 23: Decorate the Cake
Pipe red, white, and blue buttercream swirls around the top edge. Arrange fresh strawberries and blueberries over the cake.
Finish decorating with white chocolate stars, patriotic sprinkles, sanding sugar, edible glitter, and miniature American flag cake toppers as desired.
Step 24: Chill and Serve
Refrigerate the decorated cake for about 20 minutes before slicing.
Use a sharp knife to cut through the tall layers. When the first slice is removed, the hidden sprinkles or candies will spill from the center and create the firecracker surprise effect.
Notes
Choose only one cake formula. Do not combine the homemade gluten-free flour blend ingredients with the Measure for Measure flour ingredients.
Room-temperature ingredients blend more evenly and help create soft, fluffy cake layers.
Gel food coloring produces vibrant red and blue layers without adding as much liquid as conventional food coloring.
Use a kitchen scale to divide the batter evenly so the six layers bake to a similar thickness.
Bake the cake layers one day in advance if desired. Let them cool completely, wrap them tightly, and assemble the cake the following day.
The buttercream may also be prepared ahead and refrigerated. Allow it to soften, then whip it again before frosting the cake.
Save the removed cake centers to make gluten-free cake pops, trifles, parfaits, or ice cream toppings.
Keep the finished cake refrigerated until shortly before serving, especially when displaying it outdoors in warm weather.
Fresh strawberries and blueberries add natural color and fresh summer flavor. Extra berries and miniature flags can also be arranged around the serving platter.
Check the labels on the flour, sprinkles, candy-coated chocolates, candies, food coloring, sanding sugar, edible glitter, white chocolate, and other packaged decorations to confirm that they meet your gluten-free needs. Prevent cross-contact when preparing the cake for someone with celiac disease or gluten sensitivity.