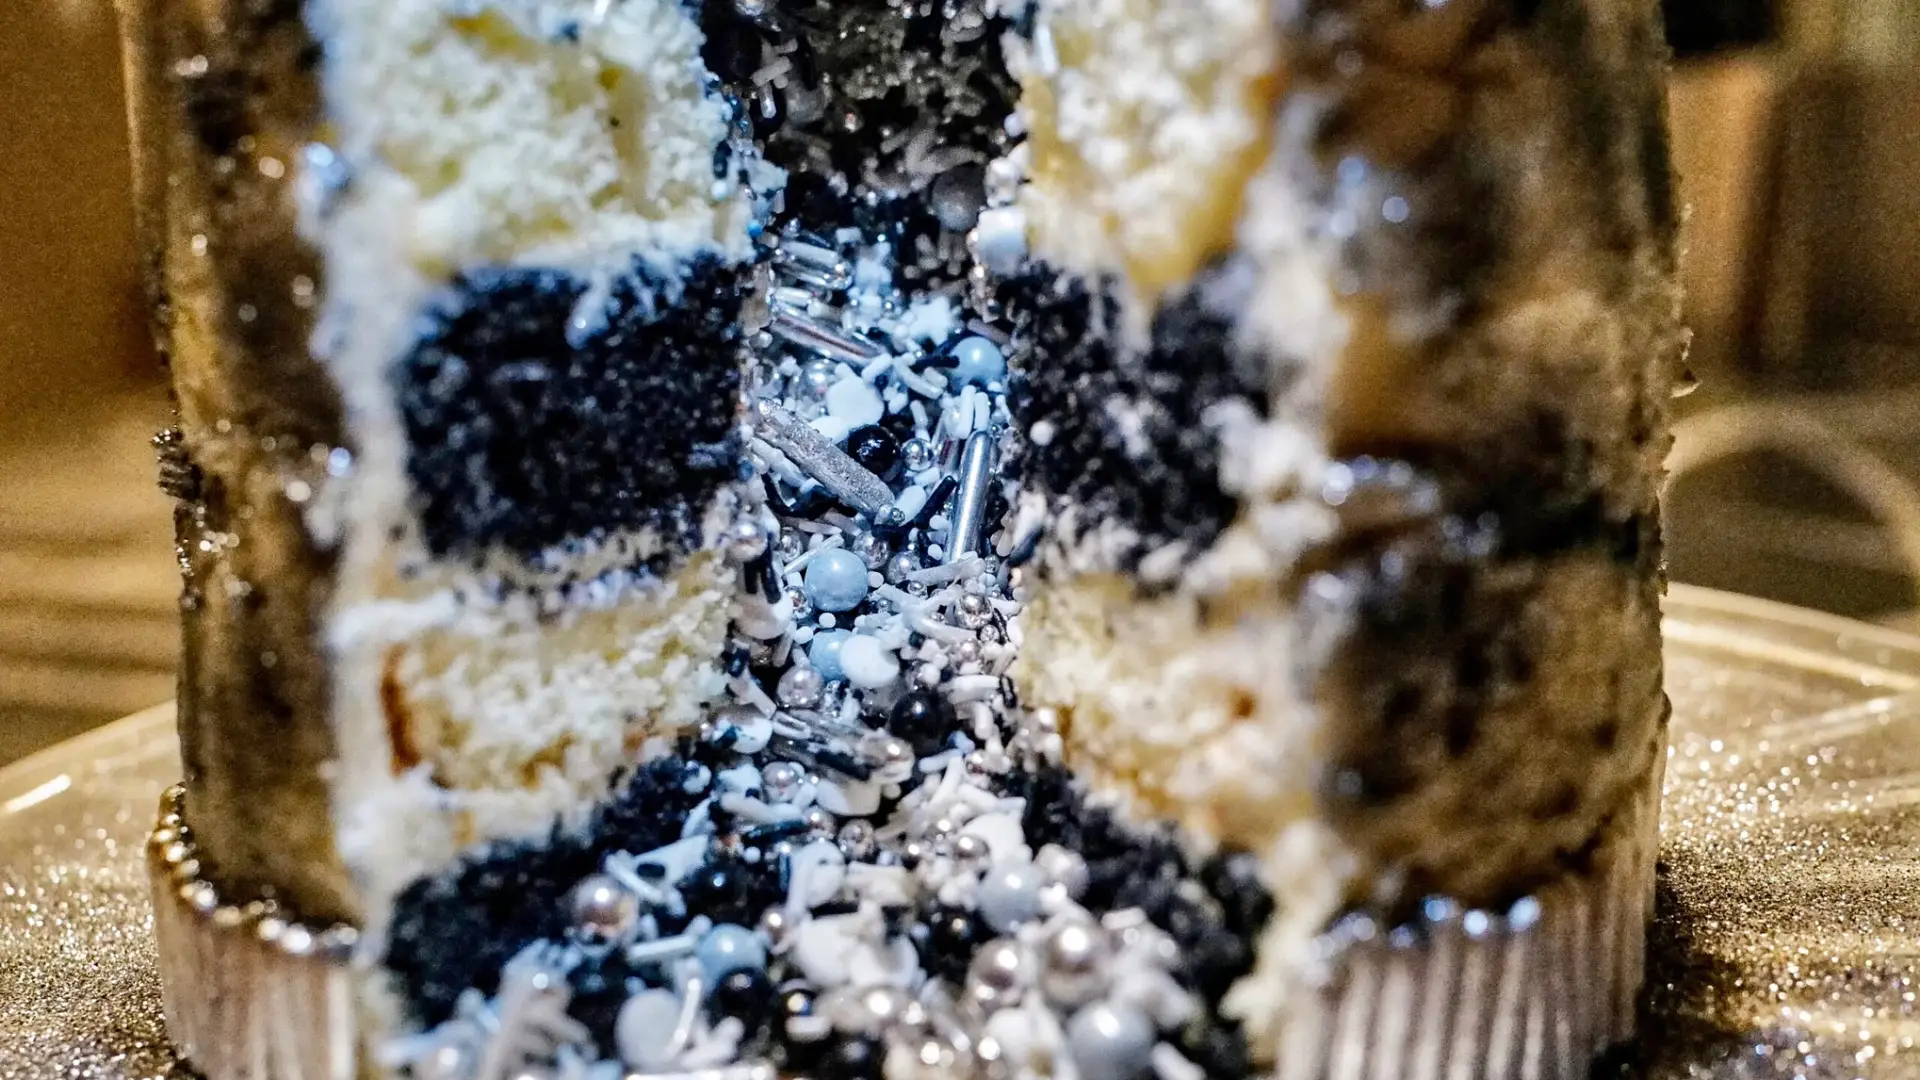
Make an elegant gluten-free New Year’s Eve surprise cake with black and white vanilla layers, silver accents, buttercream, and hidden sprinkles.
Ring in the new year with an Elegant Gluten-Free New Year’s Eve Surprise Cake with Black and White Layers Recipe. Alternating black and white vanilla cake layers create a dramatic striped interior, while creamy vanilla buttercream, shimmering silver decorations, and a hidden sprinkle center make the first slice unforgettable.
The sophisticated black, white, and silver color palette makes this gluten-free cake a stunning centerpiece for a New Year’s Eve dessert table. When the first slice is removed, the concealed sprinkles tumble from the center for a playful surprise. Soft vanilla cake, fluffy buttercream, crisp sprinkles, and delicate sugar pearls provide a festive combination of flavors and textures.
Four choose-one cake options let you select the preparation method that works best for your schedule and baking experience. Make the cake with individual gluten-free flours, use a gluten-free all-purpose or measure-for-measure flour blend, or save time with a gluten-free boxed cake mix. Follow only the ingredients and batter directions for your chosen option.
Although designed for New Year’s Eve, this elegant gluten-free surprise cake can also be customized for birthdays, anniversaries, engagement parties, graduation celebrations, winter weddings, and other special occasions. Simply change the sprinkle colors to complement your celebration.
Ingredients
Choose One Gluten-Free Vanilla Cake Option
Option 1: Classic Gluten-Free Vanilla Cake From Scratch
1/2 cup plus 1 tablespoon sweet rice flour
1/2 cup white rice flour
1/2 cup plus 1 tablespoon tapioca flour
1/4 cup brown rice flour
3/4 teaspoon xanthan gum
1 teaspoon baking powder
1/2 teaspoon baking soda
1/2 teaspoon kosher salt
1/2 cup unsalted butter, softened, or 1/2 cup neutral oil
1 cup granulated sugar
4 large eggs, at room temperature
2 teaspoons pure vanilla extract
1/2 cup whole milk or buttermilk, at room temperature
8 ounces sour cream, at room temperature
Option 2: Gluten-Free All-Purpose Flour Vanilla Cake
2 1/4 cups gluten-free all-purpose flour
1 teaspoon xanthan gum or guar gum, only if the flour blend does not contain it
1 3/4 cups granulated sugar
1 cup unsalted butter, softened
1 teaspoon kosher salt
2 1/2 teaspoons baking powder
1 tablespoon pure vanilla extract
4 large eggs, at room temperature
1 cup whole milk, at room temperature
Option 3: Measure-for-Measure Gluten-Free Vanilla Cake
1 3/4 cups measure-for-measure gluten-free flour
2 teaspoons baking powder, if the flour blend does not contain leavening
1/2 teaspoon kosher salt, if the flour blend does not contain salt
1/2 cup unsalted butter, softened
1 cup granulated sugar
3 large eggs, at room temperature
2 teaspoons pure vanilla extract
1/2 cup whole milk, at room temperature
Option 4: Gluten-Free Vanilla Cake Mix
1 package gluten-free vanilla cake mix, 15 to 16 ounces
Eggs called for on the package
Oil called for on the package
Water or milk called for on the package
1 teaspoon pure vanilla extract
1/4 cup sour cream or plain Greek yogurt, optional
2 tablespoons melted butter, optional
For the Black and White Cake Layers
Black gel food coloring, as needed
White gel food coloring, optional
For the Surprise Sprinkle Center
3/4 cup gluten-free black, white, and silver sprinkles
1/4 cup edible silver sugar pearls or edible silver dragées
For the Vanilla Buttercream Frosting
3 sticks unsalted butter, at room temperature
4 1/2 cups powdered sugar, sifted
1 tablespoon pure vanilla extract
3 to 5 tablespoons heavy cream
1/2 teaspoon kosher salt
For the Edible Silver Finish
1 small drop black gel food coloring
Edible silver luster dust, as needed
1 to 2 teaspoons clear vanilla extract or lemon juice
1/2 cup gluten-free silver sprinkles
Additional gluten-free black and white sprinkles, optional
Directions
Step 1: Prepare the Oven and Cake Pans
Preheat the oven to 350°F. Grease four 8-inch round cake pans and line the bottoms with parchment paper.
If you have only two pans, bake the layers in two batches. Let the pans cool completely before greasing, lining, and filling them with the second batch of batter.
Step 2: Make Option 1 Classic Gluten-Free Vanilla Cake Batter
For Option 1, whisk the sweet rice flour, white rice flour, tapioca flour, brown rice flour, xanthan gum, baking powder, baking soda, and salt in a medium bowl.
In a separate large bowl, beat the softened butter and sugar for 3 to 4 minutes, or until pale and fluffy. If using oil, mix the oil and sugar until thoroughly combined.
Add the eggs one at a time, mixing well after each addition. Mix in the vanilla extract.
Add half of the dry ingredients. Mix in the milk and sour cream, followed by the remaining dry ingredients.
Mix just until the batter is smooth and no dry streaks remain. Continue with Step 6.
Step 3: Make Option 2 Gluten-Free All-Purpose Flour Cake Batter
For Option 2, whisk the gluten-free all-purpose flour, xanthan gum or guar gum if needed, salt, and baking powder in a medium bowl.
In a separate large bowl, beat the butter and sugar for 3 to 4 minutes, or until light and fluffy. Mix in the vanilla extract.
Add the eggs one at a time, beating well after each addition.
Add the dry ingredients in three additions, alternating with the milk. Begin and finish with the dry ingredients. Mix only until combined. Continue with Step 6.
Step 4: Make Option 3 Measure-for-Measure Gluten-Free Cake Batter
For Option 3, check the flour blend before beginning. If it does not contain leavening or salt, whisk the listed baking powder and salt into the flour.
In a large bowl, beat the butter and sugar for 3 to 4 minutes, or until light and fluffy.
Add the eggs one at a time, mixing well after each addition. Mix in the vanilla extract.
Add the flour mixture in three additions, alternating with the milk. Begin and finish with the flour mixture. Mix just until a smooth batter forms. Continue with Step 6.
Step 5: Make Option 4 Gluten-Free Cake Mix Batter
For Option 4, prepare the gluten-free vanilla cake mix with the eggs, oil, and water or milk specified on the package.
Mix in the vanilla extract. For a richer flavor and softer texture, add the optional sour cream or plain Greek yogurt and melted butter. Mix only until combined.
Step 6: Create the Black and White Cake Batters
Divide the prepared cake batter evenly between two bowls.
Gradually add black gel food coloring to one portion, mixing after each addition, until the batter reaches a deep black shade.
Leave the second portion its natural vanilla color. If desired, add a small amount of white gel food coloring for a brighter white appearance.
Divide the black batter between two prepared pans and the white batter between the other two pans. Do not fill any pan more than two-thirds full. Smooth the batter with a spatula so the layers bake evenly.
Step 7: Bake and Cool the Cake Layers
Bake the cake layers for 20 to 28 minutes. Thicker layers may require up to 35 minutes.
The cakes are ready when the centers spring back after a light touch and a toothpick inserted in the middle comes out clean or with a few moist crumbs.
Let the cakes cool in their pans for 10 minutes. Carefully turn them onto wire cooling racks and remove the parchment paper. Allow the layers to cool completely.
Refrigerate the cooled cake layers for about 30 minutes. Chilled layers are firmer and easier to cut, stack, and frost.
Step 8: Make the Vanilla Buttercream
Place the softened butter in a large mixing bowl. Beat for 3 to 4 minutes, or until smooth, pale, and creamy.
Add the powdered sugar one cup at a time, mixing on low speed after each addition.
Add the vanilla extract, salt, and 3 tablespoons of heavy cream. Beat the frosting on medium-high speed for about 3 minutes, or until light and fluffy.
If the buttercream is too thick, add more heavy cream one teaspoon at a time until it is smooth and easy to spread.
Step 9: Prepare the Hidden Sprinkle Center
Combine the gluten-free black, white, and silver sprinkles with the edible silver sugar pearls or edible silver dragées.
Use a 3-inch round cookie cutter to remove the center from two cake layers. These cut layers will form the middle of the cake. Leave the top and bottom cake layers whole so the sprinkle filling remains enclosed.
Save the cake cutouts for another dessert, use them to make cake pops, or enjoy them separately.
Step 10: Stack the Cake Layers
Place one whole cake layer on a cake board or serving plate. Spread a thin, even layer of vanilla buttercream over the top.
Place one cut cake layer over the frosting. Spread a thin ring of buttercream over the cake, keeping the frosting away from the center opening.
Add the second cut cake layer and spread another thin ring of buttercream over the top.
Alternate the black and white cake layers to create a dramatic striped appearance when the finished cake is sliced.
Step 11: Fill the Surprise Center
Carefully pour the sprinkle mixture into the center opening. Fill the cavity to the top, but do not press down or pack the sprinkles tightly. Loosely filled sprinkles will tumble out more easily when the cake is cut.
Reserve a small amount of the sprinkle mixture for decorating, if desired.
Place the remaining whole cake layer on top. Gently adjust the cake until all four layers are centered and level.
Step 12: Apply the Crumb Coat
Spread a thin layer of vanilla buttercream over the top and sides of the assembled cake. This crumb coat traps loose crumbs and provides a smooth base for the final layer of frosting.
Refrigerate the cake for 20 to 30 minutes, or until the crumb coat feels firm.
Step 13: Create the Marbled Buttercream Finish
Reserve about 1/2 cup of white buttercream.
Place another 1/2 cup of buttercream in a small bowl. Add a tiny amount of black gel food coloring and mix until the buttercream becomes light gray.
Cover the chilled cake with the remaining white buttercream. Add small patches of gray buttercream and the reserved white buttercream around the sides.
Gently smooth the colors together with an offset spatula to create a soft marbled effect. Avoid blending the colors excessively, or the entire cake may appear gray.
Step 14: Add the Edible Silver Decorations
Place the edible silver luster dust in a small bowl. Add 1 teaspoon of clear vanilla extract or lemon juice and mix well.
Add more liquid a few drops at a time until the silver mixture has the consistency of thin paint.
Use a clean pastry brush to paint or carefully splatter the silver mixture over the chilled buttercream.
Press gluten-free silver sprinkles around the bottom edge of the cake. Decorate the top with additional gluten-free black and white sprinkles, edible silver sugar pearls, or edible silver dragées.
Step 15: Chill, Slice, and Serve
Refrigerate the decorated cake for at least 30 minutes. Chilling helps set the frosting and keeps the layers stable during slicing.
Remove the cake from the refrigerator 20 to 30 minutes before serving so the cake and buttercream can soften slightly.
Use a sharp knife to remove the first slice carefully, revealing the contrasting black and white layers and hidden sprinkle center.
Notes
Choose one cake option and follow only the ingredients and batter directions for that option. Do not combine the four cake formulas.
Check the labels on every flour blend, cake mix, sprinkle, gel color, sugar pearl, dragée, luster dust, and decorating product to confirm that it is appropriate for a gluten-free diet. Prevent cross-contact by using clean bowls, utensils, pans, and work surfaces.
Some silver dragées are intended only for decoration. Read the package carefully and use only products specifically labeled as edible.
Do not add xanthan gum or guar gum if your selected gluten-free flour blend already contains a binder. Too much binder can give the cake a dense, gummy, or sticky texture.
The four cake options may produce different quantities of batter. Never fill a cake pan more than two-thirds full.
If you do not have enough batter for four separate layers, bake two thicker cakes. Allow them to cool completely before carefully dividing each cake horizontally to create four thinner layers.
Use concentrated gel food coloring instead of liquid food coloring. Gel coloring creates a deeper black shade without adding too much moisture to the cake batter.
Add the black coloring gradually because the shade may deepen as the batter rests and bakes.
Keep buttercream and other moist ingredients out of the center opening to help prevent the surprise sprinkles from softening.
For clean slices, chill the cake before cutting. Dip a sharp knife in warm water, dry it thoroughly, and wipe the blade clean after every slice.
The cake layers can be prepared up to two days in advance. Let them cool completely, wrap each layer tightly, and refrigerate until you are ready to assemble the cake.
Store the decorated cake in a covered container at room temperature for up to one day or in the refrigerator for up to four days. Allow refrigerated cake or individual slices to warm slightly before serving for the best flavor and texture.
The black, white, and silver decorations are ideal for New Year’s Eve, but the sprinkle colors can be changed for birthdays, anniversaries, weddings, graduations, and other celebrations.
Pure vanilla extract and clear vanilla extract may contain alcohol. Must be 21 years of age or older to purchase or consume alcoholic beverages. Please drink responsibly.