Orange Zinnia Growing Guide: Plant, Grow, and Care for Stunning Orange Zinnia Flowers
Use this Orange Zinnia Growing Guide to learn how to plant, grow, water, deadhead, and care for vibrant orange zinnia flowers.
Orange zinnias bring the warmth and brilliance of summer sunshine to garden beds, borders, containers, and cut flower arrangements. Their glowing colors range from soft apricot and peach to vivid tangerine, pumpkin, coral-orange, and fiery copper. Whether you plant one orange variety or combine several shades, these cheerful flowers create an eye-catching display that lasts from summer until frost.
Zinnias are fast-growing annual flowers prized for their colorful blooms and relatively easy care. They grow readily from seed, thrive in warm weather, and produce more flowers when the mature blossoms are removed regularly. Orange zinnias also attract butterflies and other visiting pollinators, making them a beautiful addition to pollinator-friendly landscapes.
This Orange Zinnia Growing Guide explains how to select, plant, grow, and care for these colorful flowers. With abundant sunshine, well-drained soil, thoughtful watering, and regular harvesting or deadheading, orange zinnias can become some of the most productive flowers in your summer garden.
About Orange Zinnia Flowers
Orange zinnias are not a single botanical variety. The term describes zinnia cultivars that produce orange, peach, apricot, coral, copper, or flame-colored blossoms. Many popular garden zinnias belong to the species Zinnia elegans, although compact hybrids and other zinnia species are also available.
The appearance and mature size of an orange zinnia depend on the variety. Compact plants may remain under a foot tall, while tall cutting varieties can reach several feet in height. Flowers may be single, semidouble, or fully double, with shapes ranging from open daisy-like blooms to rounded pompons and large, dahlia-like flowers.
Because growth habits vary considerably, always check the seed packet or plant label before deciding where to place a particular orange zinnia. Short varieties are well suited to edging and containers, while tall plants work beautifully in cutting gardens and toward the middle or back of a sunny border.
Choosing an Orange Zinnia Variety
Think about plant height, flower size, growth habit, and intended use when selecting an orange zinnia. Compact varieties are practical for patio containers, walkway edges, and small garden spaces. Taller cultivars generally produce longer stems that are more convenient for bouquets.
If powdery mildew is a recurring problem in your garden, look for varieties or hybrid series described as disease resistant. Resistance does not guarantee that a plant will remain completely free from disease, but it may improve performance in warm, humid conditions.
Flower color may also change subtly as a blossom matures. Some orange zinnias open in saturated tangerine shades and soften as they age, while others combine orange with yellow, red, pink, or coral undertones. Review photographs from more than one source when color consistency is important to your garden design.
When to Plant Orange Zinnias
Zinnias are warm-season annuals that are sensitive to frost. Plant seeds or transplants outdoors after the danger of frost has passed and the soil has warmed. Cold, wet soil can delay germination and increase the likelihood of seed or seedling problems.
Seeds can be sown directly in the garden after the last expected frost. Gardeners in regions with short growing seasons can start them indoors approximately four to six weeks before the anticipated planting date. Zinnias grow quickly and generally do not need a very early indoor start.
Young plants should be hardened off before being moved permanently outside. Gradually expose seedlings to outdoor sunlight, wind, and temperature changes over several days. Plant them in the garden once conditions are consistently warm.
For a longer display, additional seeds may be sown in intervals during late spring and early summer, provided the local growing season is long enough for the later plants to flower before frost.
Selecting the Best Planting Location
Orange zinnias perform best in a warm location with full sun. University of Minnesota Extension recommends a site receiving at least eight hours of sun for the strongest performance. A bright location encourages sturdy stems, abundant flowers, and faster drying of the foliage. University of Minnesota Extension
Good air circulation is equally important. Avoid crowding zinnias tightly against walls, dense shrubs, or neighboring plants. A spacious planting arrangement helps moisture evaporate from the leaves and may reduce conditions that favor foliar diseases.
The ideal soil is fertile enough to support flowering but drains freely after rain or irrigation. Zinnias do not perform well when their roots remain in saturated soil. If the planting area is heavy or compacted, incorporate finished compost to improve its structure. Raised beds can also provide better drainage in challenging locations.
How to Plant Orange Zinnia Seeds
Prepare the planting area by loosening the soil and removing weeds, rocks, and large clumps. Sow the seeds according to the depth listed on the packet. Many zinnia seeds are planted approximately ¼ inch deep, although the instructions for the selected variety should take priority.
Keep the soil consistently moist while the seeds germinate, but do not leave it waterlogged. Once the seedlings develop and begin growing actively, thin them to the recommended spacing. Depending on the cultivar’s mature habit, zinnia spacing may range from approximately 8 to 24 inches. Bushy plants generally require more room than narrow, upright varieties.
Thinning can feel wasteful, but overcrowded seedlings compete for light, moisture, and nutrients. Dense growth also restricts airflow and can make disease management more difficult later in the season.
Growing Orange Zinnias in Containers
Compact orange zinnias make excellent container flowers. Choose a pot with unobstructed drainage holes and fill it with a well-draining container mix. Garden soil is usually too dense for containers and may hold excessive moisture around the roots.
Match the container size to the mature size and number of plants. Crowding several vigorous zinnias into a small pot can cause them to dry out quickly while reducing air movement around the foliage. Give each plant enough room to reach its expected width.
Container-grown zinnias may need water more frequently than plants growing in the ground, especially during hot or windy weather. Check the potting mix regularly and water thoroughly when it begins to dry. Empty saucers that collect standing water.
Watering Orange Zinnias
Young zinnias need dependable moisture while their roots become established. Mature plants can tolerate short dry periods better than constantly saturated soil, but prolonged drought may reduce flowering and cause stress.
Water deeply enough to moisten the root zone, then allow the upper layer of soil to begin drying before watering again. Apply water at the base of the plant whenever possible. Keeping the foliage dry helps discourage several common leaf diseases.
Morning is generally the most practical time to water. Plants can absorb moisture before the hottest part of the day, and any splashed foliage has time to dry. A light layer of organic mulch can help moderate soil moisture and limit soil from splashing onto lower leaves. Keep mulch from resting directly against the stems.
Fertilizing for Healthy Growth and Abundant Flowers
Zinnias growing in reasonably fertile garden soil may not require heavy feeding. Excess nitrogen can encourage lush foliage at the expense of flowers and may produce soft, weak growth.
A soil test is the most reliable way to determine whether the garden needs additional nutrients. If fertilizer is necessary, apply a balanced product according to its label rather than estimating the amount. Container plants may need periodic feeding because nutrients gradually wash out of the potting mix during watering.
Finished compost can improve soil structure and provide a modest source of nutrients. Avoid using fresh manure around actively growing zinnias because it may damage roots or introduce unwanted pathogens and weed seeds.
Pinching and Deadheading Orange Zinnias
Pinching young, healthy zinnias can encourage branching and produce a bushier plant with more flowering stems. When the plant has developed several sets of true leaves, remove the growing tip just above a leaf pair. Pinching is optional, and it may delay the first flowers slightly while the plant develops new branches.
Deadheading is one of the most effective ways to encourage continued blooming. Follow the flower stem down to a strong set of leaves and make a clean cut just above that point. Removing only the flower head can leave an unattractive stem and may not encourage growth as effectively.
Cutting flowers for arrangements serves the same purpose as deadheading. Frequent harvesting directs the plant’s energy toward producing new stems and buds instead of developing mature seeds.
Supporting Tall Orange Zinnias
Tall zinnia varieties may lean or bend after heavy rain, particularly when they are grown in rich soil or exposed to strong winds. Install stakes, flower supports, or horizontal netting early so the foliage can grow around the support naturally.
Place tall zinnias where nearby plants will not shade them. Adequate spacing, full sun, and moderate fertilization help produce stronger stems. Pinching young plants may also promote a more branched structure, although the best method depends on the variety and whether exceptionally long stems are desired for cutting.
Common Zinnia Problems
Powdery mildew is one of the most familiar zinnia diseases. It appears as white or gray powdery growth on leaves, stems, and sometimes flower parts. Severe infections may lead to distorted, yellowing, or dropping leaves. Powdery mildew often becomes more noticeable late in the growing season, particularly where air movement is poor. University of Minnesota Extension
Reduce disease pressure by choosing resistant cultivars, providing appropriate spacing, growing plants in full sun, and watering near the soil rather than over the foliage. Remove badly affected plant material and dispose of it appropriately. Do not place diseased debris in a compost pile unless the composting system reliably reaches temperatures that destroy plant pathogens.
Zinnias can also develop bacterial and fungal leaf spots. Symptoms may include brown or reddish lesions, yellow halos, or damaged tissue that eventually falls from the leaf. Avoid working among wet plants, sanitize cutting tools, and do not save seeds from visibly diseased plants.
Aphids, spider mites, Japanese beetles, and other insects may occasionally feed on zinnias. Inspect the undersides of leaves and developing buds regularly. A small population may not require treatment. When intervention is necessary, identify the pest first and choose the least disruptive control appropriate for that insect. Follow the product label carefully and avoid treating open flowers while pollinators are active.
Orange Zinnias for Pollinator Gardens
Single and semidouble zinnias generally provide easier access to their central florets than densely packed double flowers. A garden containing several flower forms and bloom times can provide a more varied environment for butterflies, bees, hoverflies, and other beneficial insects.
Zinnias should be part of a diverse pollinator garden rather than the only flower present. Combine them with regionally appropriate plants that bloom before, during, and after the zinnia season. Avoid routine broad-spectrum pesticide applications, particularly when flowers are open.
Companion Plants for Orange Zinnias
Orange zinnias pair beautifully with flowers in blue, purple, pink, cream, yellow, and white. Blue salvia, purple verbena, lavender-toned flowers, white cosmos, yellow marigolds, and ornamental grasses can complement their warm color. Deep burgundy foliage creates dramatic contrast, while silver or soft green foliage gives the planting a gentler appearance.
Choose companions with similar preferences for full sun and well-drained soil. Consider mature plant height and width so vigorous neighbors do not block light or reduce airflow around the zinnias.
In a vegetable garden, zinnias can add color near tomatoes, peppers, beans, and herbs, provided every plant has sufficient room. Their presence may attract visiting pollinators and other insects, but zinnias should not be presented as a guaranteed method of preventing garden pests.
Cutting Orange Zinnias for Bouquets
Harvest zinnias after the flowers have opened and the stems are firm. Before cutting, gently hold the stem several inches below the flower and give it a light shake. If the stem remains upright rather than bending near the flower head, it is generally mature enough to harvest.
Cut during the cooler part of the day with clean, sharp pruners or floral snips. Remove leaves that would sit below the waterline and place the stems promptly in a clean container of water. Use a thoroughly washed vase and refresh the water regularly to help preserve the arrangement.
Orange zinnias combine especially well with cream, blush, burgundy, yellow, violet, and blue flowers. They can create an energetic summer bouquet or bring warm autumn color to late-season arrangements.
Saving Orange Zinnia Seeds
Allow selected flower heads to remain on healthy plants until they become brown, dry, and papery. Harvest the heads during dry weather, separate the seeds from the chaff, and allow them to dry completely before storage. Keep the seeds in a labeled paper envelope or another breathable container in a cool, dry location.
Open-pollinated zinnias may cross with nearby varieties, so plants grown from saved seed may not produce flowers identical to the parent. Seeds collected from hybrids are even less likely to reproduce the original plant’s color, size, or growth habit reliably. Purchase fresh seed when maintaining a specific shade of orange is important.
Do not save seeds from plants showing symptoms of bacterial leaf spot or other potentially seedborne diseases.
End-of-Season Care
Orange zinnias continue flowering until frost damages or kills the plants. After the growing season ends, remove the plants and clean up fallen leaves and flower debris. Thorough cleanup is particularly important if disease was present.
Rotate the planting location when practical, especially after a serious leaf spot problem. Clean stakes, supports, and reusable containers before storing them. These simple practices create a cleaner start for the next growing season.
Brighten the Garden With Orange Zinnias
Orange zinnias deliver vivid color with relatively uncomplicated care. Their warmth makes garden beds feel cheerful and welcoming, while their long flowering season provides months of visual interest. They are equally at home in cottage gardens, modern color-themed landscapes, pollinator plantings, containers, and cutting gardens.
Select a variety suited to the available space, wait for warm planting conditions, provide generous sunlight, and leave enough room for airflow. With careful watering and regular deadheading or harvesting, orange zinnia flowers can keep the garden glowing from early summer until the first frost.
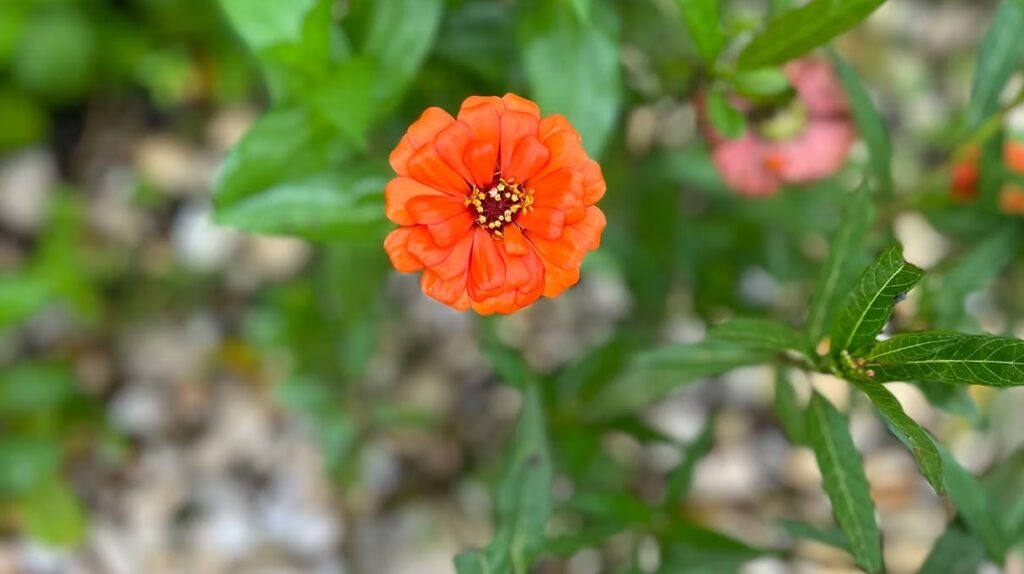
A vibrant orange zinnia adds a brilliant burst of color to the garden.
Learn how to plant, grow, and care for orange nasturtiums, including sunlight, soil, watering, container care, harvesting, and edible uses. Orange nasturtiums bring glowing color, rounded green leaves, and a relaxed cottage-garden appearance to beds, borders, containers, and edible landscapes. These cheerful flowers are especially attractive spilling over the side of a window box, filling an open space in a vegetable garden, or weaving through a sunny flower bed. Common garden nasturtiums belong to the genus Tropaeolum. The two types most often grown are trailing nasturtium, Tropaeolum majus, and compact bush nasturtium, Tropaeolum minus. Depending on the variety, the flowers may be soft apricot, golden orange, tangerine, salmon, or deep red-orange. Nasturtiums are valued for more than their beauty. Their flowers and leaves are edible and have a fresh, peppery flavor similar to watercress or arugula. The blossoms can add vivid color to salads, appetizers, pasta, and serving platters. Their easygoing nature also makes them an inviting choice for beginning gardeners. Are Orange Nasturtiums Annuals or Perennials? Nasturtiums are tender perennials in warm climates, but gardeners in colder regions usually grow them as annuals. They are sensitive to frost and generally continue growing and blooming until cold weather ends the season. In frost-free or very mild areas, nasturtiums may live longer and reseed readily. Gardeners in warm regions should monitor spreading plants and unwanted seedlings because nasturtiums can become vigorous under favorable conditions. Choosing the Right Orange Nasturtium Before purchasing seeds, decide whether a compact or trailing growth habit will work best in your garden. Compact varieties form tidy mounds that are well suited to garden borders, raised beds, small spaces, and patio containers. Many remain approximately 6 to 18 inches tall, although the final size depends on the cultivar and growing conditions. Trailing varieties produce longer stems that can spread across the ground or cascade from containers, window boxes, and retaining walls. They can also be guided onto a low support, but they do not have tendrils and may need help staying attached. For an especially colorful planting, look for named varieties with orange, apricot, peach, tangerine, or salmon-colored flowers. Check the seed packet for the plant’s mature size and habit rather than choosing by flower color alone. When to Plant Nasturtium Seeds Plant nasturtium seeds outdoors after the danger of frost has passed and the soil has begun to warm. In many regions, this means sowing them in late spring. Local frost dates and soil conditions are more useful than a fixed calendar date. Seeds can also be started indoors approximately four to six weeks before the expected final spring frost. Nasturtiums can be sensitive to root disturbance, so plantable paper or fiber pots may make it easier to move seedlings into the garden without disrupting their roots. Direct sowing is often the simplest option. The large seeds are easy to handle, and seedlings may emerge in approximately 7 to 10 days when temperature and moisture conditions are favorable. The University of Wisconsin recommends sowing seeds about ½ inch deep and placing plants approximately 10 to 12 inches apart, although spacing should also be adjusted for the selected variety. University of Wisconsin Horticulture Selecting the Best Location Nasturtiums generally flower best in full sun. A location receiving at least six hours of direct sunlight is a helpful starting point, but climate matters. Plants growing in regions with intense summer heat may benefit from protection during the hottest part of the afternoon. Partial shade can help reduce heat stress, but excessive shade may produce long, leafy plants with fewer blossoms. Watch how the plants respond and adjust container placement if flowering slows during extremely hot weather. Good air circulation is also beneficial. Avoid crowding plants tightly against one another, particularly in humid conditions. Soil and Fertilizer Requirements Nasturtiums prefer well-drained soil and often perform beautifully without rich amendments or frequent feeding. Highly fertile soil, especially soil containing abundant nitrogen, can encourage lush leaf production at the expense of flowers. Before planting, loosen compacted soil and correct serious drainage problems. Gardeners working with heavy clay or waterlogged ground may have better results growing nasturtiums in raised beds or containers. Routine fertilization is usually unnecessary unless the soil is extremely poor or a plant shows a confirmed nutrient deficiency. If a nasturtium produces many healthy leaves but very few flowers, excessive fertilizer may be part of the problem. Growing Orange Nasturtiums in Containers Orange nasturtiums make excellent container plants. Compact varieties create full mounds of foliage and flowers, while trailing varieties soften the edges of hanging baskets, window boxes, and tall planters. Choose a container with unobstructed drainage holes and fill it with a well-draining potting mix. Avoid using dense garden soil in containers because it may compact and hold too much water. Container-grown nasturtiums can dry more quickly than plants growing in the ground. Check the soil regularly, especially during hot or windy weather. Water when the upper portion of the potting mix begins to feel dry, then allow excess water to drain completely. Watering Nasturtiums Established nasturtiums tolerate some dryness, but regular watering supports stronger flowering. Water deeply enough to moisten the root zone, then allow the soil surface to begin drying before watering again. The goal is consistent but not saturated soil. Prolonged waterlogging can contribute to weak growth and root problems, while repeated severe wilting may reduce flowering. Direct water toward the soil instead of routinely soaking the foliage. Watering early in the day gives splashed leaves time to dry and may help limit disease problems in humid gardens. Encouraging More Orange Flowers Adequate sunlight, restrained fertilizer use, and regular moisture are the foundations of abundant nasturtium flowers. Harvesting blossoms or removing faded flowers can encourage the plant to continue producing buds rather than directing all its energy toward seed development. If a healthy plant has abundant foliage but few flowers, check its light and fertilizer conditions. Moving a container to a sunnier position or stopping unnecessary feeding may improve flower production. Very hot summer weather
Discover how to plant, grow, and care for orange tulips, including fall planting, watering, sunlight, containers, post-bloom care, and design ideas. Orange tulips bring warmth, energy, and unforgettable color to the spring garden. Their glowing shades range from soft apricot and peach to vivid tangerine, copper, and fiery orange-red. Whether planted in sweeping drifts, tucked into a mixed border, or arranged in containers near an entrance, these cheerful flowers create a striking display after the quiet colors of winter. Tulips belong to the genus Tulipa and grow from true bulbs planted in the fall. Most bloom sometime between early and late spring, although the precise timing depends on the variety, local climate, and seasonal weather. Orange tulips are available in several flower forms, including classic cup-shaped blooms, elegant lily-flowered varieties, dramatic parrot tulips, ruffled double tulips, and sturdy Darwin hybrids. Successful tulip growing begins with healthy bulbs, cool fall planting conditions, sufficient sunlight, and excellent drainage. Once established, the bulbs require relatively little attention during their spring display. Thoughtful post-bloom care may encourage some varieties to return, although many modern hybrid tulips produce their finest flowers during the first season. Choosing Orange Tulip Varieties The best orange tulip variety depends on the desired bloom time, flower shape, height, and garden style. Early-flowering tulips provide welcome color near the beginning of spring, while midseason and late-flowering selections extend the display. Triumph tulips are popular for their traditional shape, strong stems, and broad color range. Darwin hybrids generally produce large flowers on tall, sturdy stems and are among the better modern tulips for repeat flowering under favorable conditions. Lily-flowered varieties have slender blossoms with gracefully pointed petals, while parrot tulips feature textured, feathered petals that create a more dramatic appearance. Double tulips resemble peonies with their layers of densely arranged petals. Some open early in the season, while others bloom later. Species tulips are usually shorter and have smaller flowers, but they can be more dependable perennial performers than highly bred hybrids. When purchasing bulbs, choose large, firm specimens that feel heavy for their size. Avoid bulbs that are soft, shriveled, moldy, deeply cut, or visibly damaged. A papery outer covering that is loose or partially missing is usually less concerning than damage to the firm bulb underneath. When to Plant Orange Tulips Plant orange tulip bulbs in the fall after the soil has begun to cool but before it freezes solid. In colder regions, this may mean September through October. Gardeners in moderate climates may plant during October or November, while those in milder areas may wait until November or December. Tulips need an extended period of cold temperatures to develop and bloom correctly. In regions with consistently warm winters, gardeners may need to purchase prechilled bulbs or chill suitable bulbs before planting. The exact chilling requirements and proper planting schedule vary by cultivar and climate, so local extension guidance and the grower’s instructions are valuable. Do not plant tulips too early while the soil remains warm. Premature planting can encourage early growth and may expose the bulbs to disease or weather damage. At the same time, bulbs need enough time in cool soil to begin producing roots before severe winter conditions arrive. Selecting the Best Planting Location Orange tulips grow best in a location that receives abundant sunlight during their active spring growing period. Full sun encourages strong stems, healthy foliage, and well-developed flowers. A site beneath deciduous trees may also work because the tulips often receive plenty of sunlight before the trees develop a dense canopy. Good drainage is essential. Tulip bulbs are vulnerable to decay in saturated soil, particularly during winter dormancy. Avoid low areas where rain collects or snowmelt drains slowly. Raised beds, slopes, and containers can provide alternatives when the native soil remains wet. Tulips generally prefer fertile, moderately moist soil while actively growing, followed by drier conditions after the foliage dies back. Heavy clay may need improvement before planting. Work in well-finished compost to improve the soil’s structure, but avoid creating a small amended pocket surrounded by compacted soil, since that can hold water around the bulbs. How Deep to Plant Tulip Bulbs Planting recommendations vary according to bulb size, soil type, climate, and supplier instructions. A useful general guideline is to position a bulb at a depth approximately two to three times its height. Large tulip bulbs are commonly planted about 5 to 8 inches deep, measured from the bulb’s base to the soil surface. Follow the package directions when they differ from general advice. Place each bulb with its pointed end facing upward and its broad, flatter root plate resting at the bottom. Space tulips approximately 2 to 5 inches apart, depending on the variety and the fullness desired. Bulbs can be positioned relatively close together for a lush seasonal display, but they should not touch. Cover the bulbs with soil and water the planting area thoroughly. This settles the soil and supplies moisture for initial root development. A 2- to 3-inch layer of organic mulch can moderate soil-temperature changes and help conserve moisture, particularly in colder climates. University and botanical-garden guidance generally recommends planting spring bulbs two to three times as deep as their size while adjusting for soil conditions. University of Minnesota Extension, Missouri Botanical Garden Creating a Natural Garden Display Orange tulips usually make the strongest impression when planted in groups rather than isolated in straight, widely spaced rows. Arrange bulbs in broad drifts, informal clusters, or repeating pockets that lead the eye through the garden. For a natural effect, vary the spacing slightly while keeping enough bulbs together to create a noticeable block of color. Repeating orange tulips in several parts of a border helps connect the planting visually. Consider mature height when positioning bulbs. Shorter varieties work well along paths, at the front of borders, and in rock gardens. Taller Triumph, Darwin hybrid, and lily-flowered tulips can rise through lower spring plants or create a colorful middle layer in a mixed bed. Watering Orange Tulips Water the
Learn how to grow multi-colored zinnias, choose vibrant varieties, and provide the right sunlight, temperature, soil, water, and care for blooms until frost. Bright, cheerful, and wonderfully easy to grow, multi-colored zinnias bring months of color to garden beds, borders, containers, and cutting gardens. Their flowers appear in nearly every shade except true blue, including red, orange, yellow, pink, purple, lavender, green, cream, white, peach, coral, and richly blended combinations. Zinnias are warm-season annuals that grow quickly from seed. Once established, they tolerate summer heat, attract butterflies and other pollinators, and produce an impressive number of flowers. Depending on the variety, plants may remain compact and mounded or grow several feet tall with long stems that are ideal for bouquets. With the right sunlight, warm temperatures, well-drained soil, and consistent care, zinnias can flower from early summer until the first fall frost. This complete guide explains how to select colorful varieties, start seeds, care for the plants, prevent common problems, and encourage a long season of vibrant blooms. Why Grow Multi-Colored Zinnias? Few annual flowers provide as much color with so little effort. Multi-colored zinnias can fill open spaces in young gardens, brighten vegetable beds, create colorful walkways, or form an entire cut-flower garden. Because they grow rapidly, they are also useful when spring bulbs or early-season plants leave temporary gaps in the landscape. Zinnia flowers may be single, semi-double, or double. Single flowers have one row of petals and a clearly visible center. Semi-double flowers have additional petals while retaining an exposed center. Double flowers have numerous rows of petals that create a full, rounded appearance. Gardeners who want to support pollinators may wish to include some single and semi-double varieties because their centers are generally easier for insects to access. Fully double varieties are especially beautiful in bouquets, but their dense petals may make pollen and nectar less accessible. The Best Multi-Colored Zinnia Varieties Choosing a zinnia seed mix is one of the simplest ways to produce a garden filled with many colors. The best selection depends on the available space and whether the flowers will be used in containers, landscape beds, pollinator gardens, or arrangements. Benary’s Giant zinnias are a popular choice for cutting gardens. These tall plants produce strong stems and large, densely petaled flowers in an extensive range of colors. They need sufficient room and may require support in windy locations. California Giant and State Fair mixtures are classic choices for bold garden color. These vigorous zinnias generally grow tall and produce large flowers that stand out near fences, at the back of borders, and in cutting beds. Queen series zinnias offer more muted and unusual shades, including lime green, dusty rose, blush, peach, and antique-looking combinations. Their sophisticated colors work especially well in mixed bouquets. Oklahoma zinnias produce smaller flowers on long, sturdy stems. Their abundant blooms are useful for bouquets, and the plants are considered less susceptible to powdery mildew than some large-flowered cutting varieties. Profusion and Zahara zinnias have compact or mounded growth habits and good disease tolerance. They are excellent choices for edging, containers, humid climates, and lower-maintenance landscapes. Zinderella varieties are known for unusual crested or scabiosa-style flowers. Flower form can vary between plants, but the mix adds playful texture and color to ornamental and cutting gardens. Before planting, check the seed packet for mature height and width. Zinnias can range from compact plants under a foot tall to vigorous varieties that reach 3 to 4 feet or more. When to Plant Zinnias Zinnias are tender annuals and cannot tolerate frost. Plant them outdoors after the danger of frost has passed and the soil has warmed. Seeds germinate most reliably in warm soil, with approximately 70°F providing favorable conditions for direct sowing. In regions with short growing seasons, seeds can be started indoors about four to six weeks before the expected final frost. Avoid starting them too early because zinnias grow quickly and may become crowded or root-bound before outdoor conditions are suitable. Transplant seedlings after frost danger has passed and the soil has warmed to approximately 60°F or higher. Harden indoor-grown seedlings gradually by exposing them to outdoor conditions for increasing periods over approximately one week. Gardeners in warm climates can often sow seeds directly into the garden. Because zinnias grow rapidly, direct-sown plants frequently catch up with transplants once consistently warm weather arrives. Sunlight Requirements Zinnias grow and flower best in full sun. A location receiving at least six hours of direct sunlight may support flowering, but eight or more hours is preferable for vigorous growth, abundant blooms, and sturdy stems. Strong sunlight also helps keep the foliage dry. This is important because zinnias can be vulnerable to powdery mildew and leaf spot diseases, particularly when plants are crowded or grown in shaded, humid areas. Avoid planting tall zinnias where buildings, fences, shrubs, or larger plants will shade them for much of the day. In extremely hot climates, a little late-afternoon protection may reduce heat stress, but excessive shade can produce weak stems and fewer flowers. Temperature and Climate Zinnias thrive in warm summer weather. Growth may be slow during cool spring conditions, and even a light frost can damage or kill the plants. Wait for settled weather before moving tender seedlings into the garden. Warm days and mild nights generally encourage fast growth. Extended periods of wet, cool weather can increase the likelihood of disease, while extreme heat combined with dry soil may cause temporary wilting or reduced flowering. Although established zinnias tolerate short dry periods, they perform best when heat is balanced with regular watering at the root zone. Their season naturally ends when frost arrives in fall. Soil Requirements Plant zinnias in fertile, well-drained soil. They adapt to many garden soils, but they do not perform well in areas where water collects around the roots. A slightly acidic to neutral soil pH of approximately 5.5 to 7.5 is generally suitable. If the soil is heavy or compacted, incorporate finished compost to improve its structure.
Originally published
March 2026
Updated
August 2026
Reviewed by
Culibloom