Radish Harvest Guide: How to Harvest Radishes at the Perfect Time for Crisp, Flavorful Roots
Learn when and how to harvest radishes for crisp texture and fresh flavor, plus tips for picking spring radishes, daikon, cleaning, and storage.
Radishes are among the quickest and most satisfying vegetables to grow, but their harvest window can be surprisingly short. Pull them at the right time, and the roots are crisp, juicy, and pleasantly peppery. Leave them in the ground too long, especially during warm weather, and they may become woody, spongy, cracked, or excessively hot.
The best harvest time depends on the type of radish, its expected mature size, local weather, and growing conditions. Small spring radishes may be ready within a few weeks, while daikon and other winter varieties need considerably more time to develop.
This radish harvest guide explains how to recognize mature roots, harvest them without damage, troubleshoot quality problems, and store fresh radishes so they retain their crunch.
How Long Do Radishes Take to Grow?
Small garden radishes are known for their rapid growth. Many spring varieties are ready approximately three to five weeks after planting, although the seed packet provides the most reliable estimate for a particular cultivar. Cool temperatures, consistent moisture, adequate sunlight, loose soil, and proper spacing all help the roots develop on schedule.
Days to maturity should be treated as a general guide rather than an exact harvest date. Cold weather may slow growth, while sudden heat can shorten the period during which the roots remain tender. Begin checking the crop several days before the estimated maturity date instead of waiting until every plant has reached the same age.
Winter radishes, including many daikon, black, and storage varieties, grow more slowly. Depending on the cultivar, they may need approximately six to ten weeks or longer to reach maturity. These larger radishes generally have a wider harvest window than small spring varieties, especially when they mature during cool fall weather.
How to Tell When Radishes Are Ready to Harvest
Root size is usually a better indicator of readiness than leaf size. Gently brush a small amount of soil away from the shoulder of a radish, which is the upper portion of the root directly below the leaves. If the shoulder has reached the size described on the seed packet, the radish is likely ready to pull.
Many round spring radishes are harvested when they are about ¾ inch to 1¼ inches across. Some cultivars are intended to remain smaller, while others can grow larger without losing quality. This is why the mature dimensions listed for the variety are more useful than a single universal measurement.
A mature radish should feel firm. If the exposed shoulder looks oversized, split, or unusually rough, harvest it immediately and check its interior quality. Small spring radishes can pass their prime quickly, so inspect the planting every day or two once the first roots begin reaching usable size.
Do not wait for every radish in the row to mature at once. Seedlings often grow at slightly different rates because of spacing, moisture, soil texture, shade, and competition. Harvesting the largest roots first creates additional room for smaller ones to continue developing.
The Best Time of Day to Harvest Radishes
Harvest radishes during the cool part of the day whenever possible. Early morning is ideal because the roots are typically well hydrated and the air is cooler. If the soil is extremely dry, watering it lightly several hours before harvesting can make pulling easier and reduce stress on the roots.
Avoid saturating very dry soil immediately before harvest. A sudden surge of moisture after drought stress can contribute to splitting in mature radishes. Consistent moisture throughout the growing period is more beneficial than a heavy last-minute watering.
Once harvested, move the radishes out of direct sunlight promptly. Heat encourages moisture loss and can quickly soften the roots and wilt the greens.
How to Harvest Small Spring Radishes
Loosen the soil around the roots if it is dry, compacted, or heavy. Hold the leaves close to the top of the root and pull upward using gentle, steady pressure. In loose garden soil, mature spring radishes usually lift easily.
If the foliage breaks or the root resists, use a hand fork to loosen the surrounding soil. Position the tool far enough away from the radish to avoid piercing it. Lift the soil slightly, then pull the root by hand.
Check several radishes from different parts of the row. If the first root is still narrow or underdeveloped, cover the remaining shoulders with soil and allow them more time. If it is crisp and appropriately sized, continue harvesting other roots with similar shoulders.
How to Harvest Daikon and Winter Radishes
Daikon and other long-rooted radishes need more care because their roots may extend deeply into the soil. Pulling forcefully on the leaves can break the root, particularly in compacted ground.
Insert a garden fork or spade beside the row, leaving enough space to avoid cutting the roots. Loosen the soil beneath and around each radish, then lift it gently while holding the foliage near the crown. The University of Minnesota Extension specifically recommends loosening beneath long daikon roots to prevent breakage. University of Minnesota Extension
Winter radishes should reach the mature size expected for their variety before harvesting. Unlike small spring radishes, many winter types can remain in cool fall soil for a longer period without immediately becoming pithy. However, they should generally be harvested before the soil freezes hard enough to make digging difficult or damage the crop.
Why Radishes Become Woody, Pithy, or Too Spicy
An old radish often develops a dry, fibrous, or spongy interior. Small spring varieties are particularly susceptible because they mature rapidly and decline quickly after reaching their ideal size.
Heat and slow growth can also affect quality. Radishes grow best as a cool-season crop. When temperatures rise or plants experience prolonged stress, roots may become stronger in flavor and less tender. Illinois Extension advises harvesting spring radishes promptly once they reach edible size, before heat, pithiness, or seed stalk development reduces their quality. Illinois Extension
An unusually hot flavor does not always mean the variety is naturally spicy. Old roots, warm weather, drought stress, crowding, and inconsistent growth can all intensify pungency.
Why Radishes Crack or Split
Radishes may split when they remain in the ground past maturity. Uneven moisture is another common cause. A mature root that receives abundant water after a dry period may expand too quickly and crack.
Split radishes may still be usable when the interior is firm, fresh, and free from decay or pest damage. Wash the root carefully, trim away the damaged area, and use it promptly. Discard roots that are soft, slimy, moldy, foul-smelling, or extensively damaged.
Maintaining even soil moisture and harvesting mature roots promptly are the best ways to limit splitting.
What to Do When Radishes Grow Leaves but No Roots
Healthy-looking foliage does not guarantee a well-developed root. Overcrowding is a frequent problem because closely spaced plants must compete for moisture, nutrients, and physical growing room. Thin seedlings according to the spacing recommended for the variety.
Hot weather can also interfere with root formation. Spring radishes planted too late may produce abundant leaves, small roots, or flower stalks rather than crisp bulbs. Excessive shade and compacted soil can create additional problems.
Pull one plant to evaluate the crop rather than waiting indefinitely. If the root is still small but the weather remains cool, the other plants may continue developing after they are thinned. If the plants are beginning to bolt or prolonged hot weather has arrived, removing the crop may be more practical.
Should You Harvest All Radishes at Once?
Radishes can be harvested individually as they reach the proper size. Selective harvesting is especially useful when seedlings germinated unevenly or were not spaced perfectly.
Check a rapidly maturing spring crop frequently. Once most roots reach their expected size, complete the harvest promptly. Leaving mature spring radishes in the soil rarely makes them better.
Staggered planting can provide a steadier supply. Small sowings planted at intervals during suitable cool weather produce multiple manageable harvests instead of one large crop that must be used immediately.
How to Clean Freshly Harvested Radishes
Shake or gently brush away loose soil before bringing radishes inside. Rinse the roots under cool running water and rub away remaining dirt without scraping the skin unnecessarily.
Trim off the thin taproot if desired. Remove damaged portions and inspect each radish for tunnels, soft spots, cracks, or decay. Small holes or internal tunnels may indicate root maggot or wireworm feeding.
If the radishes will not be eaten immediately, remove the leafy tops. The leaves continue drawing moisture from the roots after harvest, causing the radishes to soften more quickly.
Can You Eat Radish Greens?
Fresh, healthy radish greens are edible, although their texture and flavor vary with age. Young leaves tend to be more tender, while mature leaves may feel coarse or prickly when raw.
Wash the greens carefully because soil and insects can collect around the stems and leaf surfaces. Store them separately from the roots and use them promptly. They can be added to salads when tender or incorporated into cooked dishes, soups, sauces, and sautés.
Do not eat leaves that are yellowed, slimy, diseased, badly damaged, or treated with a product that is not labeled for edible crops.
How to Store Radishes After Harvest
Remove the leaves before storing the roots. Wash and dry the radishes, then place them in a food-storage bag or covered container in the refrigerator. A slightly humid environment helps reduce shriveling, but excess standing water can encourage deterioration.
Storage life varies considerably with the variety, maturity, condition at harvest, temperature, and humidity. Small garden radishes are best enjoyed as fresh as possible, though properly refrigerated roots may remain usable for one to several weeks. Utah State University recommends cold, humid storage and reports a potential storage period of two to three weeks under controlled conditions. Utah State University Extension
Some winter radishes keep longer than small spring types. Store only firm, undamaged roots, and check them periodically. Remove any radish that becomes soft, slimy, moldy, or decayed so it does not affect the rest.
Enjoying Radishes at Their Best
Successful harvesting comes down to close observation. Use the seed packet’s maturity estimate as a starting point, uncover a few root shoulders, and begin pulling radishes when they reach the expected size. Check spring varieties often because their ideal harvest window can pass quickly.
Harvesting young, firm roots during cool weather produces the crispest texture and most balanced flavor. Promptly removing the tops and refrigerating the roots helps preserve that garden-fresh crunch until you are ready to enjoy them.
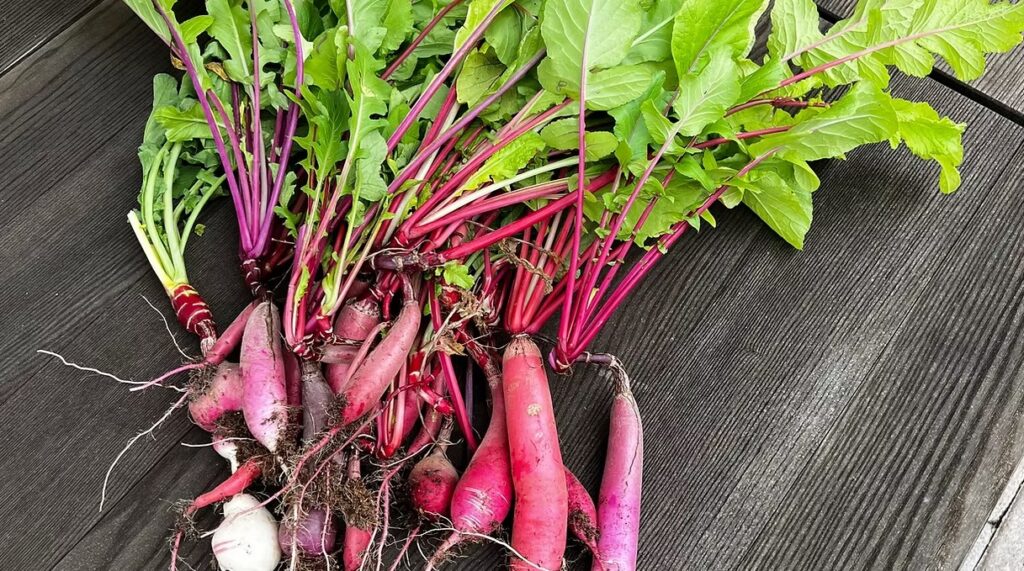
Purple, white, and red radishes with leafy green tops showcase the vibrant colors of a fresh garden harvest.
Discover the fresh flavors of a Heart Harvest Salad made with crisp radishes, juicy tomatoes, peppery arugula, tender kale, and fragrant tarragon. This colorful garden-to-table salad is healthy, naturally gluten-free, and perfect for any occasion. Heart Harvest Salad: Bringing the Garden to Your Table There is nothing quite like walking into the garden with a basket in hand and returning with the ingredients for a meal that is bursting with freshness. Every season offers its own treasures, and few dishes showcase them better than a simple garden salad. This Heart Harvest Salad is a celebration of colorful vegetables, leafy greens, and fragrant herbs that come together to create a meal that is both beautiful and nourishing. With every bite, you will enjoy the crisp crunch of freshly picked radishes, the juicy sweetness of ripe tomatoes, the peppery kick of arugula, the hearty texture of kale, and the delicate herbal notes of fresh tarragon. Each ingredient has its own personality, yet together they create a balanced salad that feels light, refreshing, and satisfying. Whether you grow your own vegetables, visit a local farmers market, or simply enjoy seasonal produce from the grocery store, this salad is an easy way to bring the flavors of the garden to your table. A Salad That Celebrates Fresh Ingredients One of the best things about this salad is that it allows every ingredient to shine. There is no need for heavy dressings or complicated techniques. Fresh, high-quality produce does all the work. The brilliant red radishes add a crisp texture and a gentle peppery bite that wakes up the palate. Sweet tomatoes provide bursts of juicy flavor that perfectly balance the greens. Arugula contributes its signature peppery taste, while kale adds heartiness and an abundance of nutrients. Finally, fresh tarragon introduces a subtle hint of anise that gives the salad an elegant finish without overwhelming the other ingredients. It is a combination that feels simple yet sophisticated, making it equally at home on a casual lunch table or served alongside an elegant dinner. Why You Will Love This Salad This Heart Harvest Salad is naturally gluten-free and filled with wholesome ingredients that are as nutritious as they are flavorful. It comes together in just a few minutes, making it perfect for busy weekdays, leisurely weekend lunches, or entertaining guests. Because it relies on fresh produce rather than processed ingredients, every serving is packed with vibrant colors, crisp textures, and naturally delicious flavors. It is also incredibly versatile, allowing you to customize it based on what is growing in your garden or what is in season. Best of all, it is a salad that never feels boring. Every bite offers something different, from crunchy radishes and juicy tomatoes to tender greens and fragrant herbs. The Stars of the Garden Radishes Fresh radishes are often one of the earliest vegetables to be harvested from the garden. Their crisp texture and mild peppery flavor add excitement to every bite while their bright color makes the salad visually appealing. Tomatoes Few ingredients capture the taste of summer quite like a perfectly ripe tomato. Whether you choose cherry tomatoes, heirloom varieties, grape tomatoes, or Roma tomatoes, their natural sweetness adds balance and freshness to the salad. Arugula Arugula brings a lively peppery flavor that complements both the tomatoes and radishes. Its tender leaves create a light texture while adding depth to the overall flavor profile. Kale Kale provides substance and nutrition, making the salad more filling without feeling heavy. Lightly massaging the leaves with a drizzle of olive oil softens their texture and makes them wonderfully tender. Tarragon Fresh tarragon is often overlooked, yet it is one of the herbs that can completely transform a simple salad. Its delicate herbal aroma and subtle notes of licorice create a unique flavor that pairs beautifully with leafy greens and ripe tomatoes. A Light Dressing That Lets the Produce Shine Instead of masking the fresh vegetables with a rich dressing, this salad benefits from a simple homemade lemon vinaigrette. A combination of extra-virgin olive oil, fresh lemon juice, Dijon mustard, honey, sea salt, and freshly ground black pepper creates a bright, tangy dressing that enhances every ingredient while allowing the garden-fresh flavors to remain the focus. Perfect for Every Season Although this salad shines during the height of summer, it can easily be adapted throughout the year. In spring, add edible flowers such as nasturtiums or calendula petals for extra color. During summer, include cucumbers, sweet peppers, or freshly picked strawberries. Autumn is the perfect time to add crisp apples, roasted squash, or toasted pecans. In winter, roasted beets, citrus segments, or pomegranate arils bring warmth and vibrant seasonal color. This flexibility makes the Heart Harvest Salad one you can enjoy nearly year-round. Serving Ideas This salad is wonderfully versatile and pairs beautifully with countless meals. Serve it alongside grilled chicken, roasted salmon, shrimp, or steak for a complete dinner. It also complements gluten-free pasta dishes, homemade soups, quiche, or roasted vegetables. For entertaining, it makes an elegant first course that is both colorful and refreshing. If you would like to make it even more filling, top it with avocado slices, toasted pumpkin seeds, sunflower seeds, shaved Parmesan, or crumbled gluten-free feta cheese. Garden Fresh Is Always Best Harvesting vegetables just before preparing a meal is one of the greatest rewards of gardening. Radishes are at their sweetest when picked young, tomatoes develop their richest flavor when allowed to ripen on the vine, and leafy greens stay crispest when harvested during the cool morning hours. Fresh tarragon should be snipped just before serving to preserve its delicate aroma, while kale benefits from a quick massage with olive oil to soften the leaves and enhance their flavor. These simple touches elevate the salad from ordinary to unforgettable. A Salad That Nourishes Body and Soul Beyond its beautiful appearance, the Heart Harvest Salad is packed with nutrients. Tomatoes provide lycopene and vitamin C, radishes offer antioxidants and fiber, kale supplies vitamins A, C, and
Learn how to harvest kale, peppers, and fresh herbs using garden clippers and a simple colander. Discover easy garden harvest tips to keep plants healthy, boost production, and enjoy fresh garden-to-table ingredients all season long. Harvesting fresh vegetables and herbs is one of the most rewarding parts of maintaining a home garden. Whether you are growing curly kale, sweet bell peppers, hot peppers, basil, parsley, rosemary, or thyme, knowing how to harvest them properly helps keep your plants healthy and productive throughout the growing season. One of the easiest and most practical ways to gather your harvest is with a pair of sharp garden clippers and a simple kitchen colander. While many gardeners use traditional harvest baskets, a colander offers several unique advantages. It is lightweight, easy to carry, allows loose soil to fall away naturally, and can go directly from the garden to the sink for washing fresh produce. If you are looking for an easy garden harvest method that saves time while protecting your plants, harvesting kale, peppers, and herbs with garden clippers and a colander is a simple solution that every gardener can appreciate. Why Proper Harvesting Matters Learning how to harvest vegetables correctly is just as important as learning how to grow them. Proper harvesting encourages plants to continue producing, reduces stress on stems and branches, and helps prevent unnecessary damage that can slow future growth. Garden clippers create clean, precise cuts that heal quickly, unlike twisting or pulling vegetables by hand. Clean cuts also reduce the risk of introducing diseases into your vegetable garden, especially when clippers are sanitized between plants. Regular harvesting keeps many vegetables and herbs actively producing, allowing you to enjoy fresh ingredients from your garden for weeks or even months. How to Harvest Kale Kale is one of the easiest leafy greens to grow because it produces continuously when harvested correctly. Rather than removing the entire plant, harvest the large outer leaves first while leaving the smaller center leaves untouched. This allows the growing crown to continue producing new foliage. Choose leaves that are dark green, crisp, and fully developed. Avoid removing more than one-third of the plant at one time, giving it plenty of energy to produce another flush of healthy leaves. Fresh garden kale is incredibly versatile and can be used in smoothies, salads, soups, casseroles, pasta dishes, stir-fries, and homemade kale chips. Harvesting kale regularly not only provides a steady supply of nutritious greens but also encourages stronger, healthier plants throughout the season. How to Harvest Garden Peppers Whether you grow sweet bell peppers, jalapeños, banana peppers, cayenne peppers, or colorful heirloom varieties, harvesting peppers correctly helps maximize production. Never pull peppers from the plant. Instead, use garden clippers to cut the stem about one inch above the pepper. Pulling can snap branches or damage developing fruit. Green peppers can be harvested early for a crisp texture, while allowing peppers to mature produces sweeter flavors and brilliant shades of red, orange, yellow, purple, or chocolate, depending on the variety. Frequent harvesting encourages pepper plants to continue flowering and producing new fruit well into the growing season. Fresh peppers are perfect for grilling, roasting, stuffing, freezing, dehydrating, making homemade salsa, adding to salads, or preserving through pickling. How to Harvest Fresh Herbs Fresh culinary herbs are among the easiest and most rewarding plants to harvest. Regular trimming actually improves growth by encouraging plants to become fuller and bushier. For the best flavor, harvest herbs during the morning after the dew has dried but before the afternoon heat begins. At this time, the essential oils responsible for flavor and aroma are often at their highest concentration. Popular herbs to harvest include basil, parsley, oregano, thyme, rosemary, sage, mint, cilantro, dill, and chives. Always trim stems just above a set of leaves rather than cutting randomly. This encourages branching and continuous production throughout the season. Fresh herbs can be enjoyed immediately or preserved by drying, freezing, or infusing them into oils, vinegars, and compound butters. Why a Colander Is the Perfect Harvest Basket Many gardeners already have the perfect harvest basket sitting in their kitchen. A colander offers excellent airflow that helps keep leafy greens cool while you continue harvesting throughout the garden. Its drainage holes allow loose soil and garden debris to fall away naturally, making cleanup much easier. Unlike solid buckets, a colander also prevents moisture from collecting around freshly picked vegetables and herbs, helping maintain their freshness until they are washed. Once harvesting is complete, simply rinse your produce directly in the same colander before bringing it into the kitchen. It is an inexpensive, practical tool that works beautifully for everyday harvesting. Garden Harvest Tips for Healthier Plants Harvest during the cooler morning hours whenever possible. Use clean, sharp garden clippers for every harvest. Harvest kale from the outer leaves inward. Cut peppers from the stem instead of pulling them. Never remove more than one-third of an herb plant during a single harvest. Inspect plants regularly for insects, diseases, or damaged foliage. Harvest often to encourage continuous vegetable production. Wash produce shortly after harvesting and store it properly for maximum freshness. Enjoy the Freshest Garden-to-Table Harvest There is something incredibly satisfying about walking into your garden with nothing more than a pair of garden clippers and a colander, then returning to your kitchen with a colorful collection of fresh kale, ripe peppers, and fragrant herbs. Homegrown produce offers exceptional flavor, beautiful color, and peak freshness that simply cannot be matched by store-bought vegetables. Every harvest represents weeks of care and attention, making each meal even more rewarding. Whether you are preparing a crisp salad, homemade soup, roasted vegetables, herb butter, fresh salsa, pasta dishes, or your favorite family recipe, harvesting directly from your garden allows you to enjoy ingredients at their absolute best. By harvesting regularly and using proper techniques, your kale, peppers, and herbs will continue producing throughout the growing season, providing a steady supply of delicious garden-fresh ingredients from your backyard to your table. Frequently
Discover how to harvest fresh arugula and chili peppers for the best flavor and continuous production. Learn expert harvesting tips, storage methods, and delicious ways to enjoy these garden favorites. This is a complete guide to a flavorful garden harvest. Fresh arugula and chili peppers are two of the most rewarding crops to grow in a home garden. Both are easy to cultivate, highly productive, and packed with bold flavor that enhances countless recipes. Whether you are growing them in raised beds, containers, or a traditional vegetable garden, harvesting them at the right time ensures the best taste, texture, and continued production throughout the growing season. A successful arugula and chili pepper harvest provides an abundance of fresh ingredients for salads, pizzas, sandwiches, pestos, sauces, soups, and countless gluten-free recipes. By understanding when and how to harvest these garden favorites, you can enjoy healthy, homegrown produce from spring through fall. When to Harvest Arugula Arugula is one of the fastest-growing leafy greens, often ready to harvest in as little as 30 to 40 days after planting. The leaves are at their most tender and flavorful when they reach approximately 3 to 6 inches long. Younger leaves have a mild, peppery taste, while mature leaves develop a stronger, more robust flavor. Rather than harvesting the entire plant, pick the outer leaves first while leaving the center intact. This “cut-and-come-again” harvesting method encourages continuous growth and allows the plant to produce fresh leaves for several weeks. Regular harvesting also helps delay bolting, especially during warmer weather. Once arugula begins flowering, the leaves become more bitter and less tender. When to Harvest Chili Peppers Chili peppers offer flexibility because they can be harvested at multiple stages of maturity. Many varieties are delicious while green, but allowing them to fully ripen often produces sweeter flavors, brighter colors, and increased heat. Depending on the variety, ripe chili peppers may turn bright red, orange, yellow, purple, or even chocolate brown. Fully mature peppers also contain more developed flavors that are perfect for cooking, drying, or making homemade hot sauces. Always harvest peppers using clean scissors or garden pruners instead of pulling them from the plant. This prevents broken stems and encourages the plant to continue producing new blossoms and fruit throughout the season. Why Regular Harvesting Matters Frequent harvesting benefits both crops by encouraging continued growth. For arugula, removing mature leaves stimulates the plant to produce fresh new foliage, extending the harvest window. For chili peppers, regularly picking ripe peppers signals the plant to produce more flowers and additional fruit, often resulting in a larger overall harvest before the end of the growing season. Healthy harvesting practices also improve air circulation around plants and reduce the chance of disease developing among crowded foliage. Delicious Ways to Use Fresh Arugula and Chili Peppers Freshly harvested arugula and chili peppers complement one another beautifully in the kitchen. Add peppery arugula to fresh salads, sandwiches, wraps, burgers, grain bowls, and gluten-free pizzas. Blend it into homemade pesto or stir it into pasta just before serving for a burst of fresh flavor. Chili peppers bring vibrant color and heat to salsas, marinades, soups, stir-fries, tacos, roasted vegetables, infused oils, and homemade hot sauces. They can also be dried, frozen, or pickled to preserve your harvest for future meals. Together, these garden favorites create a perfect balance of fresh, peppery greens and bold, spicy flavor. Storing Your Garden Harvest Proper storage helps maintain freshness after harvesting. Wash arugula gently in cool water and dry it thoroughly before storing it in a sealed container lined with paper towels. Properly stored, it will remain fresh in the refrigerator for several days. Chili peppers should be stored dry in the refrigerator, where they can last one to two weeks. For long-term storage, they can be frozen whole, dehydrated, fermented, or pickled without losing much of their flavor. Enjoy the Rewards of Your Garden Harvesting fresh arugula and chili peppers is one of the most satisfying moments of the gardening season. Their vibrant colors, bold flavors, and versatility make them valuable additions to any home garden. With regular harvesting and proper care, both crops will continue producing throughout much of the growing season, providing an ongoing supply of nutritious, garden-fresh ingredients for your favorite recipes. Whether you are creating crisp salads, flavorful sauces, spicy marinades, or gourmet gluten-free dishes, fresh arugula and chili peppers deliver exceptional taste straight from the garden to your table.
Originally published
March 2026
Updated
August 2026
Reviewed by
Culibloom