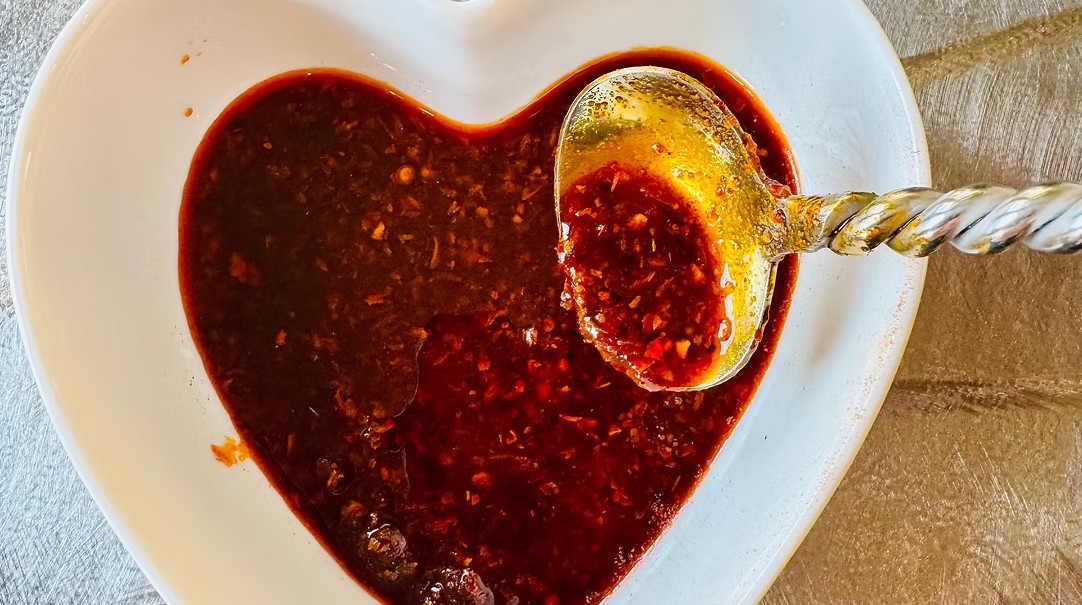
Make an easy crispy homemade chili crisp with golden garlic, crispy shallots, chili flakes, aromatic oil, and savory seasonings in just 25 minutes.
Crispy Homemade Chili Crisp Recipe combines fragrant oil, crispy shallots, golden garlic, crushed red chili flakes, and savory seasonings in one flavorful condiment. Each spoonful delivers an irresistible balance of heat, crunch, subtle sweetness, and aromatic richness.
This easy crispy homemade chili crisp is incredibly versatile. Spoon it over steamed rice, stir it into noodles, drizzle it over roasted vegetables, or use it to add bold flavor to eggs, dumplings, seafood, grilled meats, soups, and tacos. The optional cinnamon and star anise gently infuse the oil with additional warmth and complexity, while sesame oil provides a rich, nutty finish.
Preparing the garlic and shallots over medium-low heat is essential. Slow cooking allows the aromatics to become crisp and lightly golden without developing a bitter or burned flavor. Once cooled, the flavorful oil and crunchy ingredients can be mixed into countless meals for an easy restaurant-style finishing touch.
Prep Time: 10 minutes Cook Time: 15 minutes Total Time: 25 minutes Yield: About 2 cups
Make an easy homemade chili-infused olive oil with fresh peppers for a bold, spicy finishing oil that is delicious on pizza, pasta, meat, and vegetables. Bold, fruity, and pleasantly spicy, this Easy Homemade Chili-Infused Olive Oil Recipe adds an instant burst of flavor to everyday dishes. Fresh chili peppers infuse extra-virgin olive oil with vibrant color, gentle warmth, and customizable heat. Drizzle this flavorful oil over pizza, pasta, grilled meats, roasted vegetables, soups, and salads. It also makes a delicious dipping oil for crusty bread. Because this recipe uses fresh peppers, the oil must remain refrigerated and should be enjoyed within three days. Prep Time: 10 minutesInfusion Time: 24 hoursTotal Time: 24 hours 10 minutesYield: About 1 cup
Make flavorful honey lime butter with creamy butter, fresh lime zest, and honey. This easy compound butter complements bread, seafood, corn, and more. Bright, creamy, and wonderfully versatile, this Flavorful Honey Lime Butter Recipe combines rich butter with fragrant lime zest and naturally sweet honey. Made with only three simple ingredients, it is an effortless way to add fresh citrus flavor to both sweet and savory dishes. The finished butter is smooth, spreadable, and perfectly balanced, with a gentle sweetness that complements the lively flavor of fresh lime. Compound butter is simply softened butter blended with herbs, spices, fruit zest, sweeteners, or other flavorful ingredients. Although it sounds elegant, it is one of the easiest condiments to make at home. Once the butter reaches room temperature, this recipe takes only a few minutes to mix. You do not need any special equipment, and a fork or spoon is all that is required to combine the ingredients. Fresh lime zest is essential to the recipe because it contains the aromatic oils found in the outer green layer of the peel. These oils give the butter a bright lime fragrance and concentrated citrus flavor without adding too much liquid. Carefully zest only the green part of the lime and avoid the bitter white pith underneath. Washing and drying the lime before zesting also helps keep the zest clean and easy to grate. Honey balances the tangy lime with a delicate sweetness while enhancing the natural richness of the butter. The result is flavorful without being overly sweet, which allows the butter to complement a wide variety of foods. It tastes wonderful spread over warm cornbread, flaky biscuits, muffins, pancakes, waffles, toast, scones, and freshly baked dinner rolls. This homemade honey lime butter is equally useful for savory meals. Melt a slice over grilled corn on the cob, roasted carrots, sweet potatoes, green beans, or grilled zucchini. The citrus flavor also pairs beautifully with shrimp, salmon, white fish, and chicken. Even simple rice or quinoa can benefit from a small spoonful stirred in just before serving. Shaping the butter into a log makes it easy to refrigerate, slice, and serve. The individual rounds also create an attractive presentation for a brunch table, dinner party, or holiday meal. If you prefer a more casual option, simply spoon the finished butter into a small covered container. Both storage methods work well and keep the butter ready for everyday meals. Prepare this Flavorful Honey Lime Butter Recipe before a summer cookout, weekend brunch, family dinner, or holiday celebration. Because it needs time to chill, it is a convenient condiment to make ahead. Once firm, slice off only what you need and return the remaining butter to the refrigerator. This easy compound butter can also be packaged as a thoughtful homemade food gift. Place it in a small decorative container or shape it into a neat parchment-wrapped log. Whether served with breakfast, warm bread, vegetables, or grilled seafood, honey lime butter delivers a memorable burst of sweet citrus flavor with very little effort. Prep Time: 1 hour 5 minutesChilling Time: 30 minutesTotal Time: 1 hour 35 minutes
Make crispy spicy oven-dried watermelon with Tajín and chili flakes for an easy sweet, tangy, and chewy homemade fruit snack. Sweet, tangy, and pleasantly spicy, this Crispy Spicy Oven-Dried Watermelon Recipe transforms fresh watermelon into a concentrated fruit snack with a chewy center and lightly crisp edges. Tajín seasoning, olive oil, and optional red chili flakes create a lively combination of citrus flavor, salt, and heat. Slow oven-drying removes much of the watermelon’s moisture while intensifying its natural sweetness. Cutting the fruit into evenly sized pieces helps everything dry consistently, although thinner slices may become ready sooner than thicker ones. Enjoy this homemade watermelon snack on summer grazing boards, pack it for road trips, or serve it alongside nuts, cheese, and fresh fruit. Seasoning the watermelon after it dries gives you greater control over the spice level and helps preserve the bright flavor of the Tajín. Prep Time: 15 minutesCook Time: 6 to 8 hoursTotal Time: 6 hours 15 minutes to 8 hours 15 minutesYield: 4 servings
Ingredients
For the Chili Crisp
1 cup neutral oil, such as avocado oil, vegetable oil, or grape seed oil
2 shallots, roughly chopped
6 cloves garlic, roughly chopped
1/4 cup crushed red chili flakes
1 tablespoon soy sauce
1 teaspoon granulated sugar
1/2 teaspoon salt
1 teaspoon sesame oil
Optional Aromatic Spices
1 cinnamon stick, about 3 inches long
4 star anise pods
Directions
Step 1: Infuse the Oil
Pour the neutral oil into a small saucepan and place it over medium-low heat. If using the optional cinnamon stick and star anise, add them to the saucepan.
Warm the oil slowly until it begins to shimmer gently and the spices become fragrant. Do not allow the oil to smoke. Reduce the heat if it becomes too hot.
Step 2: Crisp the Shallots and Garlic
Add the chopped shallots and garlic to the warm oil. Cook for 5 to 7 minutes, stirring frequently, until the pieces become lightly golden and crisp.
Watch the aromatics carefully because garlic can change from golden to burned very quickly. Reduce the heat as needed to prevent the garlic and shallots from browning too rapidly.
If using the cinnamon stick and star anise, remove and discard them once the oil is fragrant and the garlic and shallots are lightly golden.
Step 3: Bloom the Chili Flakes
Add the crushed red chili flakes, soy sauce, granulated sugar, and salt to the saucepan. Stir constantly and cook for 30 to 60 seconds, or until the chili flakes become fragrant and the seasonings are evenly incorporated.
Keep the heat low during this step to prevent the chili flakes and garlic from burning.
Step 4: Add the Sesame Oil
Remove the saucepan from the heat. Stir in the sesame oil, making sure the crispy garlic, shallots, chili flakes, and seasonings are evenly distributed throughout the oil.
Step 5: Cool the Chili Crisp
Let the chili crisp cool briefly at room temperature. As it cools, the flavors will begin to meld and the fried garlic and shallots will develop a more pronounced crispy texture.
Do not leave the chili crisp at room temperature for longer than 2 hours.
Step 6: Transfer and Refrigerate
Transfer the chili crisp to a clean, airtight container. Refrigerate promptly and keep it at 40°F or below.
Stir the chili crisp before serving so that the crispy ingredients and seasonings are evenly distributed throughout the oil.
Notes
Cooking the garlic and shallots slowly is the secret to flavorful homemade chili crisp. High heat can burn the aromatics and give the finished condiment a bitter taste. Gentle cooking encourages an evenly golden color and crisp texture.
Neutral oils such as avocado, vegetable, canola, and grape seed oil allow the garlic, shallots, and chili flakes to remain the dominant flavors. Peanut oil can also be used for a mild nutty undertone.
For a milder variation, substitute some or all of the crushed red chili flakes with gochugaru. Its heat level can vary, so adjust the amount according to the specific product and your preferred level of spiciness.
The optional cinnamon stick and star anise add warmth and aromatic complexity. This variation pairs especially well with noodle dishes, dumplings, roasted vegetables, and grilled meats.
Leaving the garlic, shallots, and chili flakes in the oil creates the traditional crunchy texture associated with chili crisp. For a smoother finishing oil, strain out some of the solids after the mixture has cooled.
The oil may become cloudy or partially solidify in the refrigerator. This is normal. Spoon out the amount you plan to serve and let that portion stand briefly at room temperature until the oil loosens.
Because this recipe contains homemade garlic in oil and does not use a tested acidification process, refrigerate it at 40°F or below and use it within 4 days. Freeze portions immediately if you need longer storage. Never store homemade chili crisp at room temperature.
Use a clean, dry spoon each time you serve the chili crisp. Do not return unused portions to the storage container.
Spoon homemade chili crisp over rice, ramen, stir-fried noodles, fried eggs, avocado toast, dumplings, roasted vegetables, grilled chicken, seafood, pizza, tacos, soups, or freshly popped popcorn. It can also be whisked into marinades, salad dressings, and dipping sauces.
Originally published
April 2026
Updated
September 2026
Reviewed by
Culibloom