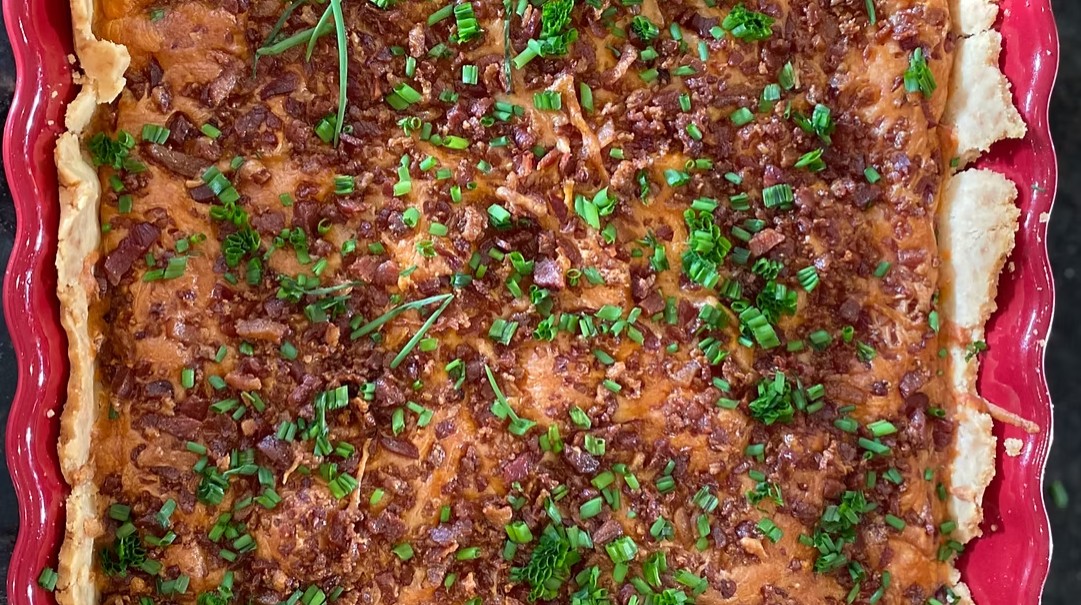
Make the best gluten-free loaded baked potato pie with tender red potatoes, crispy bacon, melted cheese, chives, and a flaky homemade crust.
Rich, cheesy, and packed with comforting flavor, this Best Gluten-Free Loaded Baked Potato Pie Recipe transforms a classic loaded baked potato into a hearty savory pie. Thinly sliced red creamer potatoes are layered with crispy bacon and melted Colby Jack cheese inside a flaky gluten-free crust, then finished with fresh chives and optional sour cream.
This recipe includes two gluten-free pie crust options. Choose either the homemade flour and starch crust for a traditional flaky texture or the easy gluten-free all-purpose flour crust for simpler preparation. The homemade version makes two crust disks, while the easy version makes one single crust.
As the pie bakes, the thin potato slices become tender, the cheese melts between the layers, and the bacon adds a smoky, savory flavor. Serve this gluten-free loaded baked potato pie as a satisfying main course, brunch centerpiece, holiday side dish, or comforting addition to a family dinner.
Directions
Step 1: Choose the Pie Crust
Prepare either the homemade gluten-free pie crust or the easy gluten-free pie crust. Do not combine the two crust formulas.
Step 2: Prepare the Homemade Gluten-Free Pie Dough
If using Option 1, place the tapioca flour, cornstarch, superfine brown rice flour, oat flour, sugar, salt, and xanthan gum in the bowl of a food processor or stand mixer. Mix several times until the dry ingredients are evenly combined.
Add the cold diced butter. Pulse or mix until the mixture resembles coarse crumbs with pea-sized pieces of butter remaining. These small pieces of cold butter help create a flaky crust as the pie bakes.
Add the eggs one at a time, mixing gently after each addition until the dough begins to come together.
Transfer the dough to a surface lightly dusted with tapioca flour. Knead it gently just until smooth. Divide the dough into two equal portions and shape each portion into a disk. Wrap the disks separately in plastic wrap and refrigerate them for at least 2 hours or up to 48 hours.
Only one disk is needed for this pie. Keep the second disk chilled or freeze it for another recipe.
Step 3: Prepare the Easy Gluten-Free Pie Dough
If using Option 2, whisk the gluten-free all-purpose flour, sugar, xanthan gum, and salt together in a large bowl.
Cut the cold butter into the flour mixture with a pastry cutter or your fingertips until coarse crumbs form.
In a separate small bowl, whisk the egg and lemon juice or vinegar until frothy. Stir the mixture into the dry ingredients until a dough forms. If the dough is too dry to hold together, add cold water 1 tablespoon at a time until it comes together.
For the egg-free version, omit the egg and lemon juice or vinegar. Add the 4 tablespoons of cold water to the flour and butter mixture, stirring until a dough forms.
Shape the dough into a ball, wrap it tightly, and refrigerate it for at least 1 hour.
Step 4: Cook the Bacon
Preheat the oven to 400°F. Arrange the bacon strips on a broiler pan or a wire rack set over a rimmed baking sheet.
Bake the bacon for approximately 8 to 10 minutes, or until crisp. Transfer it to a paper towel-lined plate and let it cool completely. Crumble the cooled bacon into small pieces and set it aside.
Reduce the oven temperature to 375°F before baking the assembled pie.
Step 5: Roll the Pie Crust
Remove the selected chilled dough from the refrigerator and let it rest at room temperature for approximately 10 minutes.
Lightly dust the work surface and rolling pin with tapioca flour. Roll the dough into a 14-inch circle. If the dough is sticky or delicate, roll it between two sheets of parchment paper.
Carefully transfer the dough to a 9-inch pie plate. Lift the edges gently and allow the crust to settle into the bottom and sides of the plate without stretching it.
Trim the excess dough, leaving a 1-inch border around the pie plate. Fold the border underneath itself and crimp the edge decoratively.
Place the prepared pie shell in the freezer for 15 to 20 minutes while preparing the potatoes. Chilling the shaped crust helps reduce shrinkage and encourages a flakier texture.
Step 6: Prepare the Potatoes
Wash and dry the red creamer potatoes thoroughly. Use a mandoline slicer or sharp knife to cut the potatoes into very thin, uniform rounds.
Pat the potato slices dry with paper towels to remove excess surface moisture. Evenly sized, dry slices will cook more consistently and help prevent the filling from becoming watery.
Step 7: Begin the Filling
Remove the chilled pie shell from the freezer. Sprinkle half of the shredded Colby Jack cheese evenly over the bottom of the crust.
Arrange half of the sliced potatoes over the cheese, slightly overlapping the rounds to create an even layer.
Step 8: Add the Bacon and Remaining Layers
Sprinkle half of the crumbled bacon over the first potato layer.
Arrange the remaining potato slices over the bacon in overlapping circles. Sprinkle the remaining Colby Jack cheese over the potatoes, then finish with the remaining crumbled bacon.
Step 9: Apply the Egg Wash
Whisk the egg and water together in a small bowl until completely combined. Brush the mixture over the exposed edge of the pie crust.
The egg wash will help the crust develop an attractive golden-brown finish. If making the pie completely egg-free, omit the egg wash.
Step 10: Bake the Loaded Potato Pie
Place the pie on the center rack of the oven. Bake at 375°F for approximately 60 minutes.
The pie is ready when the potatoes are tender when pierced with a thin knife, the cheese is melted and bubbling, and the crust is golden brown.
If the crust begins to brown too quickly, loosely cover the edges with aluminum foil during the final 15 to 20 minutes of baking.
Step 11: Cool the Pie
Transfer the baked pie to a cooling rack. Let it rest for 10 to 15 minutes before slicing.
This brief resting period allows the melted cheese and potato layers to settle, making the pie easier to cut and serve.
Step 12: Garnish and Serve
Sprinkle the warm pie with freshly sliced chives. Cut it into eight slices and serve with sour cream, if desired.
Enjoy the pie as a main course or serve it as a savory side dish with roasted vegetables, grilled chicken, baked ham, soup, or a fresh garden salad. For brunch, pair it with scrambled eggs and fresh fruit.
Notes
Choose only one of the two gluten-free pie crust options. Do not combine ingredients from the separate crust formulas.
The homemade gluten-free pie crust makes two disks. This loaded potato pie requires only one disk, so the remaining dough can be reserved for another pie.
The easy gluten-free pie crust makes one single crust. For an egg-free easy crust, replace both the egg and lemon juice or vinegar with 4 tablespoons of cold water.
A mandoline slicer makes it easier to create thin, uniformly sized potato rounds. Always use the hand guard and follow the manufacturer’s safety instructions.
Pat the sliced potatoes dry before layering them in the pie. Removing excess moisture helps protect the texture of the crust.
Sharp cheddar, Monterey Jack, or a blend of cheeses may be used in place of the Colby Jack cheese.
Green onions may be substituted for the fresh chives.
For a version without bacon, omit it from the filling. Confirm that the remaining ingredients meet the dietary needs of everyone being served.
Store leftover loaded potato pie covered in the refrigerator for up to 4 days. Reheat individual slices in a 350°F oven for 10 to 15 minutes, or until heated through.
The pie may be frozen for up to 2 months. Thaw it overnight in the refrigerator before reheating.
When preparing this recipe for someone with celiac disease or gluten sensitivity, check the labels on the flour, cornstarch, oat flour, xanthan gum, bacon, cheese, and other packaged ingredients for appropriate gluten-free labeling. Use certified gluten-free oat flour when necessary and prevent cross-contact with gluten-containing ingredients, utensils, and preparation surfaces.