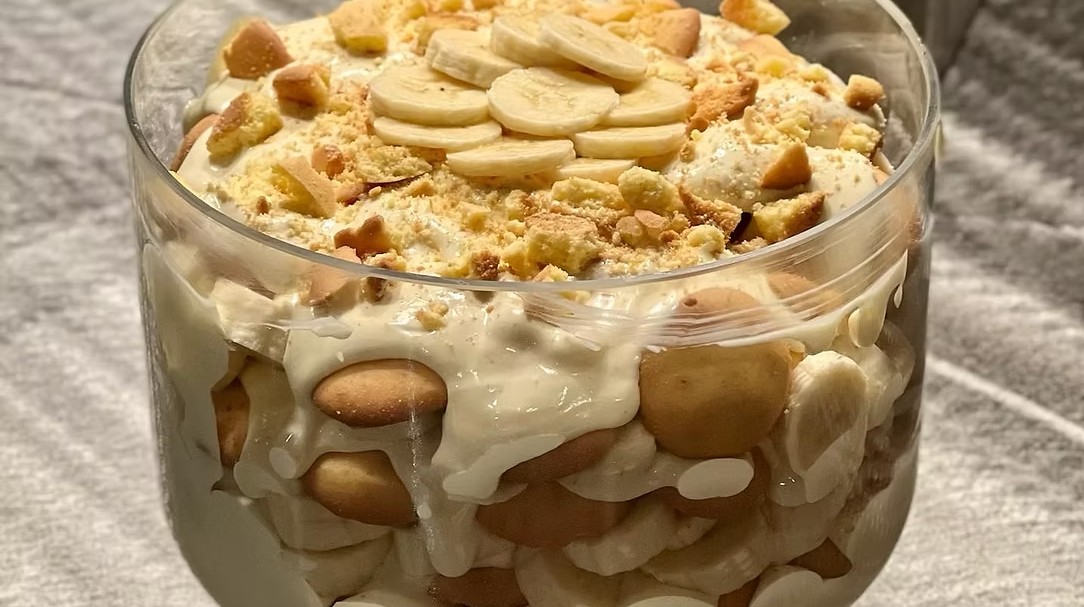
Make this creamy gluten-free banana pudding trifle with vanilla wafers, ripe bananas, and fluffy pudding. An easy no-bake dessert for gatherings.
This Creamy Gluten-Free Banana Pudding Trifle Recipe combines rich vanilla pudding, fluffy whipped topping, ripe bananas, and gluten-free vanilla wafers in a beautiful layered dessert. Each spoonful brings together sweet banana flavor, smooth pudding, and cookies that soften as they absorb moisture from the filling.
With no baking required, this banana pudding trifle is an easy dessert for holidays, birthday parties, potlucks, and family gatherings. Sweetened condensed milk adds richness to the vanilla pudding, while the whipped topping gives the filling a lighter texture. A clear serving bowl shows off the layers with very little decorating needed.
Prepare the trifle at least four hours before serving, or refrigerate it overnight for softer wafers and well-blended flavors. Most of the work is finished before your guests arrive, leaving only a simple garnish to add at serving time. It is a convenient make-ahead dessert with familiar flavors and a presentation suited to any celebration.
Directions
Step 1: Make the Vanilla Pudding
In a large mixing bowl, combine the instant vanilla pudding mix and cold milk. Whisk vigorously or beat with an electric mixer for approximately 2 minutes, until the mixture is smooth and begins to thicken.
Use the 2 cups of milk listed in this recipe rather than the amount printed on the pudding package, since the sweetened condensed milk and whipped topping will also be added.
Step 2: Add the Condensed Milk and Vanilla
Add the sweetened condensed milk and mix until completely incorporated. Scrape the sides and bottom of the bowl as needed so the filling is evenly blended.
Stir in the vanilla extract. The pudding mixture should look creamy and smooth, with no visible lumps.
Step 3: Fold in the Whipped Topping
Using a rubber spatula, gently fold the thawed whipped topping into the pudding mixture. Lift the mixture from the bottom of the bowl and fold it over itself, continuing until no streaks remain.
Avoid vigorous beating at this stage. Gentle folding helps preserve the light, fluffy texture of the filling.
Step 4: Prepare the Serving Dish and Bananas
Choose a large glass trifle bowl or deep serving dish that can accommodate the generous quantity of fruit and pudding. If needed, divide the dessert between two dishes.
Slice the bananas shortly before assembling. If you would like a cookie garnish, reserve a few vanilla wafers before building the layers.
Step 5: Build the Trifle Layers
Arrange a single layer of gluten-free vanilla wafers across the bottom of the serving dish. Top with an even layer of sliced bananas.
Spoon a generous layer of pudding over the bananas, spreading it gently to the edges of the bowl. Cover the banana slices with the filling to limit their exposure to air.
Repeat the layers of wafers, bananas, and pudding until the ingredients are used, reserving enough pudding to finish with a complete layer on top. Smooth the surface with a spatula.
Step 6: Cover and Chill
Cover the trifle tightly with plastic wrap and refrigerate for at least 4 hours before serving.
For softer wafers and more developed flavor, refrigerate overnight. During chilling, the cookies absorb moisture from the filling and take on the tender texture associated with traditional banana pudding.
Step 7: Garnish and Serve
Just before serving, crush the reserved vanilla wafers, if using, and sprinkle them over the top.
Spoon the chilled trifle into dessert bowls, reaching through the layers so each serving includes pudding, bananas, and wafers. Keep the remaining dessert refrigerated.
Notes
Choose ripe bananas that are yellow with a few small brown speckles and still firm enough to slice neatly. Green bananas can taste starchy, while very soft bananas may become mushy in the layers.
Cold milk helps the instant pudding mixture thicken properly. Be sure to use instant pudding mix, rather than a cook-and-serve variety, for this no-bake method.
Thaw the whipped topping completely before folding it into the pudding. Partially frozen topping can leave uneven pockets in the filling and make it harder to blend gently.
This recipe uses 14 bananas, so a roomy serving dish is helpful. Dividing the mixture between two bowls also makes it easier to serve at a larger gathering.
For an optional fresh garnish, add newly sliced bananas just before serving. Additional whipped topping can also be used as an optional decoration; it is separate from the amount folded into the filling.
To prepare individual servings, build the same layers in clear dessert glasses or small cups. Cover and refrigerate them for the same minimum chilling time.
For an optional homemade topping variation, substitute approximately 3 cups of freshly whipped cream for the thawed whipped topping.
Optional flavor variations include a drizzle of caramel sauce, chocolate shavings, mini chocolate chips, or sliced strawberries between the layers. Check any added packaged ingredients for gluten-free suitability.
Prepare the trifle the evening before serving if you prefer thoroughly softened wafers. Add garnishes shortly before serving for the freshest appearance.
Store leftovers covered in the refrigerator for up to 3 days. The dessert is at its best during the first 24 to 48 hours, as the bananas continue to soften and the wafers become increasingly tender. Freezing is not recommended because it can affect the texture of the pudding and fruit.
Use gluten-free vanilla wafers and check the pudding mix, whipped topping, vanilla extract, and other packaged ingredients for gluten-free suitability. Use clean utensils and preparation surfaces to help prevent cross-contact.