Easy Homemade Red Wine Vinaigrette Salad Dressing Recipe
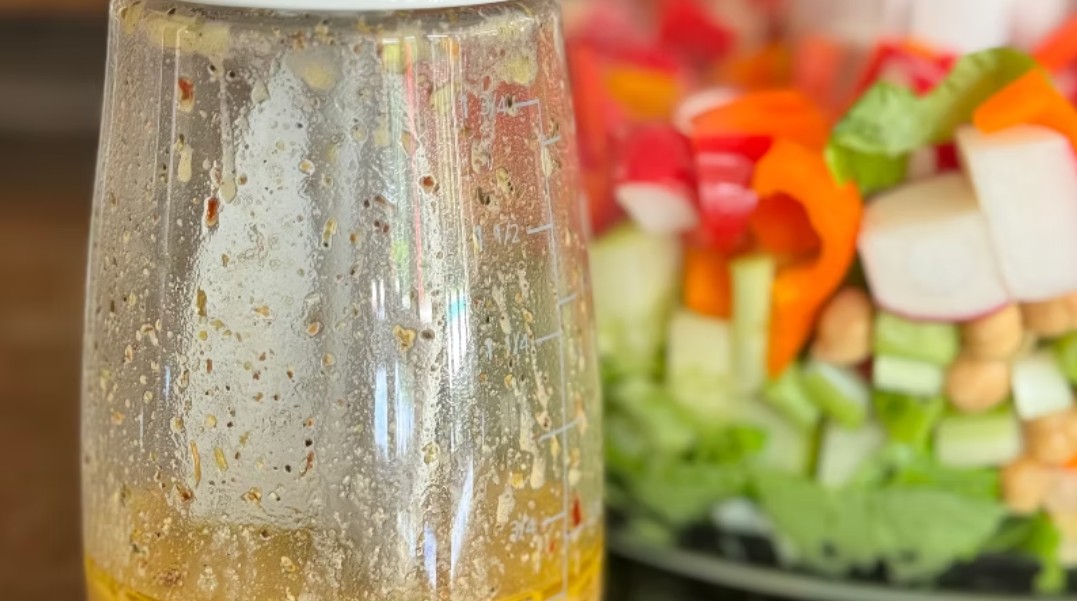
Make this easy homemade red wine vinaigrette salad dressing with olive oil, Dijon mustard, garlic, Italian seasoning, and red wine vinegar.
Bright, tangy, and wonderfully versatile, this Easy Homemade Red Wine Vinaigrette Salad Dressing Recipe is a flavorful kitchen staple made with simple pantry ingredients. Extra-virgin olive oil, red wine vinegar, Dijon mustard, garlic, Italian seasoning, and red pepper flakes come together in just minutes.
Making red wine vinaigrette from scratch allows you to adjust the acidity, heat, and seasoning to suit your taste. Dijon mustard helps emulsify the oil and vinegar, giving the dressing a smooth consistency that coats salad greens evenly.
Drizzle this homemade vinaigrette over mixed greens, pasta salads, roasted vegetables, grain bowls, or Mediterranean-inspired dishes. It can also be used as a flavorful marinade for chicken, shrimp, seafood, or vegetables.
Prep Time: 10 minutes Resting Time: 10 to 15 minutes Total Time: 20 to 25 minutes Yield: Approximately 3/4 cup, 6 servings Serving Size: About 2 tablespoons
Make a zesty Italian antipasto salad with chickpeas, artichokes, mozzarella, savory meat, vegetables, and homemade Italian vinaigrette. Fresh, colorful, and filled with bold Mediterranean flavors, this Zesty Italian Antipasto Salad Recipe transforms the best parts of a traditional antipasto platter into a satisfying meal or side dish. Chickpeas provide a hearty base, while tender artichoke hearts, juicy tomatoes, baby spinach, creamy mozzarella, savory Italian meat, and briny vegetables create a delicious combination of tastes and textures. A homemade Italian vinaigrette brings every ingredient together with extra-virgin olive oil, red wine vinegar, garlic, Dijon mustard, Italian seasoning, and a touch of red pepper flakes. The salad requires no cooking and comes together in only 15 minutes, making it an excellent choice for quick lunches, easy dinners, summer gatherings, potlucks, and meal preparation. Allowing the assembled salad to rest for a few minutes gives the chickpeas and vegetables time to absorb the zesty vinaigrette. Serve it on its own for a protein-rich lunch, spoon it over crisp romaine lettuce, or pair it with grilled chicken, seafood, or a warm bowl of soup. The colorful ingredients make this simple salad as attractive as it is flavorful. Prep Time: 15 minutesCook Time: 0 minutesTotal Time: 15 minutesYield: 6 servings
Make vibrant homemade chimichurri with fresh parsley, oregano, garlic, olive oil, red wine vinegar, and crushed red pepper. Fresh, colorful, and packed with bold herb flavor, this Vibrant Homemade Classic Chimichurri Recipe is a versatile condiment that instantly elevates grilled meats, seafood, roasted vegetables, and sandwiches. Originating in Argentina and Uruguay, chimichurri is known for its lively combination of fresh herbs, garlic, olive oil, vinegar, and gentle heat. Making chimichurri at home allows you to control its flavor and texture while using the freshest ingredients available. A simple saltwater brine helps mellow the garlic and brings the ingredients together, creating a balanced sauce that becomes even more flavorful as it rests. Serve this vibrant chimichurri alongside grilled steak, roasted chicken, shrimp, fish, potatoes, or vegetables. It can also be used as a marinade, dipping sauce, sandwich spread, or finishing sauce. Prep Time: 15 minutesResting Time: 30 minutesTotal Time: 45 minutesYield: About 1 1/2 cups
Make an easy gluten-free Classic Tuscan panzanella salad with toasted bread, ripe tomatoes, basil, red onion, and a bright red wine vinaigrette. Fresh, colorful, and filled with rustic Italian flavor, this Easy Gluten-Free Classic Tuscan Panzanella Salad Recipe combines juicy tomatoes, aromatic herbs, crisp red onion, and toasted gluten-free bread with a simple red wine vinaigrette. As the salad rests, the bread absorbs the tangy dressing and flavorful tomato juices while maintaining a pleasantly hearty texture. Traditional panzanella originated in Tuscany as a practical and delicious way to use leftover bread. This gluten-free version preserves the character of the classic Italian bread salad while making it suitable for a gluten-free diet. For the best flavor, prepare it during tomato season using ripe garden tomatoes, heirloom tomatoes, cherry tomatoes, or a colorful combination. Serve this refreshing summer salad as a light lunch, an Italian-inspired starter, or a side dish for grilled chicken, shrimp, salmon, steak, or vegetables. Optional capers, cucumber, fresh mozzarella, or creamy burrata make it easy to customize for picnics, barbecues, and casual outdoor dinners. Prep Time: 15 minutesCook Time: 10 minutesResting Time: 20 minutesTotal Time: 45 minutes
Ingredients
1/4 cup extra-virgin olive oil
1/4 cup red wine vinegar
1/2 teaspoon Italian seasoning
1 clove garlic, minced
1 tablespoon Dijon mustard
1/2 teaspoon red pepper flakes
1/2 teaspoon kosher salt
1/2 teaspoon ground black pepper
Directions
Step 1: Combine the Ingredients
Add the extra-virgin olive oil, red wine vinegar, Italian seasoning, minced garlic, Dijon mustard, red pepper flakes, kosher salt, and black pepper to a small mixing bowl or glass jar with a tight-fitting lid.
Step 2: Emulsify the Vinaigrette
Whisk the ingredients vigorously for 30 to 60 seconds, or until the oil and vinegar are thoroughly combined and the dressing becomes slightly thickened.
If using a jar, securely fasten the lid and shake vigorously until the vinaigrette looks smooth and well blended. The Dijon mustard helps bind the oil and vinegar together.
Step 3: Taste and Adjust
Taste the vinaigrette and adjust the seasonings as desired. Add more salt for enhanced flavor, additional black pepper for a bolder finish, or more red pepper flakes for extra heat.
For a milder, less acidic dressing, whisk in an additional 1 to 2 tablespoons of olive oil.
Step 4: Let the Flavors Develop
Allow the vinaigrette to rest for 10 to 15 minutes before serving. This gives the garlic, herbs, and seasonings time to infuse the dressing.
Step 5: Serve
Shake or whisk the vinaigrette again before serving. Drizzle it over mixed greens, spinach, arugula, pasta salad, grain bowls, roasted vegetables, or fresh tomato salads.
It is especially delicious with romaine lettuce, cucumbers, tomatoes, red onions, feta cheese, olives, chickpeas, quinoa, or grilled chicken.
Step 6: Store the Dressing
Transfer leftover vinaigrette to an airtight container or keep it in the covered jar used for mixing. Refrigerate for up to 1 week.
Allow the refrigerated dressing to sit at room temperature briefly if the olive oil has solidified. Shake or whisk thoroughly before each use.
Notes
Natural separation is normal in homemade vinaigrette. Shake or whisk the dressing before serving.
For a smoother garlic flavor, let the vinaigrette rest for at least 10 to 15 minutes before serving.
If you prefer a less tangy dressing, increase the olive oil by 1 to 2 tablespoons.
Add 1 teaspoon of fresh lemon juice for extra brightness.
Honey or maple syrup may be added for a touch of sweetness to balance the vinegar’s acidity.
Fresh parsley, basil, oregano, or thyme may be used in place of the dried Italian seasoning. When substituting fresh herbs, start with 1 tablespoon of finely chopped herbs and adjust to taste.
Reduce or omit the red pepper flakes for a mild vinaigrette.
Use the dressing as a marinade for chicken, shrimp, seafood, or vegetables. Always discard marinade that has come into contact with raw meat or seafood.
Store the vinaigrette in an airtight container in the refrigerator for up to 1 week for the freshest flavor.
Originally published
April 2026
Updated
September 2026
Reviewed by
Culibloom