Preserve your summer harvest with this Garden Fresh Dehydrated Tomatoes Recipe using a dehydrator or oven for rich, flavorful dried tomatoes.
Capture the concentrated flavor of your summer harvest with this Garden Fresh Dehydrated Tomatoes Recipe. Slowly removing the moisture intensifies the tomatoes’ natural sweetness and creates a rich, savory pantry ingredient you can enjoy long after tomato season ends.
Roma and plum tomatoes produce meaty dried slices, while cherry and grape tomatoes create smaller, sweeter pieces. A dehydrator provides steady airflow and consistent heat, but a low-temperature oven also works well. Drying time will vary according to the tomato variety, slice thickness, humidity, and equipment.
Homemade dehydrated tomatoes add bold flavor to pasta dishes, soups, salads, pizzas, sandwiches, omelets, dips, grain bowls, casseroles, homemade breads, pesto, and seasoning blends. Keep them plain for maximum versatility or add a light sprinkle of salt and dried herbs before drying.
Directions
Step 1: Prepare the Tomatoes
Wash the tomatoes thoroughly under cool running water and dry them completely. Remove the stems and any bruised or damaged portions.
Slice Roma and plum tomatoes into uniform 1/4-inch-thick slices. Cut cherry and grape tomatoes in half to expose their flesh and encourage even drying.
Step 2: Arrange the Tomatoes
Place the tomatoes in a single layer on the dehydrator trays. If using an oven, arrange them on parchment-lined baking sheets.
Position halved tomatoes with the cut sides facing upward whenever possible. Leave a small amount of space between the pieces so air can circulate around them.
Step 3: Add Optional Seasonings
Lightly sprinkle the tomatoes with kosher salt, dried oregano, dried basil, or dried thyme, if desired. Use seasonings sparingly because their flavors will become more concentrated as the tomatoes dry.
Leave the tomatoes plain if you plan to use them in a variety of sweet and savory recipes.
Step 4: Dry the Tomatoes in a Dehydrator
Set the dehydrator to 135°F. Dry the tomatoes for 8 to 12 hours, checking them periodically as they approach the end of the drying time.
Rotate the trays according to the dehydrator manufacturer’s instructions if your machine does not dry evenly. Remove individual pieces as they finish drying.
Step 5: Dry the Tomatoes in the Oven
For the oven method, preheat the oven to 200°F. Place the baking sheets on the center rack and dry the tomatoes for 4 to 6 hours.
Turn the tomatoes over once during drying and rotate the baking sheets if necessary. Check them frequently near the end because smaller pieces may finish before larger slices.
Step 6: Check for Doneness
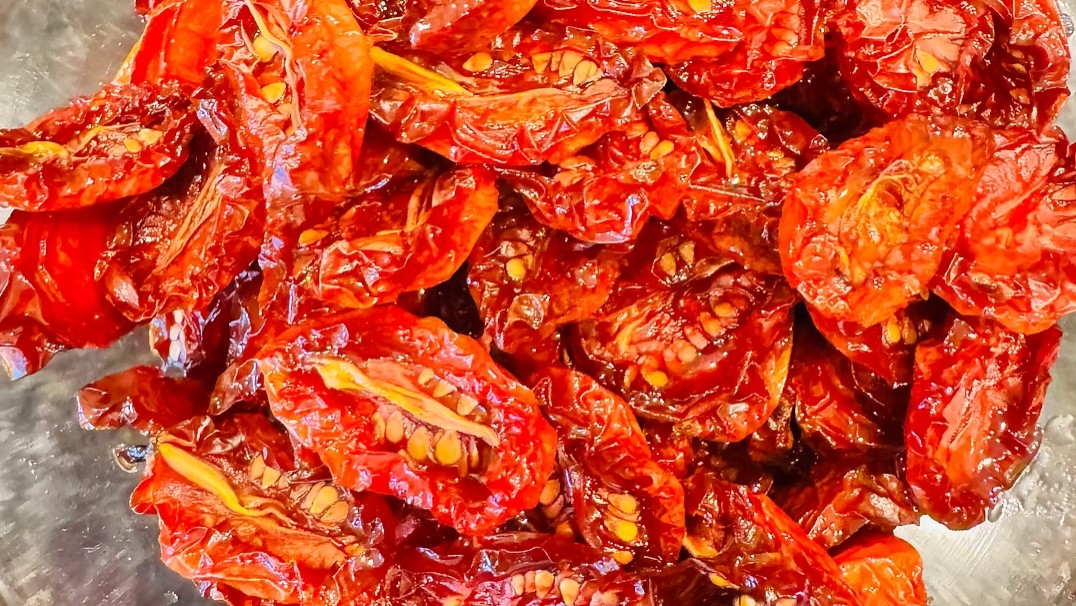
The tomatoes are ready when they feel dry and leathery or crisp, with no pockets of moisture remaining. They may remain slightly flexible, but they should not feel sticky, soft, or wet when torn open.
Continue drying any pieces that still contain visible or detectable moisture.
Step 7: Cool Completely
Transfer the dehydrated tomatoes to a clean tray and allow them to cool completely. Packaging tomatoes while they are warm can create condensation inside the storage container.
Step 8: Package and Store
Place the completely cooled tomatoes in airtight containers, glass jars, or vacuum-sealed bags. Label each container with the preparation date and store it in a cool, dry, dark location.
For longer storage, package the tomatoes securely and refrigerate or freeze them.
Step 9: Use the Dehydrated Tomatoes
Add the tomatoes directly to dishes that contain plenty of liquid, such as soups, stews, and sauces. To soften them for other recipes, cover them with hot water and soak until they reach the desired texture. Drain and pat them dry before using.
If desired, drizzle the rehydrated tomatoes with olive oil immediately before serving rather than using oil as the primary pantry-storage method.
Notes
Select firm, ripe, unblemished tomatoes for the best flavor, color, and drying results.
Cut the tomatoes to a uniform thickness so they dry at approximately the same rate. Smaller tomatoes and thinner slices will usually finish first.
Drying times are estimates and may change according to the tomato variety, thickness, moisture content, humidity, dehydrator, or oven.
Properly dehydrated tomatoes should be leathery or crisp with no remaining pockets of moisture. Continue drying them until brittle if you prefer a crisp texture for grinding into tomato powder.
Check stored tomatoes regularly for condensation, mold, unusual odors, or other signs of spoilage. If condensation develops, return the tomatoes to the dehydrator promptly and dry them again. Discard any tomatoes showing mold or spoilage.
For the best quality, use the dry-packed tomatoes within six months. Heat, light, air, and moisture can shorten their storage life.
Use clean, dry utensils when removing tomatoes from storage and reseal the container immediately.
Do not treat dried tomatoes packed in oil as a shelf-stable canned product. The safest simple option is to store the tomatoes dry and add olive oil when serving. If preparing tomatoes in oil for storage, follow a current, tested food-preservation recipe from a trusted extension service or preservation authority.
Dried tomatoes packed in oil with garlic or herbs require especially careful handling because the oil can create conditions that support harmful bacterial growth. Keep these mixtures refrigerated, use them within four days, or freeze them for longer storage.
Garden fresh dehydrated tomatoes are delicious in pasta sauces, pizzas, salads, soups, grain bowls, casseroles, omelets, pesto, compound butter, dips, sandwiches, homemade breads, and seasoning blends.