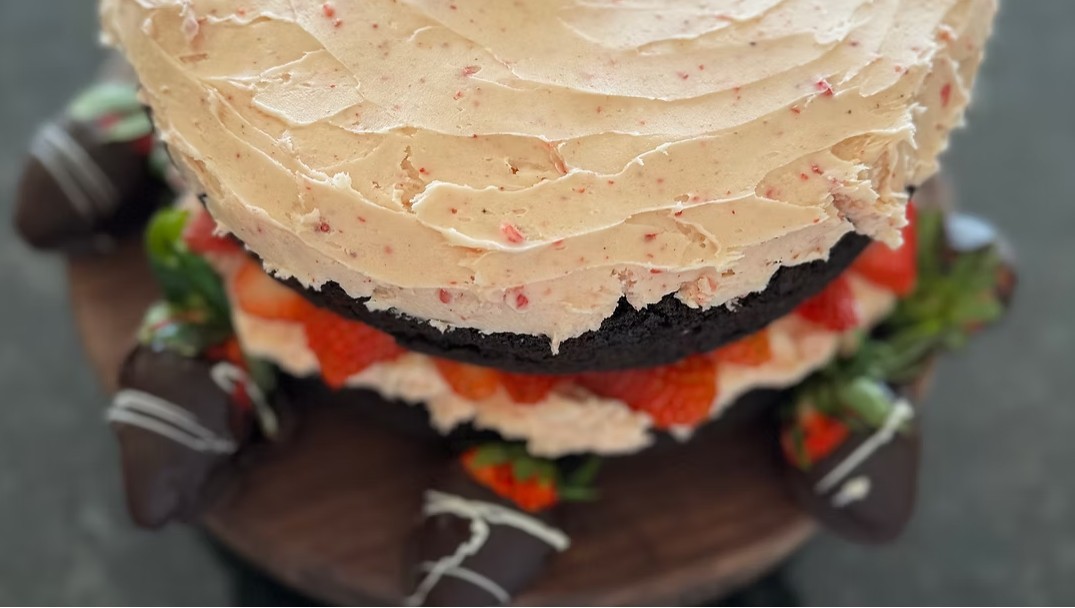
Make a moist gluten-free chocolate cake with fluffy strawberry frosting, freeze-dried berries, and rich chocolate chips for any celebration.
Rich, moist, and beautifully decorated, this Easy Gluten-Free Chocolate Cake with Strawberry Frosting Recipe pairs tender chocolate cake layers with a fluffy, naturally flavored strawberry buttercream. Freeze-dried strawberries give the frosting a vibrant berry flavor and lovely pink color without adding excess moisture.
Sour cream, chocolate pudding mix, and oil help create a soft, moist crumb, while mini chocolate chips add pockets of melted chocolate throughout the cake. A carefully balanced combination of oat flour, rice flour, glutinous rice flour, tapioca flour, and cornstarch gives the layers structure without making them heavy.
This chocolate strawberry layer cake is an impressive choice for birthdays, Valentine’s Day, Mother’s Day, bridal showers, holidays, and other special occasions. The deep chocolate flavor and bright strawberry frosting create a bakery-style dessert that chocolate and berry lovers can enjoy together.
Directions
Step 1: Prepare the Oven and Cake Pans
Preheat the oven to 350°F. Thoroughly grease two 8-inch round cake pans. Line the bottoms with parchment paper, then lightly grease the parchment paper to help the delicate gluten-free cake layers release cleanly after baking.
Step 2: Combine the Dry Ingredients
In a large mixing bowl, whisk together the oat flour, cornstarch, rice flour, glutinous rice flour, tapioca flour, baking powder, baking soda, xanthan gum, kosher salt, cocoa powder, granulated sugar, and instant chocolate pudding mix.
Continue whisking for at least 1 minute so the cocoa powder, leavening agents, and gluten-free flours are distributed evenly.
Step 3: Combine the Wet Ingredients
In a separate large bowl, combine the softened butter or the 1 cup neutral-flavored oil with the eggs, the additional 1/2 cup oil, milk or buttermilk, vanilla extract, and sour cream.
Beat with an electric mixer until the mixture is smooth and fully combined. If using softened butter, scrape the bottom and sides of the bowl as needed to eliminate any large pieces.
Step 4: Prepare the Cake Batter
Gradually add the dry ingredients to the wet mixture. Beat on medium speed just until the batter is smooth and no pockets of dry flour remain. Avoid mixing longer than necessary.
Fold in the mini chocolate chips with a rubber spatula. The finished batter will be thick and deeply chocolatey.
Step 5: Bake the Cake Layers
Divide the batter evenly between the prepared cake pans. Smooth the tops with an offset spatula.
Bake for 30 to 35 minutes, or until the centers spring back lightly when touched and a toothpick inserted into the middle comes out with a few moist crumbs.
Melted chocolate from the mini chips may appear on the toothpick, so check for uncooked batter rather than melted chocolate.
Step 6: Cool the Cakes
Let the cake layers cool in their pans for 15 minutes. Carefully turn them out onto wire racks and remove the parchment paper.
Allow the layers to cool completely before leveling, assembling, or frosting them.
Applying buttercream to warm cake can cause the frosting to soften or melt.
Step 7: Make the Strawberry Powder
Place the freeze-dried strawberries in a food processor or blender. Process them until they become a fine powder.
Reserve 1 tablespoon of the powder for decorating the finished cake. For especially smooth buttercream, sift the remaining powder through a fine-mesh sieve to remove the seeds and larger pieces.
Step 8: Prepare the Strawberry Frosting
Place the softened unsalted butter and salted butter in a large mixing bowl. Beat with an electric mixer for about 4 minutes, or until pale, light, and fluffy.
Gradually add the powdered sugar, about 1 cup at a time, mixing well after each addition. Add the strawberry powder and vanilla extract.
Slowly pour in the heavy whipping cream. Beat the frosting on high speed for 3 to 5 minutes, or until it is silky, fluffy, and easy to spread.
Step 9: Fill the Cake
If necessary, use a serrated knife to level the tops of the completely cooled cake layers.
Place one layer on a cake stand or serving plate. Spread a generous, even layer of strawberry frosting over the top. Carefully position the second chocolate cake layer over the frosting.
Step 10: Apply the Crumb Coat
Spread a thin layer of strawberry frosting over the top and sides of the cake. This crumb coat traps loose chocolate crumbs and creates a smooth foundation for the final layer of buttercream.
Refrigerate the cake for 20 minutes, or until the crumb coat is firm.
Step 11: Decorate the Cake
Cover the chilled cake with the remaining strawberry buttercream. Use an offset spatula to create smooth sides, soft swirls, or another decorative finish.
Sprinkle the reserved strawberry powder over the top. Decorate with fresh strawberries if desired.
Step 12: Serve
Let the finished cake stand at room temperature for approximately 20 minutes before slicing. This allows the buttercream to soften slightly and gives the cake its best texture.
Cut the cake with a sharp knife, wiping the blade clean between slices for a neat presentation.
Notes
The source formula provides a choice between 2 sticks of softened butter and 1 cup of neutral-flavored oil. Whichever option you select is used in addition to the separately listed 1/2 cup of oil.
Glutinous rice flour is also known as sweet rice flour. Despite its name, it does not contain gluten. Check the label to confirm that it is appropriate for your gluten-free needs.
For a simpler flour option, the individual flours may be replaced with an equal total amount of a high-quality gluten-free all-purpose flour blend. The individual flours total 2 1/4 cups. If the selected blend already contains xanthan gum, omit the additional xanthan gum.
Because replacing a custom flour mixture with a commercial blend can change the cake’s texture and liquid absorption, results may vary among brands.
Buttermilk adds a slightly tangy flavor and may produce an especially tender crumb, but whole milk can also be used.
Freeze-dried strawberries are recommended for the frosting because they provide concentrated strawberry flavor and natural color without adding the liquid found in fresh berries.
Store the finished cake covered in the refrigerator for up to 5 days. Bring individual slices closer to room temperature before serving for a softer cake and buttercream texture.
The unfrosted cake layers may be wrapped tightly and frozen for up to 3 months. Thaw the wrapped layers before assembling the cake.
For an extra-rich finish, drizzle the frosted cake with chocolate ganache before serving.
When preparing this recipe for someone with celiac disease or gluten sensitivity, verify that all packaged ingredients, including the oat flour, flours, cornstarch, cocoa powder, pudding mix, chocolate chips, baking powder, and decorations, have appropriate gluten-free labeling. Prevent cross-contact by using clean bowls, utensils, appliances, pans, and preparation surfaces.