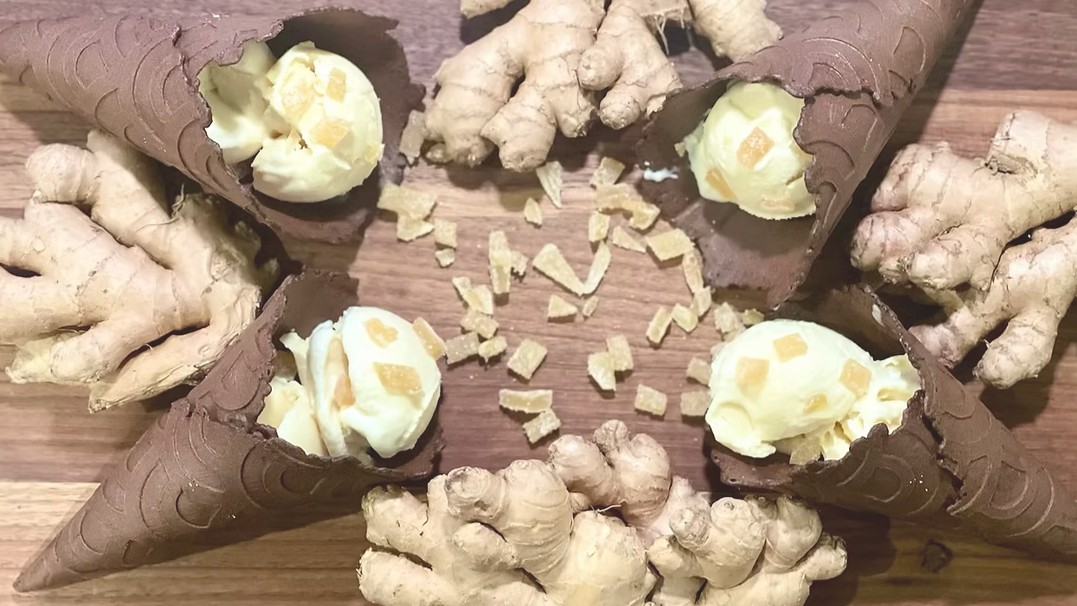
Make crisp homemade gluten-free chocolate waffle cones with rich cocoa flavor for ice cream, gelato, sorbet, and frozen desserts.
Rich, crisp, and deeply chocolatey, this Crisp Homemade Easy Gluten-Free Chocolate Waffle Cones Recipe turns any scoop of ice cream into an extra-special dessert. Each homemade cone has a delicate crunch, a warm vanilla aroma, and an intense cocoa flavor that pairs beautifully with everything from classic vanilla bean ice cream to fruity raspberry sorbet.
A combination of white rice flour, brown rice flour, tapioca starch, and potato starch gives the cones structure without making them heavy. Regular cocoa powder and dark cocoa powder create a rich chocolate color and a balanced flavor, while melted butter helps the freshly cooked waffles become crisp as they cool.
These homemade gluten-free ice cream cones are perfect for birthday parties, summer gatherings, ice cream bars, and family dessert nights. Shape them into traditional cones or turn them into edible dessert bowls for sundaes, frozen yogurt, gelato, or dairy-free frozen treats.
Directions
Step 1: Preheat the Waffle Cone Iron
Preheat the waffle cone iron according to the manufacturer’s instructions. Proper preheating helps the batter cook evenly and produces cones with a crisp texture.
If the manufacturer recommends greasing the cooking surfaces, prepare the waffle cone iron as directed.
Step 2: Combine the Eggs and Sugar
Place the eggs, egg whites, and granulated sugar in a large mixing bowl. Whisk until the mixture is smooth, evenly blended, and slightly frothy. Incorporating a little air at this stage helps create lighter, crisper waffle cones.
Step 3: Add the Butter and Extracts
Slowly pour the cooled melted butter into the egg mixture while whisking continuously. Add the vanilla extract and almond extract, then whisk until everything is thoroughly combined.
Make sure the butter has cooled before adding it. Hot butter could begin cooking the eggs and create small lumps in the batter.
Step 4: Mix the Dry Ingredients
In a separate bowl, combine the confectioners’ sugar, white rice flour, brown rice flour, tapioca starch, potato starch, cocoa powder, sifted dark cocoa powder, and baking powder.
Whisk thoroughly to distribute the flours, starches, cocoa powders, and baking powder evenly. Break apart any visible lumps so the finished batter will be smooth.
Step 5: Finish the Batter
Gradually add the dry ingredients to the wet ingredients, stirring after each addition. Continue mixing until a thick but spreadable chocolate batter forms.
Allow the batter to rest for 5 minutes. This brief resting period gives the gluten-free flours and starches time to absorb moisture.
If the rested batter appears too thick to spread in the waffle cone iron, stir in 1 teaspoon of milk. Add the second teaspoon only if needed.
Step 6: Cook the First Waffle
Place approximately 1 rounded tablespoon of batter in the center of the preheated waffle cone iron. Close the lid and cook for 30 to 45 seconds, or until the waffle is set and has developed a rich chocolate color.
The exact cooking time will depend on the waffle cone maker. Watch the first waffle carefully and adjust the cooking time for the remaining batch if necessary.
The finished waffle should be firm enough to lift without tearing but flexible enough to shape immediately.
Step 7: Shape the Cone
Carefully lift the hot waffle from the iron using a fork, offset spatula, or heat-resistant tongs. The waffle and cooking surfaces will be hot, so work carefully.
Immediately wrap the warm waffle around a waffle cone mold. Gently press the overlapping edge to help seal the cone. Hold it in place for several seconds as the waffle begins to firm.
Allow the cone to cool on the mold for approximately 5 minutes, then carefully slide it off. Repeat the cooking and shaping process with the remaining batter.
Step 8: Cool the Cones
Place the shaped waffle cones upright in a tall glass or cone stand.
Let them cool completely before filling them. The cones will become firmer and crisper as they cool.
Step 9: Fill and Serve
Fill the cooled cones with your favorite gluten-free ice cream, frozen yogurt, gelato, sorbet, or dairy-free frozen dessert.
Serve the filled cones immediately so they retain their crisp texture.
Notes
Work quickly when shaping each waffle. It will become firm within seconds of leaving the waffle cone iron and may crack if you wait too long.
The first waffle can be used as a test. Adjust the amount of batter or cooking time based on the size and temperature of your waffle cone maker.
For a deeper chocolate flavor, use Dutch-process cocoa powder. Check the labels on all cocoa powders, extracts, baking powder, confectioners’ sugar, decorations, and other packaged ingredients to confirm they meet your gluten-free needs.
To make waffle bowls, drape the hot waffles over small inverted heat-safe bowls or glasses. Leave them in place until they are firm enough to hold their shape.
For decorated cones, dip the rims in melted chocolate and add gluten-free sprinkles, chopped nuts, toasted coconut, or mini chocolate chips. Verify that all toppings are appropriately labeled gluten-free when serving someone with celiac disease or gluten sensitivity.
You can also coat the inside of each cooled cone with melted chocolate. Allow the chocolate to harden before adding ice cream. The coating helps prevent the frozen filling from softening the cone too quickly.
Store completely cooled cones in an airtight container at room temperature for up to 5 days. Place parchment paper between layers to help protect the delicate cones from breaking.
Do not refrigerate the waffle cones. Moisture inside the refrigerator can soften their crisp texture.
If the cones begin to lose their crunch, place them in a 300°F oven for 2 to 3 minutes. Let them cool completely before filling or storing them again.
When preparing this recipe for someone with celiac disease or gluten sensitivity, verify that every packaged ingredient is appropriately labeled gluten-free. Clean the waffle cone maker, utensils, bowls, mold, and work surfaces carefully to prevent cross-contact.