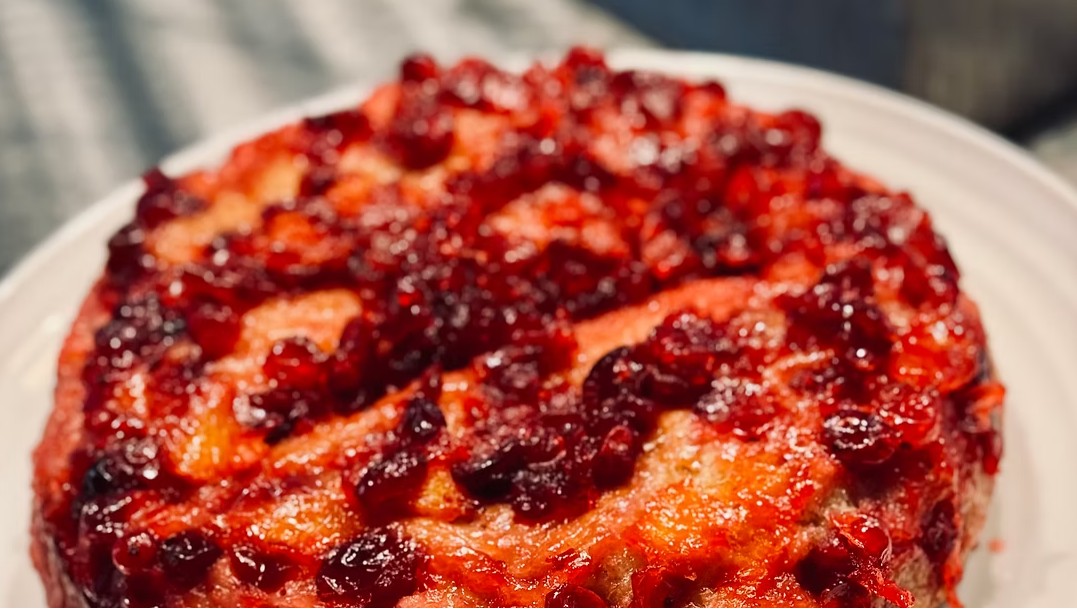
Make a festive gluten-free cranberry orange ginger upside-down cake with a tender vanilla crumb and colorful, jewel-toned cranberry topping.
This Festive Gluten-Free Cranberry Orange Ginger Upside-Down Cake Recipe pairs tart cranberries, sweet orange, and warm fresh ginger with a tender vanilla cake. After the cake is inverted, the colorful cranberry topping creates a glossy, jewel-toned finish that makes every slice look festive.
Choose the homemade version for a delicate cake made with individual gluten-free flours, fresh cranberries, and juicy orange segments. When time is limited, the easy cake mix version provides the same beautiful upside-down presentation with less preparation. Either option is perfect for Thanksgiving, Christmas, winter brunches, holiday parties, and other special occasions.
Ingredients
Option 1: Homemade Cranberry Orange Ginger Cake
For the Cranberry Orange Ginger Topping
3 cups fresh cranberries, approximately one 12-ounce bag
1 cup granulated sugar
1 tablespoon peeled and finely minced fresh ginger
1 navel orange, peel and pith removed, cut into segments
1 cup water
For the Gluten-Free Cake
1/2 cup plus 1 tablespoon sweet rice flour
1/2 cup white rice flour
1/2 cup plus 1 tablespoon tapioca flour
1/4 cup brown rice flour
3/4 teaspoon xanthan gum
1 teaspoon baking powder
1/2 teaspoon baking soda
1/2 teaspoon kosher salt
1/2 teaspoon ground cinnamon
Dash of ground cloves
1/2 cup unsalted butter, softened, or neutral oil
1 cup granulated sugar
4 large eggs, separated
2 teaspoons pure vanilla extract
1/2 cup whole milk or buttermilk, at room temperature
8 ounces sour cream, at room temperature
1 teaspoon orange zest
Long strips of orange zest, for garnish
Option 2: Easy Cranberry Upside-Down Cake
For the Cake
1 box gluten-free vanilla cake mix, plus the ingredients required on the package
1 can whole berry cranberry sauce
For the Optional Vanilla Glaze
2 cups confectioners’ sugar
2 tablespoons whole milk
2 tablespoons unsalted butter, melted
1/4 teaspoon pure vanilla extract
Directions
Option 1: Homemade Cranberry Orange Ginger Cake
Step 1: Make the Cranberry Topping
Combine the fresh cranberries, granulated sugar, and minced ginger in a medium saucepan. Cook over medium-high heat, stirring occasionally, until the sugar dissolves and the cranberries begin to burst, approximately 7 minutes.
Add the water and simmer for another 4 minutes. The mixture should thicken slightly while retaining some of the cranberries’ texture. Remove the saucepan from the heat and gently fold in the orange segments. Set the topping aside to cool while you prepare the cake batter.
Step 2: Prepare the Pan
Preheat the oven to 350°F. Lightly grease a 6-inch cake pan with oil or gluten-free cooking spray.
Line the bottom of the pan with parchment paper.
Spread the cooled cranberry orange ginger mixture evenly over the bottom of the prepared pan. Use a spatula to distribute the fruit so each finished slice has plenty of topping.
Step 3: Combine the Dry Ingredients
In a medium mixing bowl, whisk together the sweet rice flour, white rice flour, tapioca flour, brown rice flour, xanthan gum, baking powder, baking soda, salt, cinnamon, and cloves. Set the mixture aside.
Step 4: Whip the Egg Whites
Place the egg whites in a clean, dry mixing bowl. Begin beating them on low speed with a hand mixer, then gradually increase the speed to high. Continue beating until soft peaks form. The peaks should curl gently when the beaters are lifted. Set the whipped egg whites aside.
Step 5: Make the Cake Batter
In the bowl of a stand mixer fitted with the paddle attachment, beat the softened butter and granulated sugar on medium speed for approximately 3 minutes, or until the mixture is pale and fluffy. If using oil, mix it with the sugar until thoroughly combined.
Add the egg yolks one at a time, mixing well after each addition. Mix in the vanilla extract.
Reduce the mixer speed to low. Add the dry ingredients in three additions, alternating with the sour cream and milk. Begin and end with the dry ingredients. Mix only until combined.
Use a rubber spatula to gently fold one-third of the whipped egg whites into the batter. Carefully fold in the remaining egg whites until no large white streaks remain. Fold in the orange zest.
Step 6: Assemble the Cake
Spoon the batter evenly over the cranberry topping. Smooth the surface with an offset spatula or the back of a spoon. Gently tap the pan on the counter several times to release large air bubbles.
Step 7: Bake the Cake
Place the cake on the center oven rack and bake for 30 to 40 minutes. The top should be lightly golden and should spring back when gently touched.
Insert a toothpick into the center of the cake to test for doneness. It should come out clean or with a few moist crumbs. Begin checking near the lower end of the baking time because gluten-free cakes may become dry when overbaked.
Step 8: Cool and Invert the Cake
Place the baked cake on a wire rack and let it cool in the pan for approximately 10 minutes. Run a thin knife around the inside edge of the pan.
Place a serving platter over the pan and carefully invert the cake. Lift away the pan, then gently remove the parchment paper. Allow the cake to cool completely and garnish it with long strips of orange zest before serving.
Option 2: Easy Cranberry Upside-Down Cake
Step 1: Prepare the Pan and Cranberry Layer
Preheat the oven to 350°F. Grease a 9-inch cake pan.
Place the whole berry cranberry sauce in a bowl and mash it lightly with a fork. Spread the sauce evenly over the bottom of the prepared pan.
Step 2: Prepare the Cake Batter
Prepare the gluten-free vanilla cake mix according to the package directions. Carefully pour the batter over the cranberry layer and spread it evenly to the edges of the pan.
Step 3: Bake the Cake
Bake for approximately 50 minutes, or until a toothpick inserted into the center comes out clean.
Transfer the pan to a cooling rack and let the cake cool for 10 minutes.
Step 4: Make the Optional Vanilla Glaze
Whisk together the confectioners’ sugar, milk, melted butter, and vanilla extract until smooth and free of lumps.
If the glaze is too thick to drizzle, add more milk 1 teaspoon at a time until it reaches the desired consistency.
Step 5: Invert and Glaze the Cake
Run a thin knife around the edge of the cake. Place a serving platter over the pan and carefully invert the cake onto the platter.
Drizzle the optional vanilla glaze over the cranberry topping. Let the glaze set for several minutes before slicing and serving.
Notes
Choose one complete cake option before beginning. The homemade version uses fresh fruit and individual gluten-free flours, while the cake mix version offers a faster alternative.
Fresh cranberries provide the brightest flavor and best texture in the homemade topping. Frozen cranberries were not included in the original recipe and may release a different amount of liquid.
Room-temperature milk, sour cream, and eggs blend more smoothly into the batter and help create an even, tender crumb.
Buttermilk may be used in place of whole milk for additional richness and a subtle tang.
For a stronger citrus flavor, increase the orange zest in the homemade cake batter by 1 teaspoon.
Make sure the bowl and beaters used for the egg whites are completely clean and dry. Fat or traces of egg yolk can prevent the whites from whipping properly.
Serve the cake slightly warm, at room temperature, or chilled. Freshly whipped cream makes a lovely accompaniment to the tart cranberry topping.
Cover leftovers and refrigerate them for up to 4 days.
The cake may be frozen for up to 2 months. Wrap individual slices securely and thaw them overnight in the refrigerator before serving.
Check the labels on the cake mix, cooking spray, baking powder, confectioners’ sugar, vanilla extract, spices, and other packaged ingredients to confirm they are suitable for a gluten-free diet. Prevent cross-contact by using clean utensils, cookware, preparation surfaces, and serving equipment.