Make a crispy gluten-free fried chicken recipe with juicy buttermilk-marinated chicken using the easy fried or oven-baked method.
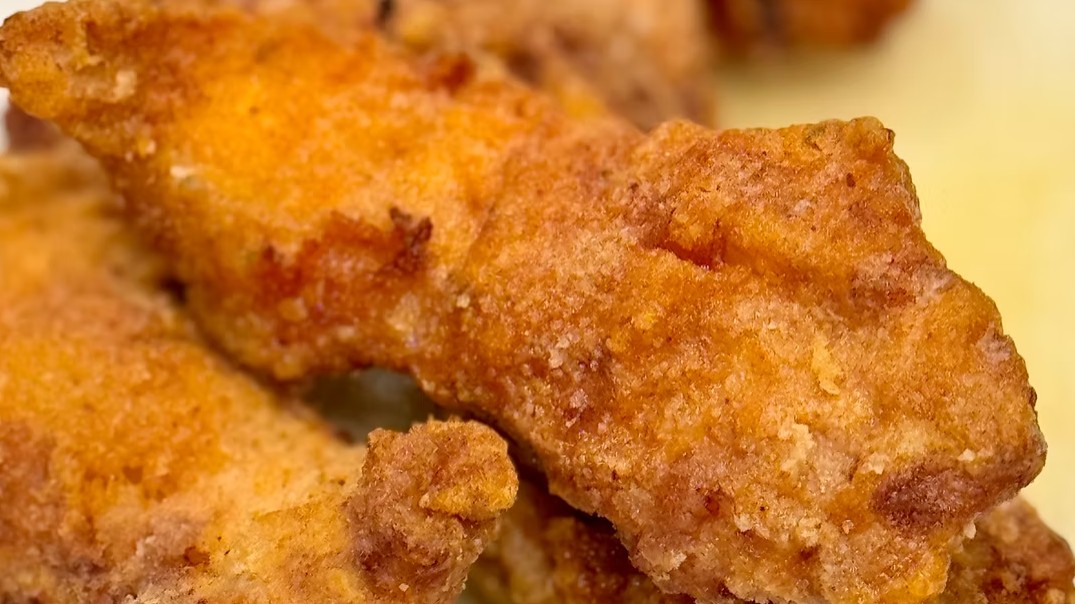
This Crispy Gluten-Free Fried Chicken Recipe delivers juicy, tender chicken beneath a light, golden coating with plenty of satisfying crunch. A seasoned buttermilk marinade adds flavor and helps keep the boneless chicken breasts moist as they cook.
The gluten-free coating combines rice flour, tapioca flour, and potato starch. Rice flour provides structure, tapioca flour helps the coating adhere, and potato starch encourages a crisp finish without wheat flour.
Choose the traditional fried method for an extra-crispy, Southern-style result or prepare the chicken in the oven for a crunchy meal made with less oil. Both versions are delicious for family dinners, picnics, game days, and casual celebrations.
Serve the chicken warm with coleslaw, potato salad, mashed potatoes, corn, roasted vegetables, or your favorite gluten-free dipping sauce.
Directions
Step 1: Prepare the Buttermilk
If using milk and lemon juice instead of buttermilk, combine 4 cups milk with 4 tablespoons fresh lemon juice. Let the mixture stand for 10 minutes before preparing the marinade.
Step 2: Marinate the Chicken
In a large bowl, whisk together the buttermilk, paprika, grated garlic, onion powder, oregano, sea salt, and black pepper.
Add the chicken breasts and turn them until completely coated. Cover the bowl and refrigerate for at least 4 hours or up to 12 hours. Marinating the chicken overnight will produce the best flavor and tenderness.
Step 3: Prepare the Gluten-Free Coating
In a shallow dish, whisk together the rice flour, tapioca flour, potato starch, sweet paprika, garlic powder, black pepper, and sea salt until evenly combined.
Step 4: Prepare for Cooking
Remove the marinated chicken from the refrigerator approximately 20 minutes before cooking.
For fried chicken, pour enough avocado oil into a heavy-bottomed Dutch oven, cast-iron pot, or wok to reach approximately one-third of the way up the sides. Heat the oil to 375°F.
For oven-baked chicken, preheat the oven to 425°F. Line a baking sheet with parchment paper and place a wire rack on top. Lightly brush the rack with avocado oil.
Step 5: Coat the Chicken
Remove one piece of chicken from the marinade and allow the excess marinade to drip back into the bowl.
Press the chicken firmly into the gluten-free coating, covering every side completely.
For a thicker, crunchier crust, dip the coated chicken back into the buttermilk marinade and cover it with the flour mixture a second time.
Place the coated chicken on a wire rack and let it rest for 10 minutes before frying or baking.
Fried Method
Step 6: Fry the Chicken
Carefully place a few chicken breasts in the hot oil without overcrowding the pan. Fry for 8 to 15 minutes, depending on their thickness, until lightly golden.
Monitor the oil temperature throughout frying and adjust the heat as necessary to keep it close to 375°F.
Transfer the chicken to a wire rack and let it rest for 10 minutes while frying the remaining pieces.
Step 7: Fry the Chicken a Second Time
Return the chicken to the 375°F oil and fry for another 4 to 5 minutes, or until the coating is deep golden brown and extra crispy.
Transfer the fried chicken to a clean wire rack or paper towels to drain. Insert an instant-read thermometer into the thickest portion of each chicken breast. The chicken is fully cooked when it reaches an internal temperature of 165°F.
Let the chicken rest for 5 minutes before serving.
Oven-Baked Method
Step 8: Bake the Chicken
Arrange the coated chicken breasts on the prepared wire rack, leaving space between each piece. Lightly brush both sides of the chicken with avocado oil.
Bake for 25 to 30 minutes, turning the chicken halfway through the cooking time.
For an extra-crispy finish, broil the chicken for the final 2 to 3 minutes.
Watch it carefully to prevent the coating from burning.
Insert an instant-read thermometer into the thickest portion of each chicken breast. The chicken is fully cooked when it reaches an internal temperature of 165°F.
Let the chicken rest for 5 minutes before serving.
Notes
Allowing the coated chicken to rest for 10 minutes before cooking helps the coating adhere and become crisp.
Keep the frying oil close to 375°F. If the oil is too cool, the coating may absorb excess oil. If it is too hot, the coating may brown before the chicken is fully cooked.
Using a wire rack instead of placing fried chicken directly on paper towels helps air circulate beneath the chicken and keeps the coating crisp.
Double-coating the chicken creates a thicker, crunchier crust.
For the oven-baked method, brushing the chicken generously with avocado oil encourages browning and helps the coating become crispy.
Marinating the chicken for up to 12 hours produces the most flavorful and tender results.
Cooking times may vary depending on the thickness of the chicken breasts. Always use an instant-read thermometer to confirm that the chicken has reached 165°F.
Refrigerate leftovers in an airtight container for up to 4 days.
Reheat the chicken in a 375°F oven or air fryer until it reaches 165°F and the coating is hot and crispy.
When preparing this recipe for someone with celiac disease or gluten sensitivity, check the labels on all packaged ingredients to confirm they are gluten-free and prevent cross-contact during preparation.