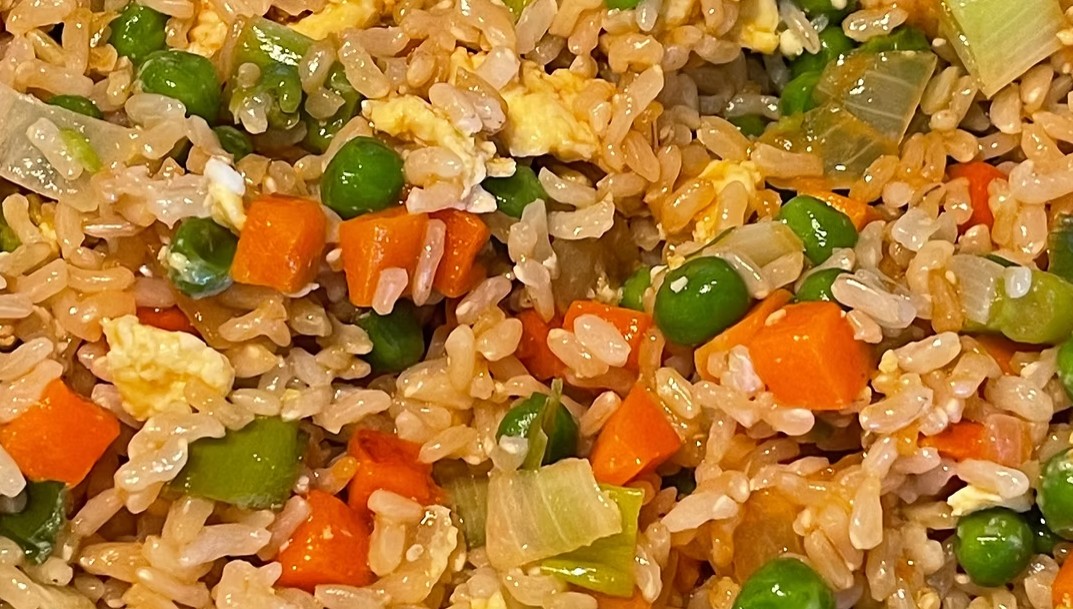
Make easy gluten-free fried rice with chilled rice, vegetables, fluffy eggs, sesame oil, and tamari for a quick meal that is better than takeout.
This Easy Gluten-Free Fried Rice Recipe delivers the savory flavor, colorful vegetables, fluffy eggs, and lightly toasted rice you expect from restaurant-style fried rice. Gluten-free tamari provides the rich umami seasoning without the wheat found in many traditional soy sauces.
Cold, previously cooked rice is the secret to achieving the best texture. Refrigeration firms the grains and removes excess surface moisture, allowing the rice to fry instead of becoming soft or mushy. Briefly leaving portions of the rice against the hot skillet also creates delicious golden edges.
This flexible recipe is an excellent way to transform leftover rice and vegetables into a satisfying meal. Serve it as a quick weeknight dinner, a flavorful side dish, or a customizable main course with cooked chicken, shrimp, pork, beef, or tofu.
Directions
Step 1: Prepare the Rice
Break apart any large clumps of chilled rice with your hands or a fork. Separating the grains before cooking makes it easier to distribute the rice evenly throughout the skillet.
If you are preparing fresh rice specifically for this recipe, cook it several hours in advance or the day before. Spread the cooked rice on a baking sheet and refrigerate it until completely chilled.
Step 2: Prepare the Ingredients
Chop the onion, slice the scallion, thaw the peas and carrots, and measure the remaining ingredients before heating the skillet. Fried rice cooks quickly, so everything should be ready before you begin.
Prepare any optional vegetables or cooked proteins you plan to include. Cut them into small, evenly sized pieces so they heat quickly and blend easily with the rice.
Step 3: Sauté the Onion and Scallion
Place a large wok or skillet over medium-high heat. Add the sesame oil and heat it until shimmering.
Add the chopped onion and sliced scallion. Cook for 2 to 3 minutes, stirring frequently, until the onion is translucent and fragrant.
If using the optional garlic or ginger, add it during the final minute. Stir continuously so it becomes aromatic without burning.
Step 4: Cook the Vegetables
Add the thawed peas and carrots. Cook for 3 to 4 minutes, stirring often, until the vegetables are tender and heated through.
If using mushrooms, bell peppers, broccoli, or water chestnuts, add them during this step. Continue cooking until the additional vegetables are tender-crisp. Avoid overcrowding the skillet because excess moisture can cause the ingredients to steam instead of fry.
Step 5: Scramble the Eggs
Push the vegetables to one side of the skillet to create an open space. Pour the beaten eggs into the empty area and let them cook undisturbed for several seconds.
Gently scramble the eggs with a spatula until they are fully set but still soft and fluffy. Stir the cooked eggs into the vegetables, distributing the pieces evenly.
Step 6: Add the Chilled Rice
Add the chilled rice to the skillet. Use a spatula or wooden spoon to break apart any remaining clumps while combining the rice with the vegetables and eggs.
Continue stirring until the ingredients are evenly distributed and the grains remain separate.
Step 7: Season the Fried Rice
Drizzle the gluten-free soy sauce or tamari evenly over the rice. Toss thoroughly so the sauce coats the rice without collecting in one area.
If you are adding cooked chicken, shrimp, pork, beef, or tofu, stir it into the skillet now. Continue cooking until the chosen protein is heated completely through.
Step 8: Stir-Fry Until Golden
Cook the fried rice for 4 to 6 minutes, stirring occasionally. Allow portions of the rice to rest against the hot surface briefly before tossing again. This technique lightly toasts the grains and helps create the signature texture of restaurant-style fried rice.
Taste the rice and add a little more gluten-free tamari if desired. The finished dish should be hot throughout, evenly seasoned, and lightly golden in places.
Step 9: Garnish and Serve
Remove the skillet from the heat. Garnish the fried rice with sesame seeds and additional sliced scallions, if desired.
Serve immediately as a main course or alongside grilled chicken, teriyaki shrimp, sesame tofu, stir-fried vegetables, or another favorite gluten-free dish.
Notes
Cold, day-old rice produces the best texture because the grains are firmer and contain less surface moisture. Warm, freshly cooked rice is more likely to become soft or clump together.
A large skillet or wok gives the ingredients enough room to fry properly. If your skillet is small, cook the recipe in batches to prevent overcrowding and steaming.
This fried rice can be customized with cooked chicken, shrimp, pork, beef, or tofu. Make sure any protein added to the skillet is already fully cooked.
For vegetable fried rice, omit the meat and increase the quantity of vegetables. Mushrooms, bell peppers, broccoli, and water chestnuts are all suitable additions.
Store leftover fried rice in an airtight container in the refrigerator for up to 3 days. Refrigerate it promptly after the meal rather than allowing it to remain at room temperature.
Leftovers can be frozen in freezer-safe containers for up to 2 months. Thaw them safely in the refrigerator before reheating.
For the best reheated texture, warm the fried rice in a hot skillet with a small amount of sesame oil. Stir frequently and heat until the rice is steaming hot throughout.
Traditional soy sauce commonly contains wheat. Select soy sauce or tamari carrying appropriate gluten-free labeling, and check every packaged ingredient used in the recipe. Prevent cross-contact by using clean cookware, utensils, preparation surfaces, and serving dishes.