Make soft, fluffy gluten-free homemade pita bread with simple ingredients. These flexible pitas are perfect for wraps, sandwiches, and dipping.
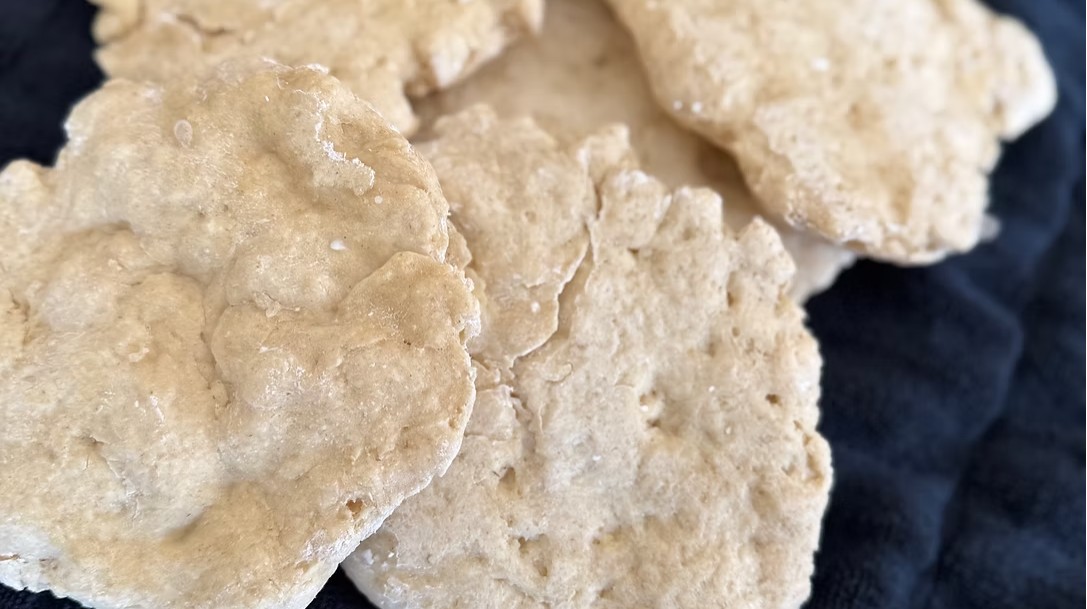
Soft, fluffy, and wonderfully versatile, this Easy Gluten-Free Homemade Pita Bread Recipe brings the comfort of warm, freshly baked pita to the gluten-free table. Each round has a lightly golden exterior and a tender, flexible interior that works beautifully for sandwiches, wraps, dipping, and serving alongside Mediterranean-inspired meals.
A combination of oat flour, potato starch, cornstarch, and tapioca flour gives the pita a soft texture, while xanthan gum helps hold the dough together. Active dry yeast provides lift and flavor, and baking the rounds in a very hot oven creates the quick burst of steam needed to encourage puffing and pocket formation.
Gluten-free pita may not always form the same dramatic pocket as wheat-based pita, but the bread will still be soft, delicious, and useful as a flexible flatbread. Serve it warm with hummus, falafel, grilled vegetables, chicken shawarma, salads, or your favorite sandwich fillings.
Directions
Step 1: Combine the Dry Ingredients
Place the oat flour, potato starch, cornstarch, tapioca flour, xanthan gum, active dry yeast, sugar, and salt in a large mixing bowl. Whisk thoroughly for about 1 minute, making sure the ingredients are evenly distributed.
Mixing the dry ingredients carefully is especially important in gluten-free baking. It helps distribute the xanthan gum and yeast throughout the flour mixture, supporting a more consistent texture and even rise.
Step 2: Add the Wet Ingredients
Add the warm milk, egg, olive oil, and apple cider vinegar to the dry mixture. Stir or whisk until everything is completely combined and no dry pockets remain.
The mixture may initially resemble a thick batter rather than a traditional kneadable bread dough. This soft, tacky consistency is normal for gluten-free yeast dough and helps produce tender pita bread.
Step 3: Mix the Dough
Fit a stand mixer with the paddle attachment. Mix the dough on low speed for approximately 5 minutes, stopping to scrape down the sides of the bowl if necessary.
The finished dough should look smooth and cohesive but remain slightly tacky. The extended mixing time allows the gluten-free flours and starches to absorb the liquid fully, which improves the texture of the baked pita.
Step 4: Prepare the Baking Sheets
Line two baking sheets with parchment paper. Lightly dust a clean work surface with additional oat flour or starch to prevent the dough from sticking.
Divide the dough into six equal portions. Keeping the portions similar in size will help the pita breads bake at the same rate.
Step 5: Shape the Pita Rounds
Roll each portion into a circle approximately 6 inches in diameter. Aim for an even thickness across the entire round because uneven areas may prevent the pita from puffing consistently.
Transfer the shaped rounds to the prepared baking sheets, leaving a small amount of space between them.
Step 6: Let the Dough Rise
Loosely cover the pita rounds with plastic wrap or a clean kitchen towel. Set them in a warm, draft-free place and allow them to rise for 1 to 1 1/2 hours.
Gluten-free dough may not rise as dramatically as wheat-based dough, but this resting period is still essential. It gives the yeast time to create air pockets and contributes to a softer, lighter finished bread.
Step 7: Preheat the Oven
Toward the end of the rising time, preheat the oven to 475°F. Allow the oven to heat completely before baking the pita rounds.
The intense heat creates steam quickly, which encourages the bread to puff. Just before placing the baking sheets in the oven, lightly brush the tops of the rounds with water to provide additional moisture for steam development.
Step 8: Bake the Pita Bread
Bake the pita breads for 5 to 7 minutes, or until they puff and become lightly golden. Watch them closely during the final minutes because they can brown quickly at this high temperature.
For more even browning, bake the pita rounds for about 3 minutes, carefully flip them, and continue baking for approximately 3 additional minutes.
Step 9: Keep the Pita Bread Soft
Remove the pita breads from the oven immediately after baking. Transfer them to a clean kitchen towel and wrap them while they are still warm.
Wrapping the fresh pita traps steam and helps keep the bread soft, tender, and flexible. Let the rounds cool slightly before serving.
Step 10: Serve
Serve the gluten-free pita warm with hummus, falafel, grilled vegetables, chicken shawarma, salads, or Mediterranean-style dips. The pita can also be sliced and filled, folded around sandwich ingredients, or cut into wedges for dipping.
Notes
Use fresh active dry yeast for the best rise and texture. Yeast that has been stored for a long time may not provide enough lift.
The milk should be warm, between 95°F and 110°F. Milk that is too hot can damage the yeast and prevent the dough from rising properly.
Use oat flour that is specifically labeled gluten-free. Oats are frequently exposed to wheat during growing, processing, or packaging, so ordinary oat flour may not be suitable for someone with celiac disease or gluten sensitivity.
Check the labels on the potato starch, cornstarch, tapioca flour, xanthan gum, yeast, and other packaged ingredients for appropriate gluten-free labeling. Prevent cross-contact by using clean bowls, utensils, baking sheets, and work surfaces.
If the pita breads do not develop complete pockets, they can still be enjoyed as soft gluten-free flatbreads. Use them for wraps, sandwiches, pizzas, or dipping.
Rolling each round to a consistent thickness is one of the most important steps for encouraging even puffing. Avoid leaving the center noticeably thicker than the edges.
For a dairy-free version, replace the milk with an unsweetened dairy-free milk suitable for baking. This substitution may slightly change the flavor or texture.
Allow the pita breads to cool completely before storing them. Place them in an airtight container and keep them at room temperature for up to 2 days.
For longer storage, place the cooled pita breads in a freezer-safe bag and freeze them for up to 2 months. Separate the rounds with parchment paper if you want to remove them individually.
To reheat, wrap one pita in a damp paper towel and microwave it for 15 to 20 seconds. You can also warm it in a skillet over medium heat until it becomes soft and pliable.
Homemade gluten-free pita bread has its best texture when served fresh on the day it is baked.
Wrapping the warm rounds in a clean towel helps preserve their softness until serving.