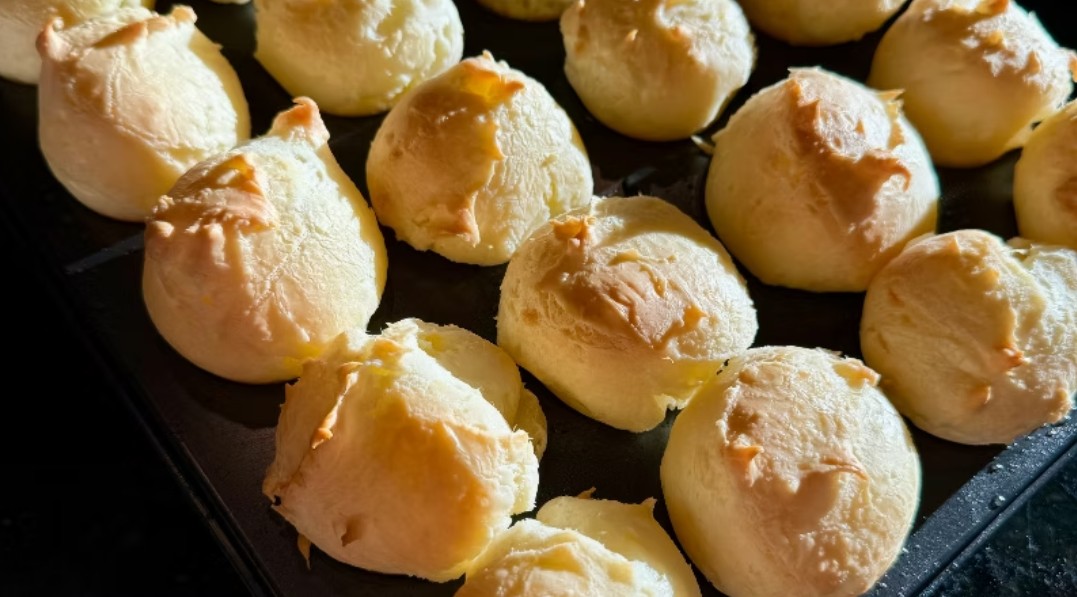
Make chewy pão de queijo with tapioca flour, Parmesan, and garlic. These naturally gluten-free Brazilian cheese breads bake until golden.
Warm, savory, and irresistibly chewy, this Chewy Pão de Queijo (Brazilian Cheese Bread) Recipe transforms a handful of simple ingredients into golden cheese puffs. Tapioca flour gives each bread a lightly crisp exterior and a tender, stretchy center that makes pão de queijo so distinctive.
Parmesan cheese brings a rich, salty flavor, while fresh garlic adds a savory touch to every bite. Because tapioca flour replaces wheat flour, these Brazilian cheese breads are naturally gluten-free. Serve them for breakfast, enjoy them as an afternoon snack, or add them to an appetizer platter.
The dough can be portioned onto baking sheets, baked in a mini muffin pan, or prepared in an air fryer. Pão de queijo tastes best while it is still warm, when the outside is golden and the cheese-filled center is at its softest and chewiest.
Directions
Step 1: Preheat the Oven
Preheat the oven to 375°F. Line two baking sheets with parchment paper or lightly grease them to help prevent the cheese breads from sticking. Alternatively, lightly grease a mini muffin pan.
Step 2: Heat the Liquid Mixture
Combine the butter, water, milk, and kosher salt in a medium saucepan. Place the saucepan over medium heat and bring the mixture to a full boil, stirring occasionally. Continue heating until the butter has melted completely and the ingredients are combined.
Watch the saucepan carefully as the mixture approaches a boil because the milk can foam and rise quickly.
Step 3: Prepare the Tapioca Dough
Place the tapioca flour in a large mixing bowl. Carefully pour the boiling butter mixture over the flour.
Mix with a sturdy wooden spoon, hand mixer, or stand mixer until the flour has absorbed the liquid.
Continue mixing until a thick, smooth, and elastic dough begins to form. Scrape the sides and bottom of the bowl as needed so no pockets of dry tapioca flour remain.
Step 4: Add the Cheese and Garlic
Add the minced garlic and grated Parmesan cheese to the warm tapioca dough. Mix until the garlic and cheese are distributed evenly throughout the dough.
Freshly grated Parmesan generally blends into the warm mixture more smoothly than coarsely grated or pre-shredded cheese.
Step 5: Cool the Dough Slightly
Allow the dough to cool for 2 to 3 minutes. It should still feel warm, but it should not be so hot that it begins cooking the eggs as soon as they are added.
Step 6: Incorporate the Eggs
With the mixer running on low speed, gradually add the lightly beaten eggs. Mix thoroughly after each addition until the eggs are fully incorporated.
The dough may initially appear slippery, lumpy, or separated. Continue mixing until it comes together and develops a smooth, glossy consistency. The exact texture may vary slightly depending on the tapioca flour, the size of the eggs, and how finely the cheese is grated.
Step 7: Portion the Dough
Use a medium cookie scoop or ice cream scoop to portion the dough onto the prepared baking sheets. Leave space between the portions so the cheese breads can expand as they bake.
If using a mini muffin pan, divide the dough evenly among the prepared cups. A lightly greased scoop or damp hands can make sticky dough easier to portion.
Step 8: Bake the Pão de Queijo
Bake for approximately 20 minutes, or until the cheese breads are puffed and lightly golden with small spots of browned cheese.
Avoid opening the oven during the early part of baking because the steady heat helps the cheese breads rise. When ready, the exteriors should look set and lightly crisp while the centers remain soft and chewy.
Step 9: Cool and Serve
Remove the pão de queijo from the oven and allow them to cool on the baking sheets or in the muffin pan for a few minutes. Serve them warm for the best flavor and texture.
Air Fryer Directions
Step 1: Prepare the Air Fryer
Preheat the air fryer to 375°F if recommended by the manufacturer. Cut a piece of air fryer-safe parchment paper to fit inside the basket without covering all the openings needed for air circulation.
Do not place loose parchment paper in the air fryer during preheating. Add it only when it can be held securely in place by the portions of dough.
Step 2: Arrange the Dough
Place the parchment paper in the basket and arrange the dough portions on top, leaving about 2 inches between them. Do not overcrowd the basket. Cook the cheese breads in batches if necessary.
Step 3: Air Fry Until Golden
Air fry at 375°F for approximately 20 minutes, or until the cheese breads are puffed, golden, and cooked through. Air fryer temperatures and cooking speeds vary, so begin checking the first batch a few minutes early.
Step 4: Serve Warm
Carefully remove the pão de queijo from the air fryer. Let them cool for a few minutes before serving them warm.
Notes
Tapioca flour is essential for creating the traditional chewy texture of pão de queijo. It may also be labeled tapioca starch. Do not replace it with wheat flour, cornstarch, cassava flour, or another gluten-free flour because these ingredients behave differently.
Freshly grated Parmesan provides a rich, savory flavor and melts smoothly into the dough. If desired, replace part of the Parmesan with Asiago, Romano, or sharp cheddar cheese. Changing the cheese may affect the saltiness, moisture, and final texture.
The garlic adds a flavorful variation to the dough. For a milder cheese bread, reduce the garlic or omit it.
The dough may be sticky after the eggs are incorporated. This is normal. Use a greased cookie scoop or lightly dampened hands to make portioning easier.
For evenly sized cheese breads, use the same scoop for every portion. Consistent sizing helps the breads bake at approximately the same rate.
Pão de queijo is ready when it has puffed, developed a lightly golden exterior, and feels set around the edges. Avoid overbaking it because the center should remain tender and chewy.
Serve the cheese breads with eggs or fresh fruit for breakfast. They also pair well with soups, salads, roasted vegetables, and grilled meats. For entertaining, arrange them on an appetizer board with olives, cured meats, and cheese.
For extra flavor, add a pinch of black pepper or 1 tablespoon of finely chopped fresh herbs to the dough. Parsley, chives, or rosemary can complement the Parmesan and garlic.
Store cooled leftovers in an airtight container at room temperature for up to 2 days. Reheat them briefly before serving to restore some of their softness and chewiness.
Baked pão de queijo can be frozen for up to 3 months. Allow the breads to cool completely, freeze them in a single layer, and then transfer them to a freezer-safe container. Reheat them in a 350°F oven for 5 to 8 minutes, adding more time if needed, or microwave them briefly until warmed through.
This recipe is naturally gluten-free because it is made with tapioca flour. When preparing it for someone with celiac disease or gluten sensitivity, verify that every packaged ingredient is appropriately labeled gluten-free and prevent cross-contact with wheat-based ingredients, utensils, and work surfaces.