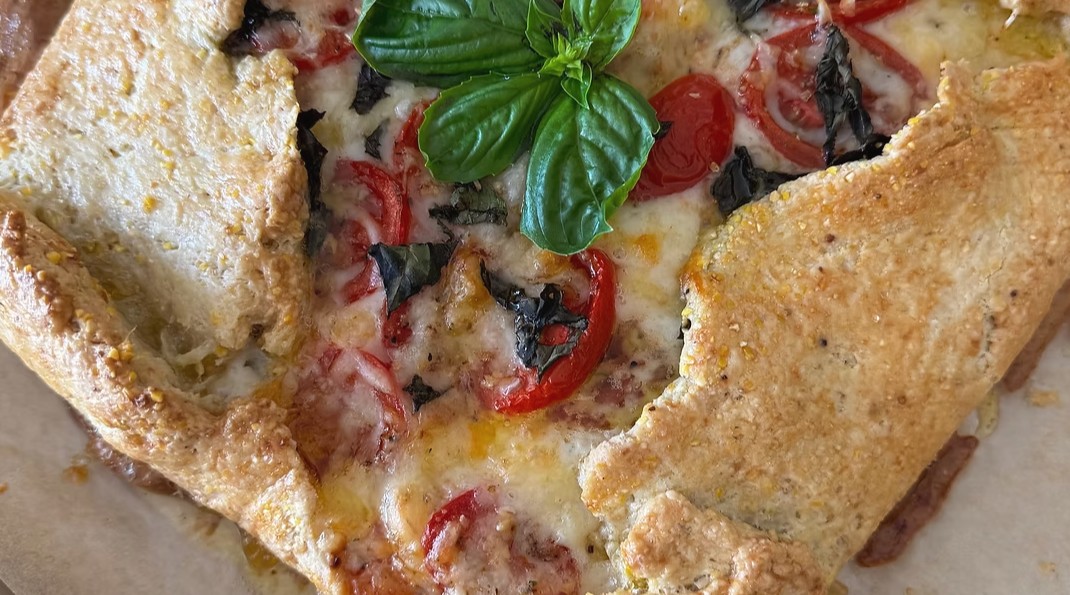
Make a rustic gluten-free tomato and Gruyère cornmeal galette with heirloom tomatoes, fresh basil, melted cheese, and a flaky homemade crust.
This Rustic Gluten-Free Tomato and Gruyère Cornmeal Galette Recipe pairs ripe heirloom tomatoes, nutty Gruyère cheese, and fragrant fresh basil with a buttery homemade crust. Its relaxed, free-form shape gives the savory tart an inviting appearance while making it easier to assemble than a traditional pie.
Finely ground cornmeal lends the pastry a subtle sweetness and pleasantly crisp texture. Tapioca flour, cornstarch, superfine brown rice flour, oat flour, and xanthan gum work together to create a tender gluten-free dough sturdy enough to hold the juicy tomatoes and melted cheese.
Salting and draining the tomatoes before assembling the galette helps prevent a soggy crust, while the layer of shredded Gruyère creates an additional barrier between the tomatoes and pastry. Serve the finished galette for a summer lunch, weekend brunch, light dinner, or elegant appetizer with a green salad, grilled vegetables, or a warm bowl of soup.
Directions
Step 1: Combine the Dry Ingredients
Add the tapioca flour, cornstarch, superfine brown rice flour, oat flour, cornmeal, granulated sugar, sea salt, and xanthan gum to a food processor fitted with the steel blade. Pulse several times until all the dry ingredients are thoroughly and evenly combined.
Step 2: Add the Butter
Add the cold diced butter to the food processor. Pulse until the mixture resembles coarse crumbs with small, pea-sized pieces of butter distributed throughout. Do not process the mixture until it becomes completely smooth. Those visible pieces of cold butter will create steam in the oven and help give the baked crust a flaky texture.
Step 3: Add the Eggs
Add the eggs one at a time, pulsing briefly after each addition. Continue processing only until the dough begins to come together. Avoid overmixing, which can warm the butter and make the finished crust less tender.
Step 4: Shape and Chill the Dough
Lightly dust a clean work surface with tapioca flour. Transfer the dough to the prepared surface and knead it gently just until it forms a cohesive ball.
Divide the dough into two equal portions and shape each portion into a disk. Wrap both disks tightly in plastic wrap and refrigerate them for at least 2 hours or for up to 2 days. Only one disk is needed to prepare this galette. Keep the second disk refrigerated or freeze it for another galette.
Step 5: Drain the Tomatoes
While the dough chills, cut the tomatoes into slices approximately 1/4 inch thick. Arrange the slices in a single layer on paper towels or a wire rack and sprinkle them lightly with sea salt.
Let the tomatoes rest for 15 to 20 minutes. The salt will draw out some of their excess moisture, helping protect the crust from becoming soggy. Pat the tomato slices dry before adding them to the galette.
Step 6: Prepare the Oven
Position an oven rack in the center of the oven and preheat the oven to 375°F. Lightly sprinkle a large sheet of parchment paper with cornmeal and a small amount of tapioca flour. The parchment will make it easier to transfer the delicate gluten-free dough to the baking sheet.
Step 7: Roll Out the Crust
Remove one disk of chilled dough from the refrigerator and place it on the prepared parchment paper. Roll the dough into a 15-inch round.
Gluten-free pastry may crack slightly around the edges as it is rolled. If cracks form, gently press them together with your fingers. Slide an offset spatula beneath the dough occasionally to keep it from sticking. Transfer the parchment paper with the rolled dough onto a large baking sheet.
Step 8: Add the Cheese and Basil
Sprinkle the shredded Gruyère evenly over the rolled dough, leaving an uncovered 2-inch border around the entire edge. Scatter the chopped fresh basil over the cheese.
Keeping the border clear provides enough dough to fold over the filling. The cheese layer also adds rich flavor while helping separate the pastry from the moist tomatoes.
Step 9: Arrange the Tomatoes
Arrange the drained and dried tomato slices in a slightly overlapping pattern over the cheese and basil.
Keep all the filling inside the uncovered border so the dough can be folded without covering the center completely.
Brush the tomato slices with the extra-virgin olive oil and season them with freshly ground black pepper.
The tomatoes were salted while draining, so taste and season thoughtfully if adding any additional salt.
Step 10: Shape the Galette
Carefully lift and fold the exposed edge of the dough over the outer portion of the filling. Pleat the crust as you work around the galette, leaving the tomatoes in the center visible.
If the pastry develops any cracks or tears, gently pinch them together with your fingers. Brush the exposed folded crust with the lightly beaten egg white to encourage an attractive golden finish.
Step 11: Bake the Galette
Place the baking sheet on the center oven rack and bake the galette for 35 to 45 minutes. It is ready when the crust is deeply golden and crisp, the tomatoes are tender, and the Gruyère is melted and bubbling.
Because ovens can vary, begin checking the galette near the lower end of the baking range. If necessary, continue baking until the bottom and folded edges appear properly browned.
Step 12: Cool and Serve
Remove the baking sheet from the oven. Carefully slide the galette, still supported by the parchment paper, onto a cooling rack.
Let the galette cool for about 10 minutes before slicing. This brief resting period allows the melted cheese and tomato juices to settle, making the galette easier to cut into neat wedges. Serve it warm or at room temperature.
Notes
Keep the butter very cold while making the crust. Small pieces of cold butter release steam as the galette bakes, helping the gluten-free pastry develop flaky layers.
Do not overwork the dough. Process and knead it only until it holds together. Excessive handling can warm the butter and affect the finished texture.
The crust mixture makes two disks, but only one disk is used for this galette. Wrap the unused disk tightly and freeze it for up to 3 months. Thaw it overnight in the refrigerator before rolling.
Chill the dough for at least 2 hours. Proper chilling allows the ingredients to hydrate, makes the gluten-free pastry easier to roll, and helps the crust maintain its shape during baking.
If the chilled dough feels very firm, let it rest briefly at room temperature before rolling. It should be pliable enough to roll without becoming warm or sticky.
Use an offset spatula to loosen the dough occasionally as you roll it. If it begins to stick, add a very light dusting of tapioca flour or cornmeal rather than a heavy coating.
For an especially crisp crust, the rolled dough may be frozen for 10 to 15 minutes before the filling is added. This is an optional step and does not replace the initial 2-hour chilling time.
Draining and drying the tomatoes is important. Tomatoes naturally contain a great deal of water, and removing some of that moisture helps keep the bottom of the galette from becoming soggy.
Choose ripe but firm tomatoes that will hold their shape when sliced. Roma or vine-ripened tomatoes may be used when heirloom tomatoes are unavailable.
Gruyère contributes a savory, nutty flavor and melts smoothly beneath the tomatoes. Shred the cheese before assembling the galette so it can be distributed evenly across the dough.
Sweet rice flour may be substituted for the superfine brown rice flour, although the texture of the finished crust may vary slightly.
Serve the galette on its own as an appetizer or pair it with a lightly dressed green salad for lunch or brunch. It also complements grilled vegetables and simple vegetable soups.
Store leftovers in an airtight container in the refrigerator. Reheat individual wedges in the oven until warmed through to help restore some of the crust’s crisp texture.
Check the labels on the cornmeal, flours, cornstarch, xanthan gum, and all other packaged ingredients to confirm they are gluten-free. Prevent cross-contact during preparation when serving someone with celiac disease or gluten sensitivity.