Make an elegant gluten-free ombre cake with colorful vanilla layers and silky gradient buttercream for birthdays, showers, weddings, and celebrations.
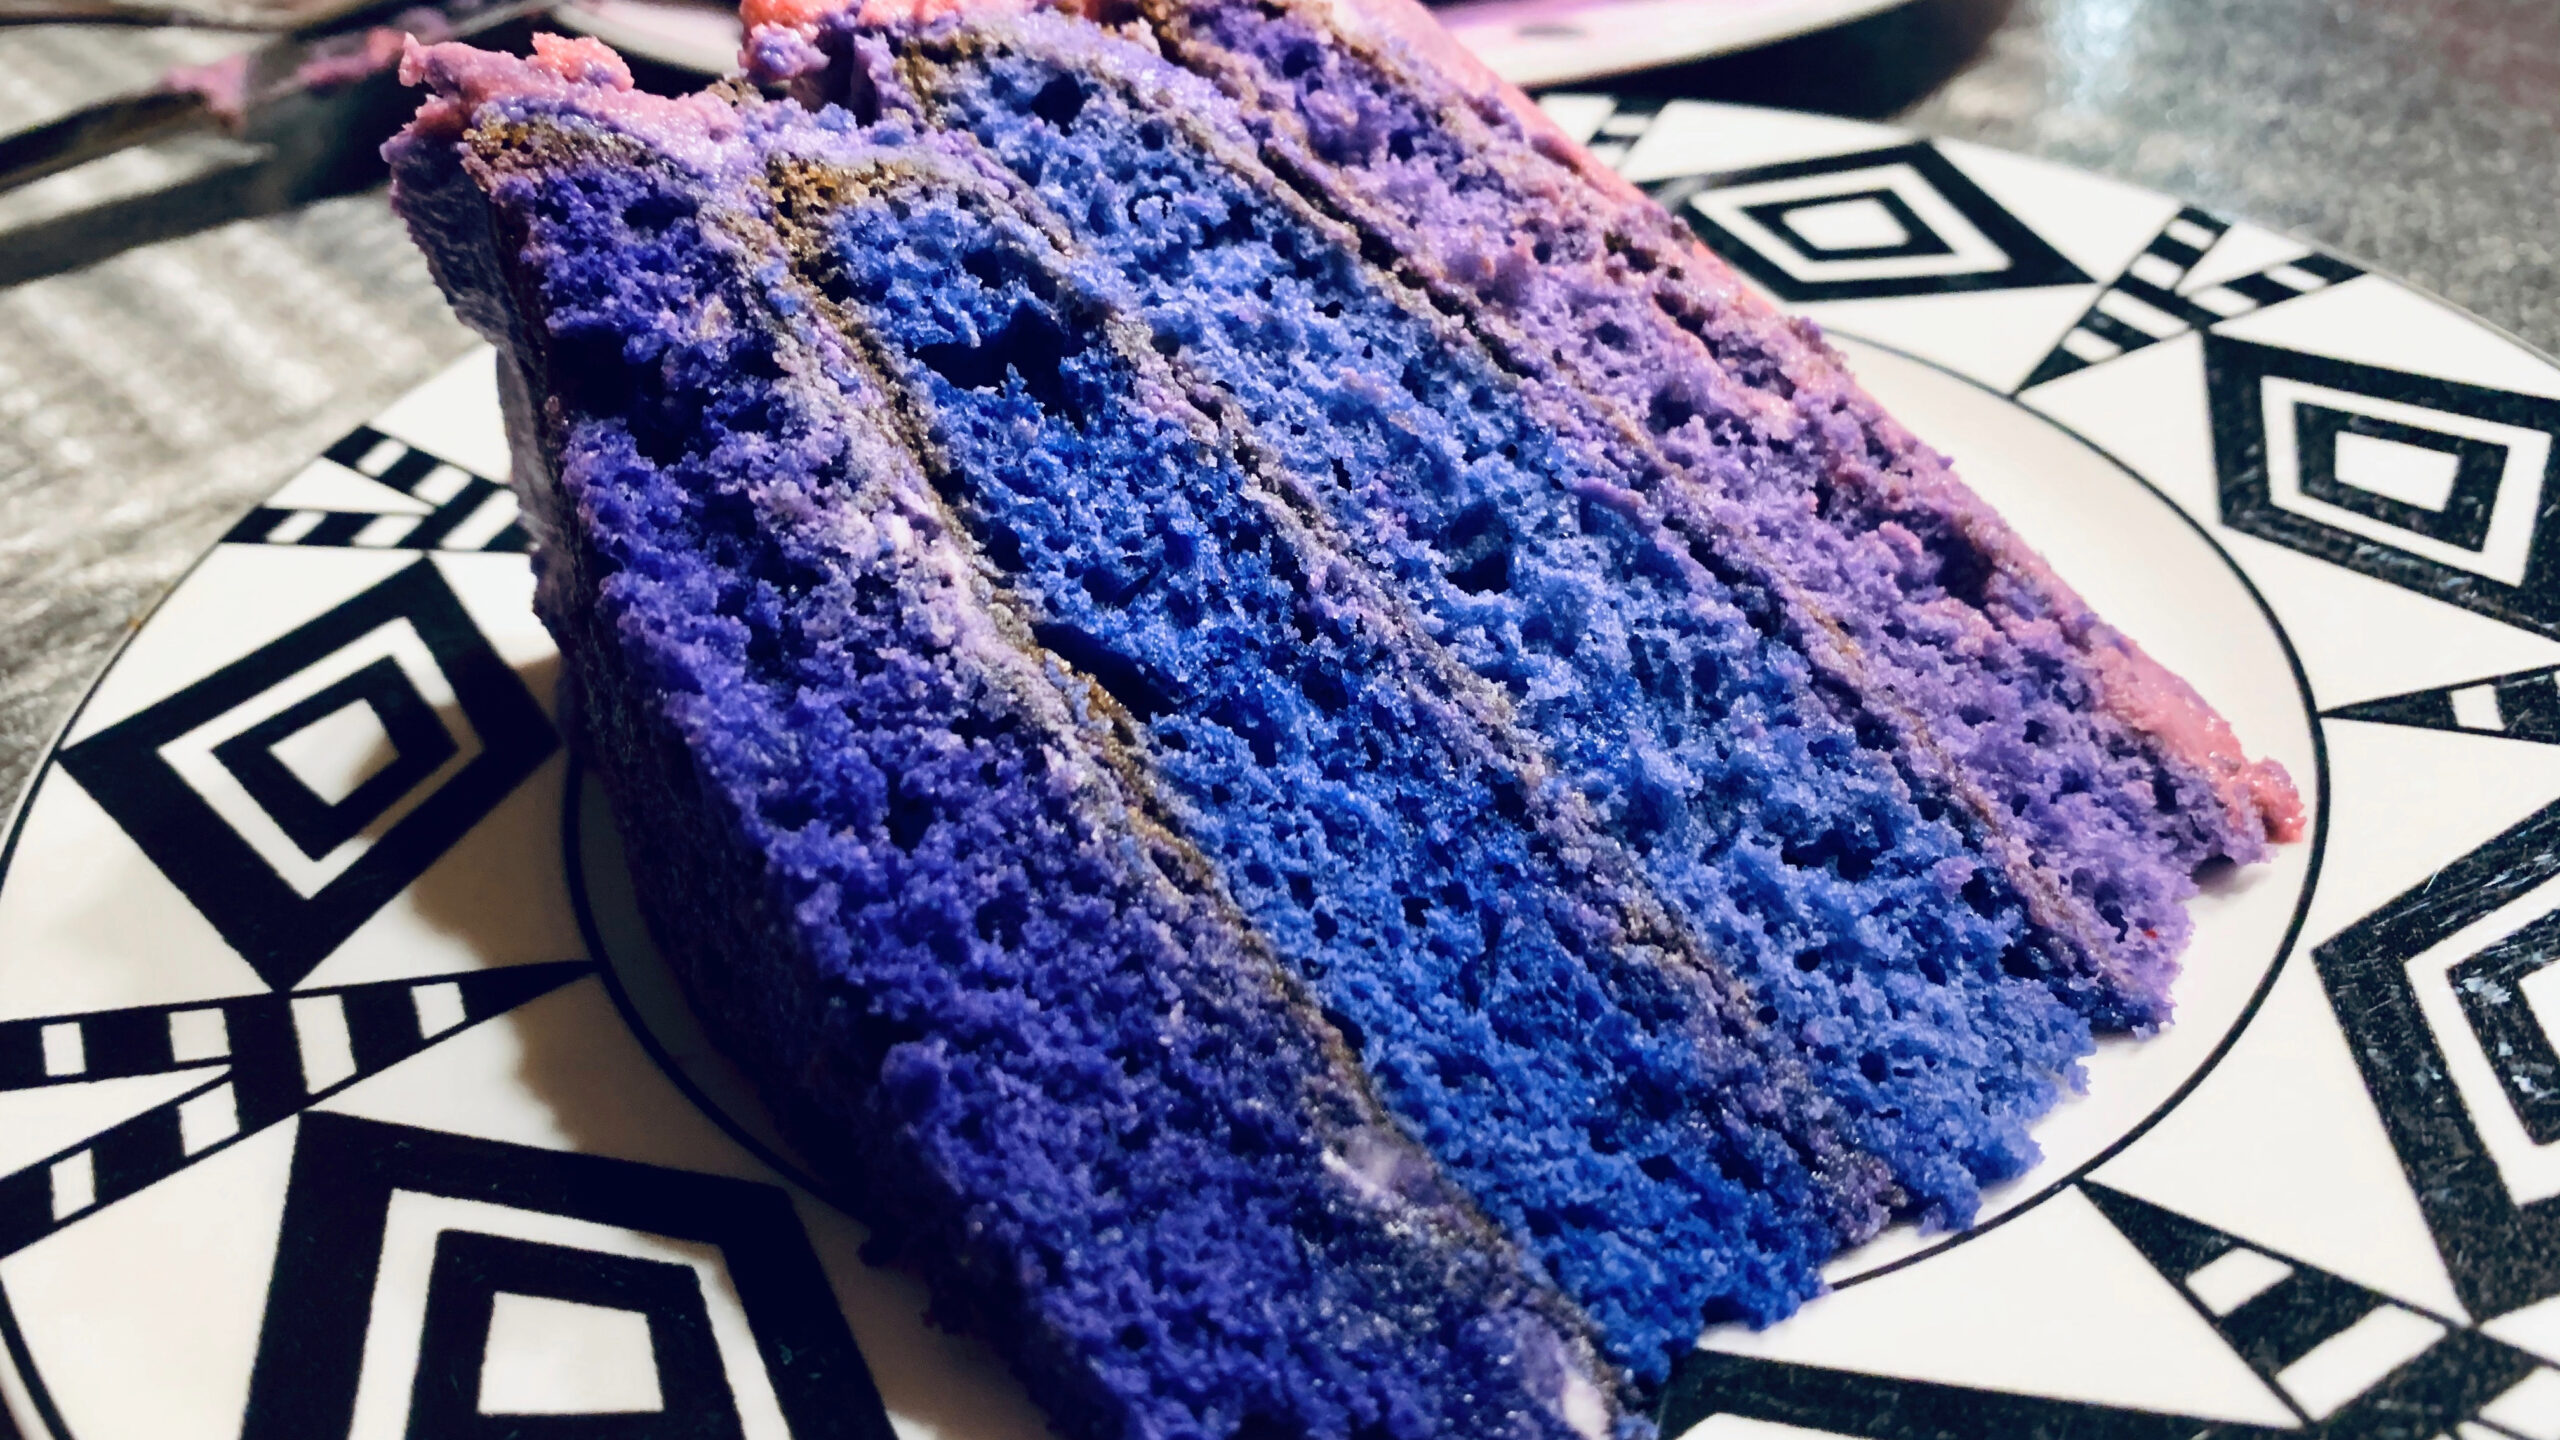
This Elegant Gluten-Free Ombre Cake Recipe transforms a classic vanilla layer cake into a stunning celebration dessert. Graduated cake layers transition from the palest tint to the deepest shade, while silky vanilla buttercream creates a matching ombre finish around the outside.
Unlike a tie-dye cake, which combines several swirling colors, an ombre cake uses increasingly deeper shades of a single color. The result is a smooth, sophisticated gradient that looks beautiful before and after slicing. Choose pink, blue, purple, peach, teal, lavender, or another favorite color to coordinate the cake with your celebration.
Four gluten-free cake batter options make this recipe flexible. You can prepare the cake from scratch with individual gluten-free flours, use a gluten-free all-purpose flour blend, bake with measure-for-measure flour, or start with a gluten-free vanilla cake mix. Choose only one cake batter option and do not combine the formulas.
Finished with homemade vanilla buttercream, this gluten-free ombre cake makes an impressive centerpiece for birthdays, bridal showers, baby showers, weddings, anniversaries, and other special occasions.
Ingredients
Choose One Cake Batter Option
Select one of the following cake batter formulas. Do not combine ingredients from different options.
Option 1: Classic Gluten-Free Vanilla Layer Cake From Scratch
1/2 cup plus 1 tablespoon sweet rice flour
1/2 cup white rice flour
1/2 cup plus 1 tablespoon tapioca flour
1/4 cup brown rice flour
3/4 teaspoon xanthan gum
1 teaspoon baking powder
1/2 teaspoon baking soda
1/2 teaspoon kosher salt
1/2 cup unsalted butter, softened, or 1/2 cup neutral oil
1 cup granulated sugar
4 large eggs, at room temperature
2 teaspoons pure vanilla extract
1/2 cup whole milk or buttermilk, at room temperature
8 ounces sour cream, at room temperature
Option 2: Gluten-Free Vanilla Cake With All-Purpose Flour
2 1/4 cups gluten-free all-purpose flour
1 teaspoon xanthan gum or guar gum, if the flour blend does not already contain one
1 3/4 cups granulated sugar
1 cup unsalted butter, softened
1 teaspoon kosher salt
2 1/2 teaspoons baking powder
1 tablespoon pure vanilla extract
4 large eggs, at room temperature
1 cup whole milk, at room temperature
Option 3: Measure-for-Measure Gluten-Free Vanilla Cake
1 3/4 cups measure-for-measure gluten-free flour
1/2 cup unsalted butter, softened
1 cup granulated sugar
3 large eggs, at room temperature
2 teaspoons pure vanilla extract
1/2 cup whole milk, at room temperature
Option 4: Gluten-Free Vanilla Cake Mix
1 package (15 to 16 ounces) gluten-free vanilla cake mix
Ingredients called for on the package, typically eggs, oil, and water or milk
1 teaspoon pure vanilla extract
1/4 cup sour cream or plain Greek yogurt, optional
2 tablespoons melted butter, optional
For the Homemade Vanilla Buttercream Frosting
3 sticks unsalted butter, at room temperature
4 1/2 cups powdered sugar, sifted
1 tablespoon pure vanilla extract
3 to 5 tablespoons heavy cream
1/2 teaspoon kosher salt
For the Ombre Effect
Gel food coloring in one preferred color, such as pink, blue, purple, peach, teal, or lavender
Directions
Step 1: Prepare the Cake Pans
Preheat the oven to 350°F. Grease four 6-inch round cake pans or three 8-inch round cake pans and line the bottoms with parchment paper.
If using three 8-inch pans to create four distinct layers, reserve one portion of batter and bake it after one pan becomes available. Let the used pan cool before greasing, lining, and filling it again. This second baking round may increase the total preparation time.
Step 2: Prepare Cake Batter Option 1
If using butter, whisk the sweet rice flour, white rice flour, tapioca flour, brown rice flour, xanthan gum, baking powder, baking soda, and salt together in a bowl.
In a separate large bowl, beat the softened butter and sugar until light and fluffy. Add the eggs one at a time, beating well after each addition. Mix in the vanilla.
Alternate adding the dry ingredients and the milk or buttermilk, mixing just until combined after each addition. Fold in the sour cream until the batter is smooth and evenly blended.
If using neutral oil instead of butter, mix the oil and sugar together rather than attempting to cream them. Continue with the eggs, vanilla, dry ingredients, milk or buttermilk, and sour cream as directed.
Proceed to Step 6 after preparing the batter.
Step 3: Prepare Cake Batter Option 2
Whisk the gluten-free all-purpose flour, xanthan gum or guar gum if needed, salt, and baking powder together in a bowl.
In a separate large bowl, beat the softened butter and sugar until light and fluffy. Add the eggs one at a time, followed by the vanilla.
Alternate adding the dry ingredients and milk, mixing only until the batter is smooth and combined. Proceed to Step 6.
Step 4: Prepare Cake Batter Option 3
Place the measure-for-measure gluten-free flour in a medium bowl.
In a separate large bowl, beat the softened butter and sugar until light and fluffy. Add the eggs one at a time, beating well after each addition. Mix in the vanilla.
Alternate adding the flour and milk, mixing just until combined. Proceed to Step 6.
Step 5: Prepare Cake Batter Option 4
Prepare the gluten-free vanilla cake mix according to the package directions, using the eggs, oil, and water or milk specified on the package.
Mix in the vanilla. Add the optional sour cream or plain Greek yogurt and melted butter, if using, and blend until evenly incorporated.
Step 6: Color the Ombre Cake Layers
Divide the prepared batter evenly among four bowls. A digital kitchen scale can help create evenly sized cake layers.
Leave the first bowl plain. Add a very small amount of gel food coloring to the second bowl to create a pale shade. Add a little more coloring to the third bowl to produce a medium shade. Color the fourth bowl with enough gel food coloring to create the darkest shade.
Use the same color in every bowl, gradually increasing the amount. Add the coloring carefully because gel food coloring is highly concentrated.
Step 7: Bake the Cake Layers
Transfer each shade of batter to a separate prepared cake pan and smooth the top.
Bake for 28 to 35 minutes, or until a toothpick inserted into the center of each layer comes out clean. Oven temperatures and baking times can vary, so begin checking the layers near the lower end of the baking range.
Allow the cakes to cool in their pans for 10 minutes. Carefully turn them out onto wire racks, remove the parchment paper, and let them cool completely before assembling the cake.
Step 8: Make the Vanilla Buttercream
Place the room-temperature butter in a large mixing bowl. Beat until smooth and creamy.
Gradually add the sifted powdered sugar, mixing on low speed until incorporated. Add the vanilla, salt, and 3 tablespoons of heavy cream.
Beat the frosting for several minutes, or until it becomes light and fluffy. Add more heavy cream, 1 tablespoon at a time, as needed to create a smooth, spreadable consistency.
Step 9: Assemble the Ombre Cake
Place the darkest cake layer on a serving plate or cake board. Spread an even layer of vanilla buttercream over the top.
Add the next darkest layer and cover it with another even layer of buttercream. Continue stacking and frosting the remaining layers, finishing with the lightest or uncolored layer on top.
Apply a thin layer of buttercream over the top and sides to create a crumb coat. Chill the cake until the crumb coat is firm before adding the final ombre frosting.
Step 10: Color the Ombre Buttercream
Divide the remaining buttercream among four bowls. Leave one portion white.
Tint the other three portions with increasingly larger amounts of the same gel food coloring used for the cake. Create one light shade, one medium shade, and one dark shade.
Step 11: Frost the Cake
Spread the darkest buttercream around the bottom section of the cake. Apply the medium shade around the middle, followed by the light frosting near the top. Cover the top and upper edge with white buttercream.
Hold a bench scraper or offset spatula against the side of the cake and gently smooth the frosting as you rotate the cake. Continue smoothing until the boundaries between the colors soften and form an elegant gradient.
Avoid over-smoothing the frosting, which can blend the colors together too thoroughly and reduce the definition of the ombre effect.
Step 12: Decorate the Cake
Use any remaining buttercream to pipe swirls around the top edge. Decorate the cake with fresh flowers, edible flowers, white chocolate curls, sprinkles, pearl dragées, or gold leaf, if desired.
Confirm that all decorations are food-safe and appropriately labeled gluten-free when preparing the cake for someone with celiac disease or gluten sensitivity.
Step 13: Chill and Serve
Chill the finished cake for 20 to 30 minutes to help the buttercream set. Before serving, allow it to soften slightly at room temperature for the best flavor and texture.
Cut the cake with a sharp knife, wiping the blade clean between slices. Each serving will reveal the graduated cake layers inside and the matching ombre buttercream outside.
Notes
Choose only one cake batter option. The four formulas are alternatives and should not be combined.
Use gel food coloring rather than liquid food coloring. Gel produces deeper color without adding enough liquid to noticeably change the consistency of the cake batter or buttercream.
Add the coloring gradually. It is easier to deepen a pale shade than to lighten a color that has become too dark.
A digital kitchen scale makes it easier to divide the cake batter and buttercream evenly. Equal batter portions help the cake layers bake at a similar rate and create a balanced appearance when stacked.
Pastel colors create a soft and elegant cake for weddings, bridal showers, and baby showers. More concentrated shades produce a bold centerpiece for birthdays and other celebrations.
Cool every cake layer completely before adding the buttercream. Warm layers can soften or melt the frosting and cause the stacked cake to shift.
Chilling the crumb-coated cake before applying the final frosting creates a firmer, smoother surface and makes the ombre buttercream easier to blend.
When using three 8-inch pans for four batter colors, the fourth layer must be baked after one pan is available. This may extend the recipe’s total time.
Store the cake covered in the refrigerator for up to 5 days. Allow refrigerated slices to come closer to room temperature before serving for the best cake and buttercream texture.
Check the labels on the flour, cake mix, food coloring, powdered sugar, decorations, and other packaged ingredients to confirm they meet your gluten-free needs. Prevent cross-contact by using clean bowls, utensils, pans, and work surfaces.