Make a fluffy gluten-free classic vanilla cake with creamy homemade vanilla buttercream, fresh berries, and helpful tips for baking and decorating.
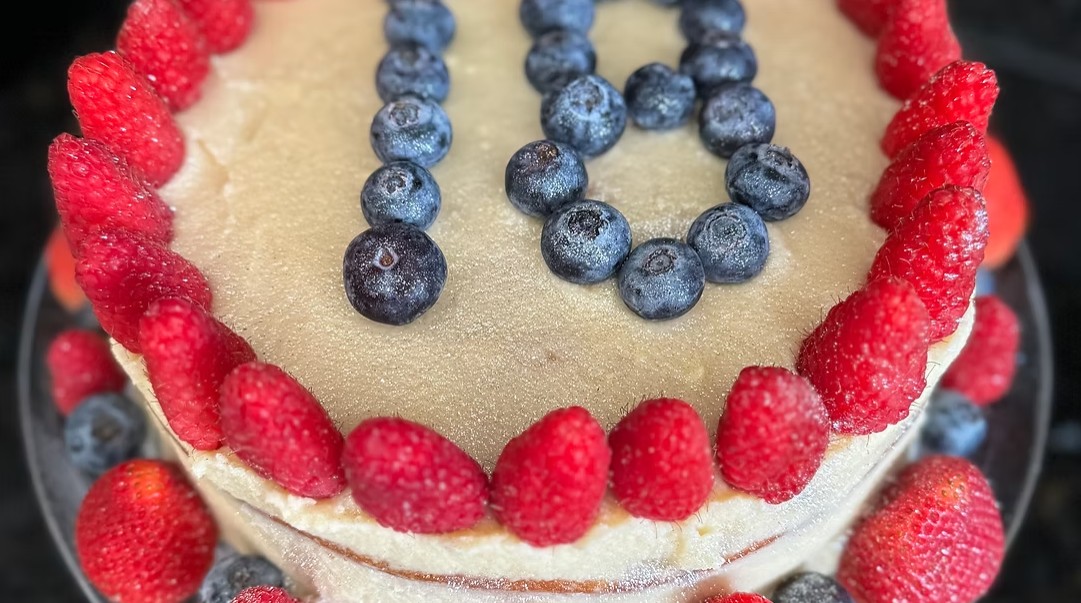
Soft, buttery, and fragrant with vanilla, this Fluffy Gluten-Free Classic Vanilla Cake Recipe brings a timeless dessert to birthdays, holidays, and family celebrations. Homemade vanilla buttercream adds a creamy finish, while fresh berries, colorful sprinkles, or white chocolate curls make the cake easy to decorate for any occasion.
This collection includes four approaches: an individual gluten-free flour blend, gluten-free all-purpose flour, Measure for Measure flour, and a gluten-free vanilla cake mix. Choose one cake option and pair it with the buttercream below. Each option has its own ingredient quantities and preparation instructions, so keep the formulas separate.
For a tender cake and smooth frosting, measure carefully, use softened butter where specified, and let the layers cool completely before assembling. The Measure for Measure option in the supplied recipe needs clarification before baking because its ingredient list does not include a leavening agent.
Ingredients
Choose one cake option below. Prepare one batch of vanilla buttercream for your selected cake.
Option 1: Vanilla Cake with an Individual Gluten-Free Flour Blend
1/2 cup plus 1 tablespoon sweet rice flour
1/2 cup white rice flour
1/2 cup plus 1 tablespoon tapioca flour
1/4 cup brown rice flour
3/4 teaspoon xanthan gum
1 teaspoon baking powder
1/2 teaspoon baking soda
1/2 teaspoon kosher salt
1/2 cup unsalted butter, softened, or 1/2 cup neutral oil
1 cup granulated sugar
4 large eggs, at room temperature
2 teaspoons pure vanilla extract
1/2 cup whole milk or buttermilk, at room temperature
8 ounces sour cream, at room temperature
Option 2: Vanilla Cake with Gluten-Free All-Purpose Flour
2 1/4 cups gluten-free all-purpose flour
1 teaspoon xanthan gum or guar gum, only if the flour blend does not already contain either
1 3/4 cups granulated sugar
1 cup unsalted butter, softened
1 teaspoon kosher salt
2 1/2 teaspoons baking powder
1 tablespoon pure vanilla extract
4 large eggs, at room temperature
1 cup whole milk, at room temperature
Option 3: Vanilla Cake with Measure for Measure Gluten-Free Flour
The following quantities are preserved from the supplied recipe. This option is incomplete: the leavening ingredient and amount need confirmation before baking.
1 3/4 cups Measure for Measure gluten-free flour
1/2 cup unsalted butter, softened
1 cup granulated sugar
3 large eggs, at room temperature
2 teaspoons pure vanilla extract
1/2 cup whole milk, at room temperature
Option 4: Gluten-Free Vanilla Cake Mix
1 package gluten-free vanilla cake mix, 15 to 16 ounces
Eggs, oil, and water or milk in the quantities specified on the package
1 teaspoon pure vanilla extract
1/4 cup sour cream or plain Greek yogurt, optional
2 tablespoons melted butter, optional
Homemade Vanilla Buttercream
1 1/2 cups unsalted butter, at room temperature, equivalent to 3 sticks
4 1/2 cups powdered sugar, sifted
1 tablespoon pure vanilla extract
3 to 5 tablespoons heavy cream
1/2 teaspoon kosher salt
Optional Decorations
Gluten-free rainbow sprinkles
Fresh strawberries, raspberries, or blueberries
Food-grade edible flowers
White chocolate curls
Chocolate shavings
Colorful sanding sugar
Fresh mint leaves
Lemon zest
Seasonal fruit
Decorative cake toppers
Directions
Step 1: Select Your Cake Option and Prepare the Pans
Choose one cake formula. Do not combine the ingredient lists.
For Option 1, preheat the oven to 350°F and prepare three 6-inch round cake pans. For Option 2, preheat the oven to 350°F and prepare two 9-inch round cake pans. Lightly grease the pans, line their bottoms with parchment paper, and lightly grease the parchment.
For Option 4, follow the cake mix package for oven temperature, pan size, and pan preparation. The supplied recipe suggests round layers, a sheet cake, or cupcakes, but the package should determine which sizes suit your particular mix.
Option 3 specifies two 8-inch round pans and a 350°F oven, but it should not be baked until its missing leavening information is confirmed.
Step 2: Measure and Prepare the Ingredients
Bring the refrigerated ingredients for your selected homemade cake to room temperature before mixing. The butter should be soft enough to cream easily while still holding its shape.
Spoon the gluten-free flours into measuring cups and level the tops with a straight edge. Measure the remaining ingredients before beginning so you can follow your selected formula without interruption.
Step 3: Prepare Option 1 Batter
Whisk together the sweet rice flour, white rice flour, tapioca flour, brown rice flour, xanthan gum, baking powder, baking soda, and salt.
In a separate bowl, stir together the milk or buttermilk and sour cream until smooth.
Beat the softened butter and sugar on medium speed for 3 to 4 minutes, until pale and fluffy. If using the neutral oil alternative, whisk the oil and sugar together until combined.
Add the eggs one at a time, mixing after each addition. Scrape the bowl as needed, then mix in the vanilla.
On low speed, add the dry ingredients in portions, alternating with the milk and sour cream mixture. Begin and end with the dry ingredients. Mix until fully incorporated, then divide evenly among the three prepared 6-inch pans.
Step 4: Prepare Option 2 Batter
Whisk together the gluten-free all-purpose flour, baking powder, salt, and xanthan gum or guar gum if needed.
In a separate mixing bowl, beat the butter and sugar on medium speed for 3 to 4 minutes, until light and fluffy.
Add the eggs one at a time, beating after each addition and scraping the bowl as necessary. Mix in the vanilla.
Add the flour mixture in portions, alternating with the milk. Begin and end with the flour mixture, mixing until the batter is evenly combined. Divide between the two prepared 9-inch pans and smooth the tops.
Step 5: Review Option 3 Before Proceeding
The supplied Measure for Measure formula lists flour, butter, sugar, eggs, vanilla, and milk, but no baking powder or baking soda. Its listed method is to cream the butter and sugar, add the eggs and vanilla, then incorporate the flour and milk.
Its stated baking time is 20 to 24 minutes in two 8-inch pans at 350°F. These details are retained for reference, but the formula needs its leavening information confirmed before it can be presented as a complete baking option.
Step 6: Prepare Option 4 Batter
Prepare the gluten-free cake mix using the ingredients and mixing instructions printed on the package.
Add the vanilla extract with the wet ingredients. If using the optional sour cream or Greek yogurt and melted butter, incorporate them with the wet ingredients as well.
Transfer the batter to the pan or pans recommended on the package. The optional additions may affect baking time and texture, so check the finished cake for doneness rather than relying on time alone.
Step 7: Bake Your Selected Cake
Bake Option 1 for 29 to 33 minutes.
Bake Option 2 for 25 to 30 minutes.
Bake Option 4 according to the package directions.
Check that a toothpick inserted into the center comes out clean or with a few moist crumbs. The tops should spring back lightly when gently touched. Baking times vary with the oven and pans, so use these signs alongside the stated time.
Step 8: Cool the Layers
Place the pans on wire racks and let the homemade cake layers cool in their pans for about 10 minutes. For the cake mix version, follow the package cooling instructions.
Loosen the edges carefully, turn the layers onto racks, and remove the parchment. Let them cool completely before frosting. Allow approximately 45 minutes for cooling, with additional time as needed.
Step 9: Make the Vanilla Buttercream
Beat the softened butter on medium speed for 2 to 3 minutes, until smooth and creamy.
Add the sifted powdered sugar in three additions, mixing on low speed after each addition. Mix in the vanilla and salt.
Add the heavy cream 1 tablespoon at a time, using 3 to 5 tablespoons to reach a spreadable consistency. Beat on medium-high speed for another 2 to 3 minutes, until fluffy.
If the frosting becomes too soft to spread neatly, refrigerate it for 10 to 15 minutes before continuing.
Step 10: Fill and Stack the Cake
Place one completely cooled layer on a cake stand or serving plate. Spread approximately 1/2 cup of buttercream over the surface.
Add the next layer. For the three-layer cake, spread another layer of buttercream over the second layer before adding the third.
Check that the cake is level. If desired, position the top layer with its flat bottom facing upward for an even frosting surface.
Step 11: Apply the Crumb Coat
Spread a thin layer of buttercream over the top and sides to hold loose crumbs in place.
Refrigerate for about 15 minutes, until the coating feels firm. Spread the remaining buttercream over the cake, reserving some for piping if desired.
For a sheet cake or cupcakes, spread or pipe the buttercream directly onto the completely cooled cake.
Step 12: Decorate and Serve
Finish with fresh berries, gluten-free sprinkles, white chocolate curls, or another decoration from the ingredient list.
Slice and serve the layer cake once decorated. If it has been refrigerated, allow about 30 minutes at room temperature before serving so the buttercream can soften.
Notes
Choose one complete cake option and follow its matching ingredient list and directions. The four formulas use different quantities and should not be combined or treated as direct flour substitutions.
The Measure for Measure option in the supplied recipe does not list baking powder or baking soda. Its leavening ingredient and amount need confirmation before baking. Use one of the other cake options until that information is available.
Use room-temperature eggs, milk, and sour cream where specified. Butter should be softened but not melted so it creams smoothly with the sugar.
Measure gluten-free flour using the spoon-and-level method. Spoon the flour into the measuring cup, then level the surface with a straight edge rather than scooping directly from the container.
For the gluten-free all-purpose flour option, add xanthan gum or guar gum only if the flour blend does not already contain a binder.
Allow the cake layers to cool completely before frosting. Warm layers can soften the buttercream and cause the filling to slide. If the layers have domed tops, trim them after cooling for a more even stack.
Sift the powdered sugar before making the buttercream. Add the cream gradually until the frosting reaches your preferred consistency. If it becomes too soft, refrigerate it for 10 to 15 minutes before decorating.
The total time includes a 15-minute chill for the crumb coat. Cooling may take longer than 45 minutes, depending on the size of the layers and the temperature of your kitchen.
For cupcakes, the source suggests baking the homemade batters at 350°F for approximately 20 to 22 minutes, with liners filled about two-thirds full. Yield varies by formula. Follow the package instructions when using a cake mix.
For a sheet cake, the source suggests a 9 × 13-inch pan and approximately 35 to 40 minutes at 350°F. The formulas produce different amounts of batter, so cake thickness and baking time will vary. Follow the package pan recommendations for the cake mix option.
For an optional dairy-free variation, substitute dairy-free butter, milk, sour cream or plain yogurt, and a heavy cream alternative where needed. Check the cake mix ingredients as well. Substitutions may affect the cake’s texture and the frosting’s consistency.
For the optional passion fruit variation, replace 2/3 cup of the milk in the gluten-free all-purpose flour option with passion fruit puree, leaving 1/3 cup of milk. Passion fruit concentrate varies in strength and should not automatically replace puree in the same amount.
Fresh berries, gluten-free sprinkles, citrus zest, and white chocolate curls make simple decorations.
Raspberry preserves or strawberry jam can also be spread between the layers for additional flavor.
To prepare ahead, cool the unfrosted cake layers completely before wrapping them tightly. Freeze for up to 3 months, then thaw the wrapped layers in the refrigerator before decorating.
Keep the finished cake covered and refrigerated, especially when decorated with fresh fruit or filled with cream, mousse, or curd. Allow refrigerated servings to sit at room temperature for about 30 minutes before serving to soften the buttercream.
Check flour blends, cake mixes, flavorings, sprinkles, and decorations for appropriate gluten-free labeling. Use clean pans, utensils, and preparation surfaces to prevent cross-contact.