Rosemary with Ladybugs: Nature’s Tiny Garden Guardians
Discover how seeing rosemary with ladybugs on it can support a balanced garden, plus tips for attracting beneficial insects and managing pests naturally.
Rosemary brings year-round beauty, fragrance, and flavor to the garden. Its slender evergreen leaves release a fresh, woodsy aroma, while its delicate flowers can provide nectar for visiting pollinators. When ladybugs appear among the branches, this familiar culinary herb becomes part of an even more fascinating garden ecosystem.
Ladybugs, also called lady beetles, are often welcomed because many species feed on aphids and other soft-bodied garden pests. Rosemary is not guaranteed to attract or retain them, but a healthy, diverse garden can provide the food, shelter, and water they need. Together, rosemary and ladybugs offer a lovely reminder that some of the best garden care begins with supporting natural balance.
Why Ladybugs Are Valuable Garden Visitors
Ladybugs are best known for eating aphids, which are small sap-feeding insects that can gather on tender stems, buds, and new growth. Depending on the species and life stage, ladybugs may also consume mites, scale insects, insect eggs, and other tiny prey.
Both adult ladybugs and their larvae can be beneficial. Ladybug larvae look very different from the rounded adults. They are elongated, dark-colored, and often marked with orange or yellow. Gardeners unfamiliar with their appearance sometimes mistake them for harmful insects, so learning to recognize them can help protect these hardworking predators.
Not every ladybug species has the same diet, and their presence does not guarantee complete pest control. They are most effective as part of a broader garden-care approach that includes plant health, regular observation, and thoughtful pest management.
Does Rosemary Attract Ladybugs?
Rosemary does not serve as a primary food source for most predatory ladybugs, but it can contribute to a welcoming habitat. Its dense, branching growth offers places to crawl, hunt, and temporarily shelter. When rosemary flowers, the blooms may also provide nectar or pollen for beneficial insects.
Ladybugs are more likely to remain where suitable prey is available. A garden containing aphids and other small insects may naturally draw ladybugs searching for food. Once the prey population declines, the beetles may move elsewhere. This movement is normal and does not mean the garden has failed to support them.
A diverse landscape is usually more inviting than a garden planted with rosemary alone. Flowering herbs and small, nectar-rich flowers can help create a more dependable habitat throughout the growing season.
Creating a Ladybug-Friendly Garden Around Rosemary
Plant rosemary in a location that receives plenty of sunlight and has excellent drainage. Established plants generally tolerate dry conditions better than consistently wet soil. Water deeply when needed, then allow the soil to begin drying before watering again. Exact moisture requirements will vary with the climate, container size, soil, and maturity of the plant.
Surrounding rosemary with a variety of herbs and flowers can provide beneficial insects with additional shelter and food. Dill, fennel, cilantro, sweet alyssum, yarrow, and calendula are often included in insect-friendly gardens, although their performance and suitability depend on local growing conditions.
A shallow water source can also support small garden visitors. Place pebbles in a shallow dish so insects have safe landing places, and refresh the water regularly to keep it clean and discourage mosquitoes.
Avoid immediately removing every aphid at the first sign of activity. A small, manageable population provides food for ladybugs and other predators. Check the plant frequently, however, because a rapidly growing infestation may still require intervention.
Avoiding Practices That Harm Beneficial Insects
Broad-spectrum insecticides can kill helpful insects along with the pests they are intended to control. Even products commonly described as natural or organic may harm ladybugs if sprayed directly on them. Always read the product label, follow its directions, and begin with the least disruptive solution appropriate for the problem.
For a light aphid infestation, a firm stream of water may be enough to dislodge many of the insects. Pruning a heavily affected stem can also help when the problem is limited to one area. Before applying any treatment, inspect the plant for ladybug adults, larvae, pupae, and eggs.
Ladybug eggs are usually small, yellow to orange, and laid in clusters, often near a food source. Pupae may appear attached to a leaf or stem. Leaving these life stages undisturbed gives the next generation an opportunity to mature in the garden.
Should You Purchase Ladybugs?
Released ladybugs often disperse soon after they are introduced, especially if the garden lacks food, water, or shelter. Creating suitable habitat is generally more dependable than expecting purchased insects to remain on a single rosemary plant.
If you choose to purchase ladybugs, learn how they were collected and confirm that the species is appropriate for your region. Follow the supplier’s release guidance, avoid releasing them onto recently treated plants, and remember that no release can guarantee long-term residence or pest control.
Encouraging locally occurring predators can support more than ladybugs. Lacewings, hoverfly larvae, predatory beetles, spiders, and tiny parasitoid wasps may also help keep pest populations in check.
Recognizing Problems on Rosemary
Rosemary is often considered relatively resilient, but stressed plants may become more vulnerable to pests and disease. Aphids usually gather around tender new growth. Spider mites can cause fine stippling or faded foliage and may leave delicate webbing. Spittlebugs create noticeable masses of white foam around stems.
Yellowing leaves, darkened roots, and declining growth may indicate overly wet soil or poor drainage rather than insect damage. Before treating a rosemary plant for pests, examine its growing conditions. Correcting drainage, light, airflow, or watering problems may be the most important step.
Growing Rosemary in Containers
Container-grown rosemary is a practical choice in cold climates or gardens with heavy soil. Select a pot with drainage holes and use a well-draining potting mixture. Because containers can dry quickly, check the soil regularly without keeping it constantly wet.
Place the container where the plant receives strong light and has good air circulation. In regions where rosemary is not reliably winter hardy, move the plant to a protected location before damaging freezes arrive. Winter care will depend on the variety, climate, and indoor growing conditions.
Ladybugs may visit container herbs outdoors, but they are unlikely to remain on an isolated plant without prey or supporting habitat. Grouping rosemary with other insect-friendly container plants can create a more appealing miniature garden.
A Healthier Garden Through Natural Balance
Rosemary and ladybugs make a charming combination, but their relationship represents something larger. A healthy garden is not completely free of insects. It is a living community in which plants, predators, pollinators, and prey interact.
By growing vigorous rosemary, planting a diversity of flowers, limiting disruptive sprays, and observing insects before reacting, gardeners can make space for natural pest control. Ladybugs may be tiny, but their presence can reveal that a garden is becoming a richer and more balanced habitat.
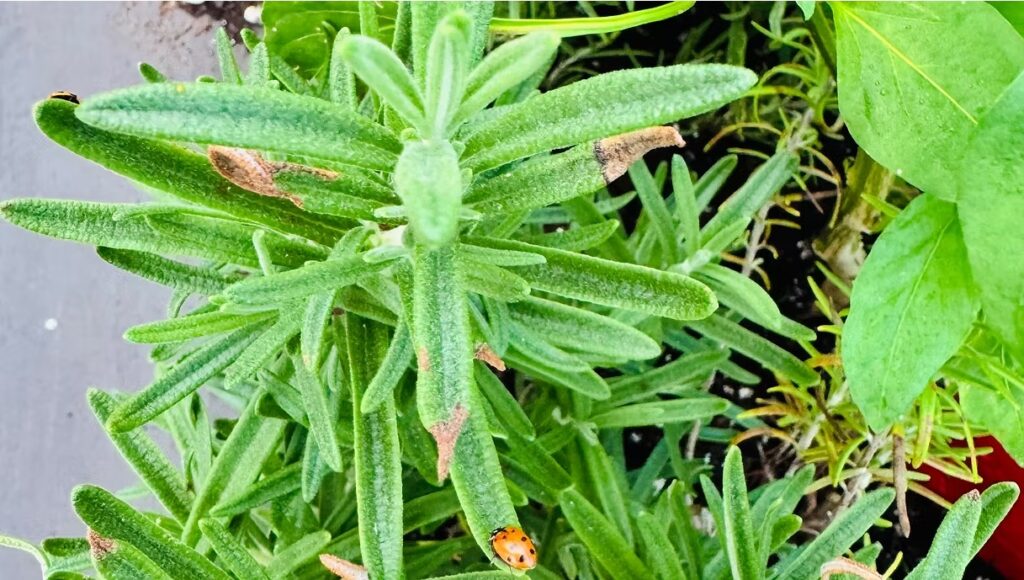
A ladybug explores the aromatic green leaves of a rosemary plant.A ladybug explores the aromatic green leaves of a rosemary plant.
Discover how to grow, care for, harvest, and enjoy rosemary blossoms, including flowering tips, pollinator benefits, and safe culinary uses. Rosemary is treasured for its fragrant, needle-shaped leaves, but its delicate blossoms deserve just as much attention. These tiny flowers bring shades of blue, violet, pink, or white to the herb garden while attracting bees, butterflies, and other beneficial pollinators. Their soft color and petite shape create a beautiful contrast with rosemary’s evergreen foliage. Rosemary blossoms are also edible when they come from a correctly identified culinary rosemary plant that has not been treated with products unsuitable for edible crops. Their flavor resembles rosemary leaves but is usually milder, sweeter, and less resinous. Fresh blossoms can add color and a subtle herbal note to salads, breads, vegetables, desserts, drinks, and savory dishes. Whether rosemary is growing in a garden bed, along a pathway, or in a sunny container, flowering is a rewarding sign of the plant’s natural growth cycle. Understanding what encourages blossoms can help gardeners enjoy a rosemary plant that is productive, fragrant, attractive, and valuable to pollinators. What Are Rosemary Blossoms? Rosemary blossoms are the small, two-lipped flowers produced by culinary rosemary, botanically known as Salvia rosmarinus. The plant was formerly classified as Rosmarinus officinalis, so both names may appear on plant tags and in gardening references. Rosemary belongs to the mint family, Lamiaceae. Like many members of this family, it has aromatic foliage and flowers arranged along its stems. The blossoms are usually pale blue or violet-blue, although certain cultivars may produce deeper blue, pink, lavender, or white flowers. The flowers form in small clusters near the leaves, often covering portions of the stems with a soft haze of color. Although each flower is tiny, a mature rosemary shrub in full bloom can create an impressive display. When Does Rosemary Bloom? Rosemary’s flowering season depends on the cultivar, climate, plant maturity, and growing environment. In mild Mediterranean-style climates, outdoor plants may begin flowering during winter or early spring. Some plants continue into summer or produce another lighter flush of blossoms in fall. In colder regions, rosemary grown outdoors may bloom primarily in spring or summer. Container plants moved indoors for winter can follow a different schedule because temperature, day length, light exposure, and humidity affect their growth. A healthy rosemary plant may not flower on precisely the same schedule every year. Weather patterns, pruning time, winter protection, and the amount of sunlight the plant receives can all influence blossom production. How to Encourage Rosemary Blossoms Rosemary generally produces its best flowers when its growing conditions resemble its native Mediterranean environment. Abundant sunlight, excellent drainage, moderate fertility, and good air circulation support healthy foliage and blooming. Place rosemary where it can receive at least six hours of direct sunlight daily. Plants grown in partial shade may survive, but they can become thin, produce less vigorous growth, and flower less generously. Avoid planting rosemary in areas that remain wet after rainfall. The herb performs best in loose, sharply draining soil and may decline in dense clay or waterlogged ground. Raised beds, slopes, gravel gardens, and containers with drainage holes can provide better conditions when native soil drains poorly. Rosemary does not usually need heavily enriched soil. Excessive fertilizer, particularly products high in nitrogen, may encourage leafy growth without improving flower production. In-ground plants growing well in suitable soil often require little or no supplemental feeding. Container-grown plants may benefit from light feeding during the active growing season, depending on the potting mix and plant condition. Watering Rosemary Correctly Newly planted rosemary needs regular attention while its roots become established. Water deeply when the upper layer of soil begins to dry, but do not keep the ground constantly damp. Established rosemary is relatively drought tolerant, although that does not mean it should be neglected during prolonged hot, dry weather. Water according to the plant’s environment, soil, and appearance rather than following a rigid schedule. Container-grown rosemary generally dries more quickly than rosemary planted in the ground. Check the potting mix regularly, especially during summer, and water thoroughly when needed. Allow excess water to drain completely, and never leave the container standing in water. Yellowing foliage, wilting in wet soil, or darkened stems near the base may indicate excessive moisture or root problems. Wilting can also result from dry soil, so check the moisture level before watering again. Pruning Without Sacrificing the Flowers Pruning keeps rosemary compact, encourages branching, and helps prevent the plant from becoming sparse or woody. Timing matters when blossoms are one of the main attractions. Rosemary often flowers on growth formed during the previous season. Heavy pruning before the expected bloom may remove developing buds. If you want to enjoy the flowers, wait until the main display has finished before giving the plant its annual trim. Use clean, sharp pruners and shorten flexible green stems to shape the plant. Avoid cutting deeply into old, leafless wood because rosemary may not readily produce new growth from bare sections. Light harvesting throughout the growing season can encourage a bushier shape. Stop major pruning early enough for new growth to mature before freezing weather arrives in cold climates. Growing Rosemary in Containers A container is an excellent choice when garden soil drains poorly or winters are too cold for rosemary to remain outdoors. Choose a pot with generous drainage holes and use a loose potting mix formulated for herbs, Mediterranean plants, or other plants that prefer fast drainage. A breathable terra-cotta pot can help excess moisture evaporate, although it will require closer watering attention in hot weather. Select a container large enough to support the plant’s root system and repot when the roots become crowded or the potting mix begins to break down. Keep outdoor containers in a warm, sunny location. In regions with freezing winters, move the plant to a protected place before damaging cold arrives. Rosemary’s cold tolerance varies among cultivars, and plants in containers are generally more exposed to freezing temperatures than those growing in the
Lavender and chamomile companion planting is one of the easiest and most rewarding ways to create a beautiful, fragrant, and productive herb garden. These two beloved herbs have been cultivated for centuries for their ornamental beauty, calming aromas, culinary uses, and medicinal properties. Together, they form a stunning combination that not only enhances your landscape but also supports pollinators, attracts beneficial insects, and contributes to a healthier garden ecosystem. Whether you are planning a cottage garden, designing a pollinator-friendly landscape, or creating an edible herb garden, lavender and chamomile companion planting offers countless benefits. Their complementary growth habits, similar cultural requirements, and long-lasting blooms make them an ideal pairing for gardeners of all skill levels. What Is Lavender and Chamomile Companion Planting? Lavender and chamomile companion planting is the practice of growing these two herbs together because they thrive under similar growing conditions and provide mutual benefits within the garden. While companion planting cannot eliminate every gardening challenge, it encourages biodiversity, supports beneficial insects, and creates a balanced growing environment. Lavender adds striking vertical spikes of fragrant purple flowers, while chamomile produces delicate white blossoms with cheerful yellow centers. Together they create a classic cottage garden display that is both elegant and functional. Their flowers bloom over an extended period, providing a continuous source of nectar for pollinators while filling the garden with color and fragrance. Benefits of Lavender and Chamomile Companion Planting One of the greatest advantages of lavender and chamomile companion planting is the abundance of pollinators it attracts. Honeybees, native bees, butterflies, hoverflies, and other beneficial insects are drawn to their nectar-rich flowers throughout the growing season. As pollinators visit these herbs, they also improve the pollination of nearby vegetables, fruit trees, berry bushes, and flowering ornamentals. A garden filled with pollinators is often healthier, more productive, and more resilient. Lavender and chamomile also attract beneficial insects such as ladybugs, lacewings, parasitic wasps, and hoverflies. These natural predators help control aphids, whiteflies, spider mites, and other common garden pests, reducing the need for chemical pesticides. Lavender’s aromatic foliage contains naturally fragrant essential oils that may help discourage mosquitoes, moths, fleas, and certain flying insects. While no single plant completely prevents pests, incorporating aromatic herbs into your landscape contributes to a more balanced garden ecosystem. Another advantage of lavender and chamomile companion planting is its simplicity. Since both herbs enjoy similar growing conditions, caring for them together is easy and efficient. Growing Conditions for Lavender and Chamomile Successful lavender and chamomile companion planting begins with choosing the right location. Both herbs grow best in full sun and require at least six to eight hours of direct sunlight each day. Plenty of sunshine encourages compact growth, abundant blooms, and stronger fragrance. Well-drained soil is essential for healthy plants. Lavender thrives in sandy or gravelly soil that drains quickly, while chamomile prefers fertile, loose soil with good drainage. Incorporating compost before planting improves soil structure without sacrificing drainage. Lavender becomes highly drought tolerant once established and prefers the soil to dry slightly between waterings. Chamomile appreciates moderate moisture during dry periods but should never remain in waterlogged soil. Providing adequate spacing between plants encourages good airflow, reduces humidity around the foliage, and minimizes the risk of fungal diseases. The Best Companion Plants for Lavender and Chamomile Although lavender and chamomile thrive together, they also pair beautifully with many other herbs, vegetables, flowers, and fruit-producing plants. Excellent companion plants include rosemary, thyme, sage, oregano, basil, calendula, borage, yarrow, echinacea, roses, strawberries, blueberries, tomatoes, peppers, eggplant, broccoli, cabbage, cauliflower, and many drought-tolerant flowering perennials. These companions benefit from increased pollinator activity while creating a diverse and visually appealing garden. Plants to Avoid To ensure successful lavender and chamomile companion planting, avoid placing lavender near plants that require constantly moist soil. Mint, celery, hostas, watercress, and other moisture-loving plants have watering requirements that differ significantly from lavender. Excess moisture around lavender roots can lead to root rot and poor plant performance. Grouping plants with similar moisture needs simplifies watering and promotes healthier growth throughout the garden. Culinary Uses of Lavender and Chamomile Lavender and chamomile companion planting provides more than ornamental beauty. Both herbs are edible and offer a variety of culinary possibilities. Lavender flowers add delicate floral notes to teas, shortbread cookies, cakes, muffins, scones, ice cream, custards, infused honey, lemonade, simple syrups, sugar blends, and Herbes de Provence seasoning. Lavender also complements roasted vegetables, poultry, lamb, seafood, and grilled dishes. Chamomile flowers are widely enjoyed in herbal teas, infused honey, syrups, jellies, cakes, cookies, fruit salads, custards, smoothies, and homemade desserts. Their mild apple-like flavor makes them a versatile ingredient for both sweet and savory recipes. Growing both herbs together provides a convenient harvest of fresh flowers throughout the growing season. Harvesting Lavender and Chamomile Harvest lavender stems when approximately one-third to one-half of the flowers have opened. At this stage, the blossoms contain the highest concentration of aromatic oils and dry exceptionally well. Chamomile flowers should be harvested once they are fully open. Frequent harvesting encourages additional blooms, providing a continuous supply throughout the season. Dry the flowers in a cool, shaded location with good air circulation before storing them in airtight containers away from direct sunlight. Growing Lavender and Chamomile in Containers Lavender and chamomile companion planting is not limited to garden beds. These herbs also thrive in containers, making them excellent choices for patios, balconies, porches, and small-space gardens. Select containers with drainage holes and fill them with a high-quality, well-draining potting mix. Place containers where they receive plenty of sunlight, and water carefully, allowing the soil to dry slightly between waterings. Container-grown herbs bring fragrance, beauty, and fresh culinary ingredients within easy reach. Why Lavender and Chamomile Companion Planting Belongs in Every Garden Lavender and chamomile companion planting combines ornamental beauty with practical gardening benefits. Their shared growing requirements make them easy to cultivate together, while their abundant flowers support pollinators, attract beneficial insects, and enhance biodiversity throughout the landscape. Whether you are growing herbs for
Discover essential planting, sunlight, soil, watering, pruning, harvesting, and seasonal care tips in this complete Thyme Growing Guide for garden beds and containers. Thyme is a fragrant perennial herb that brings beauty, flavor, and versatility to the garden. Its tiny leaves deliver an earthy, savory taste that complements vegetables, poultry, fish, soups, sauces, breads, and many other dishes. When allowed to flower, thyme also produces delicate blossoms that attract bees and other beneficial pollinators. One of thyme’s greatest strengths is its ability to thrive with relatively little attention once established. This Mediterranean herb prefers abundant sunshine, excellent drainage, and lean soil. It generally needs less water and fertilizer than moisture-loving herbs, making it a practical choice for water-conscious gardens, raised beds, rock gardens, and containers. Although thyme is often described as easy to grow, it can struggle in wet, compacted soil. Choosing the right planting location and avoiding excessive watering are the most important steps for maintaining healthy, flavorful plants. With suitable conditions and occasional pruning, thyme can provide fresh harvests throughout the growing season and return for several years in many climates. Understanding the Thyme Plant Thyme belongs to the mint family and includes hundreds of species and cultivars with different growth habits, fragrances, flavors, flower colors, and levels of cold tolerance. Some plants form upright, shrubby mounds, while others spread close to the ground. Common thyme, botanically known as Thymus vulgaris, is one of the most familiar culinary types. It develops small, aromatic leaves on slender stems that gradually become woody as the plant matures. English, French, German winter, and lemon thyme are also popular in culinary gardens, although flavor and growing habits vary by cultivar. Creeping thyme is generally grown as an ornamental ground cover, edging plant, or filler between stepping stones. Some creeping varieties are aromatic, but not every ornamental thyme has the flavor or texture desired for cooking. If culinary use is your priority, choose a plant specifically labeled as an edible culinary thyme. Is Thyme an Annual or a Perennial? Most thyme varieties are evergreen or semi-evergreen perennials in suitable climates. Common thyme is often hardy in approximately USDA Zones 5 through 9, but winter survival depends on the cultivar, regional weather, soil drainage, exposure, and protection from severe cold. Wet winter soil can be more damaging to thyme than cold temperatures alone. In colder or particularly rainy regions, planting thyme in a raised bed, rock garden, slope, or well-draining container may improve its chances of surviving winter. Gardeners outside a variety’s recommended growing range can treat thyme as an annual or bring container-grown plants into a bright, protected location during cold weather. Always check the label for the particular species or cultivar you are growing, since hardiness is not identical across all types of thyme. Choosing the Best Thyme Variety Common thyme is an excellent all-purpose selection for an herb garden. It has the familiar savory flavor associated with many Mediterranean and European dishes. English thyme typically has a strong, traditional flavor and works well in soups, stews, roasted vegetables, stuffing, and meat dishes. French thyme is often selected for its refined fragrance and slightly sweeter flavor. German winter thyme is valued in many gardens for its culinary quality and improved cold tolerance. Lemon thyme offers a bright citrus fragrance that pairs especially well with fish, poultry, vegetables, marinades, and herbal beverages. Variegated cultivars can add visual interest, but their growth rate and cold tolerance may differ from solid-green varieties. Creeping and woolly thyme create attractive mats around stones, pathways, and borders. These low-growing plants are usually selected for their ornamental qualities rather than dependable culinary harvests. How Much Sun Does Thyme Need? Plant thyme in a location that receives at least six hours of direct sunlight each day. Full sun encourages compact growth, strong fragrance, abundant leaves, and better flowering. Plants grown in too much shade may become thin, leggy, or less flavorful. In extremely hot climates, thyme may tolerate some light afternoon shade, especially when grown in a container that heats up quickly. Even in warm regions, the plant should still receive several hours of bright, direct sunlight. Good air circulation is also beneficial. Avoid squeezing thyme between dense plants that trap moisture around its foliage and stems. A sunny, open location allows leaves and soil to dry more efficiently after rain or watering. The Best Soil for Growing Thyme Excellent drainage is essential for growing healthy thyme. The plant performs well in light, loose, or somewhat gritty soil that does not remain saturated. Heavy clay and low areas where water collects can expose the roots and crown to rot. Before planting in dense soil, improve the planting area by creating a raised bed or selecting another naturally well-drained location. Adding organic matter may improve soil structure, but avoid creating an overly rich, moisture-retentive bed. Thyme generally develops satisfactory flavor and compact growth in moderately fertile or relatively lean soil. A slightly acidic to neutral soil is suitable for many varieties. A soil test can provide more useful guidance than guessing, particularly if thyme and other herbs have struggled in the same garden area. When and How to Plant Thyme Thyme can be planted outdoors in spring after the danger of severe frost has passed and the soil has begun to warm. In mild climates, fall planting may also be successful if the roots have enough time to establish before stressful weather arrives. Dig a hole approximately as deep as the plant’s root ball and slightly wider. Position the crown at or just above the surrounding soil level. Planting too deeply can trap moisture around the base of the stems and increase the risk of decay. Spacing depends on the cultivar’s mature width. Many upright culinary thyme plants can be spaced approximately 10 to 12 inches apart, while spreading varieties may require additional room. Consult the plant label for mature dimensions and allow enough space for air to circulate. Water the new plant thoroughly after planting. Keep the soil lightly
Originally published
March 2026
Updated
August 2026
Reviewed by
Culibloom