Italian Parsley Growing Guide: How to Grow, Harvest, and Enjoy This Flavorful Herb
Discover everything you need to know about growing Italian parsley. Learn how to plant, care for, harvest, and use this versatile culinary herb with expert gardening tips, companion planting advice, and delicious kitchen inspiration in this Italian Parsley growing guide.
Italian parsley is one of the most rewarding herbs you can add to your garden. Loved by home gardeners and professional chefs alike, this fragrant herb produces lush green foliage, thrives in a variety of growing conditions, and delivers fresh flavor throughout the growing season. Whether you have a spacious backyard, a raised garden bed, or a sunny windowsill, Italian parsley is easy to grow and provides a continuous supply of fresh herbs for countless recipes.
Unlike curly parsley, which is often used as a garnish, Italian parsley is prized for its bold, fresh flavor and tender leaves. It is a staple in Mediterranean cooking and enhances everything from soups and sauces to salads, roasted vegetables, seafood, and pasta dishes. Beyond its culinary value, Italian parsley is rich in vitamins, minerals, and antioxidants, making it one of the healthiest herbs you can grow.
If you are searching for an herb that is productive, beautiful, and incredibly versatile, Italian parsley deserves a permanent place in your garden.
What Is Italian Parsley?
Italian parsley, also known as flat-leaf parsley, is a biennial herb in the carrot family. Although it naturally lives for two years, most gardeners grow it as an annual to enjoy its abundant foliage during the first growing season.
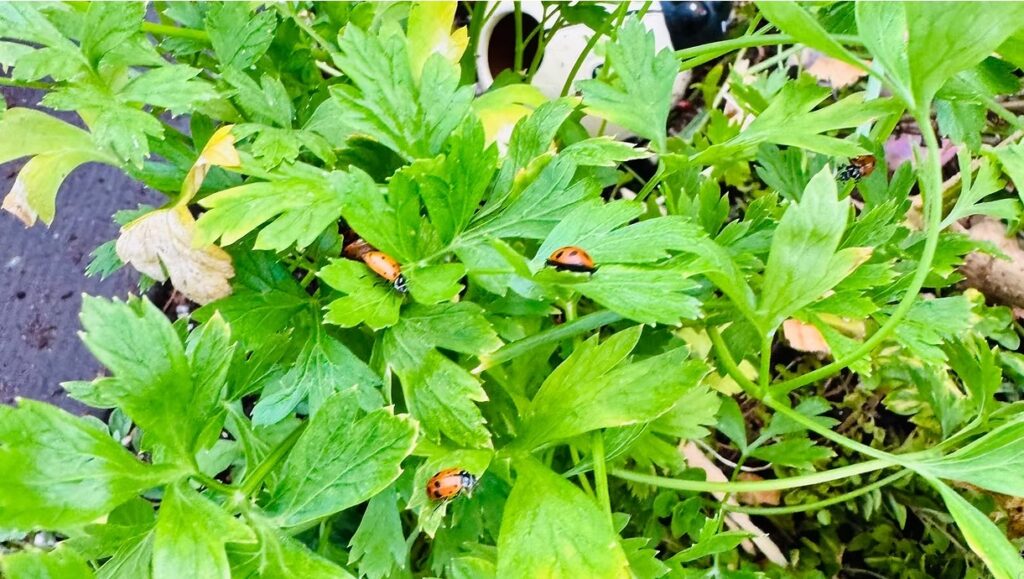
Native to the Mediterranean region, Italian parsley has smooth, flat leaves that are darker green and more aromatic than curly parsley. The plant typically reaches between 12 and 24 inches tall and develops sturdy stems filled with flavorful leaves. During its second year, it produces clusters of tiny yellow-green flowers that attract bees, butterflies, hoverflies, ladybugs, and other beneficial insects before eventually producing seed.
Its dependable growth habit, exceptional flavor, and ornamental appearance have made Italian parsley one of the most popular herbs in gardens around the world.
A Brief History of Italian Parsley
Italian parsley has been cultivated for thousands of years. Ancient civilizations in Greece and Rome valued parsley for both culinary and medicinal purposes. While the Greeks often associated parsley with celebrations and ceremonies, the Romans incorporated it into everyday cooking, appreciating both its flavor and health benefits.
As Mediterranean cuisine spread across Europe and eventually around the world, Italian parsley became an essential ingredient in countless traditional recipes. Today, it remains one of the most widely grown culinary herbs and is considered indispensable in kitchens everywhere.
Why Grow Italian Parsley?
Italian parsley offers far more than fresh herbs for cooking. It is an attractive addition to vegetable gardens, herb beds, and decorative containers while providing months of continuous harvests.
Gardeners appreciate Italian parsley because it grows quickly, requires relatively little maintenance, attracts pollinators, and pairs well with many vegetables and herbs. Its lush foliage adds texture and vibrant green color to the garden, while frequent harvesting encourages even more vigorous growth.
Fresh parsley also provides a flavor that simply cannot be matched by dried herbs. Having a plant just steps from your kitchen means you can harvest exactly what you need whenever inspiration strikes.
Choosing the Perfect Growing Location
Selecting the right location is one of the most important steps toward growing healthy Italian parsley.
This herb grows best in an area that receives six to eight hours of sunlight each day. In regions with especially hot summers, afternoon shade helps protect the leaves from scorching while keeping the plants productive.
Italian parsley also appreciates locations with good air circulation. Proper airflow helps reduce humidity around the foliage, lowering the risk of fungal diseases while promoting healthier growth.
Whether planted directly in the ground, in raised beds, or in decorative containers, parsley performs best in a location that combines sunlight, well-drained soil, and consistent moisture.
Soil Requirements
Healthy soil creates healthy parsley plants.
Italian parsley thrives in fertile, well-draining soil enriched with organic matter. Before planting, mix compost or well-aged manure into the soil to improve fertility, increase moisture retention, and encourage strong root development.
The ideal soil pH ranges from 6.0 to 7.0, which allows the plant to absorb nutrients efficiently.
Avoid planting in compacted soil or areas where water tends to collect. Excessively wet conditions can lead to root rot and other fungal problems that reduce the plant’s vigor.
How to Plant Italian Parsley
Italian parsley can be started from seed or purchased as young nursery plants.
Growing from seed requires a bit of patience because parsley seeds naturally germinate slowly. It often takes two to four weeks before seedlings emerge.
Soaking the seeds overnight before planting helps soften the seed coat and encourages faster germination.
Plant seeds about one-quarter inch deep in moist soil and keep the planting area consistently damp until seedlings appear.
Once plants are several inches tall, thin or space them approximately 8 to 12 inches apart. Proper spacing encourages healthy air circulation and gives each plant enough room to mature.
If transplanting nursery-grown parsley, water thoroughly immediately after planting to reduce transplant shock and encourage root establishment.
Watering Italian Parsley
Consistent watering is the secret to lush, productive parsley plants.
Italian parsley prefers evenly moist soil, especially during warm weather. Water deeply whenever the top inch of soil begins to dry, allowing moisture to penetrate into the root zone.
Applying a layer of organic mulch around the base of the plants helps conserve moisture, suppress weeds, and regulate soil temperatures throughout the growing season.
Container-grown parsley dries out faster than plants growing in garden beds, so check the soil regularly and water whenever necessary.
Fertilizing for Continuous Growth
Because parsley is grown primarily for its leafy foliage, regular feeding helps maintain healthy production.
Incorporate compost into the soil before planting to provide slow-release nutrients.
Throughout the growing season, apply a balanced organic fertilizer every four to six weeks. Compost tea or fish emulsion can also provide gentle nutrition while encouraging vigorous leaf growth.
Avoid excessive nitrogen applications, as overly rapid growth may produce softer leaves with less concentrated flavor.
Caring for Italian Parsley
Italian parsley is remarkably easy to maintain.
Harvest regularly to encourage new stems.
Remove yellowing or damaged leaves as they appear.
Keep weeds under control to reduce competition for nutrients and moisture.
Monitor soil moisture during periods of hot weather.
If flower stalks begin forming during the first growing season, remove them promptly to encourage continued leaf production.
These simple maintenance practices help keep plants productive for many months.
Growing Italian Parsley in Containers
Italian parsley adapts beautifully to container gardening, making it an excellent choice for patios, balconies, porches, and apartment gardens.
Select a container at least 10 to 12 inches deep with adequate drainage holes.
Fill the pot with high-quality potting mix enriched with compost.
Place the container where it receives at least six hours of sunlight each day.
Because containers dry more quickly than garden soil, monitor moisture closely during warm weather.
One of the greatest advantages of container gardening is portability. If temperatures become too hot or cold, containers can easily be moved to provide better growing conditions.
Companion Planting
Italian parsley grows exceptionally well alongside many popular vegetables and herbs.
Excellent companion plants include tomatoes, peppers, asparagus, onions, carrots, lettuce, spinach, basil, oregano, thyme, rosemary, chives, radishes, and marigolds.
These companions create attractive garden combinations while encouraging biodiversity and attracting beneficial insects.
Allowing a few parsley plants to flower also provides nectar for many natural predators that help keep harmful insects under control.
Pollinators and Beneficial Insects
Although many gardeners harvest parsley before flowering, allowing one or two plants to bloom provides valuable benefits for the garden ecosystem.
The tiny flower clusters attract honeybees, native bees, butterflies, hoverflies, lacewings, parasitic wasps, and ladybugs.
Many of these insects prey on aphids and other common garden pests, creating a healthier and more balanced garden naturally.
Harvesting Italian Parsley
Harvesting parsley correctly encourages continuous production throughout the season.
Begin harvesting once the stems reach approximately 6 to 8 inches tall.
Always remove the outer stems first by cutting them near the base of the plant. This allows the younger center growth to continue producing new leaves.
Never remove more than one-third of the plant during a single harvest.
Frequent harvesting encourages fuller, bushier plants while providing a steady supply of fresh herbs.
Culinary Uses
Italian parsley is one of the most versatile herbs in the kitchen.
Italian parsley is a biennial. It grows foliage during the first year and flowers during the second year before completing its life cycle.
Can parsley survive frost?
Italian parsley tolerates light frosts surprisingly well, making it one of the hardier culinary herbs.
Grow Italian Parsley for Fresh Flavor All Season Long
Italian parsley is much more than a finishing garnish. It is an easy-to-grow herb that rewards gardeners with months of fresh harvests, beautiful greenery, and exceptional culinary versatility. From enhancing homemade soups and pasta dishes to attracting beneficial insects and supporting a healthy diet, this remarkable herb earns its place in every garden.
Whether you are planting your first herb garden or expanding an established vegetable bed, Italian parsley offers dependable growth, minimal maintenance, and an abundant harvest that keeps your kitchen stocked with fresh flavor throughout the season.
Ladybugs gather among the bright green leaves of a thriving parsley plant.
Here, you will learn all about chive blossoms and parsley, including how companion planting helps both herbs thrive, the many benefits they bring to your garden, and the delicious ways to use them in everyday cooking. Whether you are creating a thriving kitchen garden or looking for fresh inspiration in the kitchen, chive blossoms and parsley are a versatile pairing that offers beauty, flavor, and abundant harvests throughout the growing season. There is something incredibly satisfying about walking into your garden, brushing your hand across a patch of fragrant herbs, and gathering a handful of fresh parsley alongside a few vibrant purple chive blossoms. Moments like these remind us that a garden is more than a place to grow food. It is a space where beauty, nature, and fresh ingredients come together to inspire every meal. Among the many herbs you can grow, chives and parsley are one of the easiest and most rewarding companion planting combinations. They thrive under similar growing conditions, complement one another beautifully, and provide fresh harvests from spring through fall. Their partnership benefits not only your kitchen but your entire garden by attracting pollinators, supporting beneficial insects, and helping create a healthier growing environment. Whether you are planting a large kitchen garden, filling raised beds, or growing herbs in containers on your patio, chive blossoms and parsley are a pairing that delivers season after season. Their fresh flavors elevate everyday meals, while their graceful appearance adds charm and color to any outdoor space. A Perfect Partnership in the Herb Garden Companion planting is the practice of growing plants together that naturally benefit one another. Some companion plants improve soil conditions, others attract pollinators, while some help reduce pest problems or make better use of available growing space. Chives and parsley check nearly every one of those boxes. Parsley grows in lush, leafy mounds that remain attractive throughout much of the growing season. Chives produce slender green leaves that eventually give way to beautiful globe-shaped blossoms in shades of lavender and purple. Together they create layers of texture and color that look just as lovely in ornamental gardens as they do in vegetable beds. Their similar care requirements also make them easy companions. Both appreciate fertile soil, regular watering, and plenty of sunshine, allowing gardeners to care for both herbs using the same routine. For anyone just beginning an herb garden, this combination is an excellent place to start. Why Companion Planting Matters Healthy gardens are built on diversity. Instead of growing a single crop in isolation, companion planting encourages a balanced ecosystem where plants, pollinators, and beneficial insects work together. Every herb contributes something unique to the garden. Parsley provides dense foliage that helps shade the soil and reduce moisture loss. Chives contribute their distinctive onion aroma while producing nectar-rich flowers that become gathering places for pollinating insects. Together they create an environment where plants thrive naturally. Rather than viewing herbs simply as ingredients for cooking, companion planting reminds us that every plant plays an important role in supporting the health of the entire garden. Chives Help Naturally Discourage Garden Pests One reason gardeners have planted chives throughout vegetable gardens for generations is their reputation for helping reduce certain insect problems. As members of the onion family, chives contain sulfur compounds responsible for their mild onion fragrance. While people enjoy this familiar aroma, many insects do not. Growing chives near parsley may help discourage aphids, Japanese beetles, spider mites, and several other common garden pests. Although companion planting is not a replacement for good garden management, it can become an important part of an organic gardening strategy by encouraging healthier plants and reducing stress caused by insect activity. Many gardeners also plant chives near tomatoes, carrots, strawberries, roses, peppers, and apple trees for the very same reason. Chive Blossoms Bring Your Garden to Life If there is one reason never to cut every chive flower before it opens, it is the incredible number of beneficial insects they attract. As spring transitions into early summer, chives produce clusters of soft purple blossoms that quickly become one of the busiest places in the garden. Honeybees eagerly gather nectar from the flowers while native bees move from bloom to bloom collecting pollen. Butterflies drift through the blossoms, adding movement and beauty to the landscape, while hoverflies quietly perform double duty by feeding on nectar as adults and helping control aphids during their larval stage. Watching these visitors move through your herb garden is one of the simple pleasures of gardening. Their presence also benefits nearby vegetables, fruit trees, berry bushes, and flowering plants that depend on pollination for healthy harvests. Growing Chives and Parsley Together One of the reasons these herbs are so popular is because they are wonderfully uncomplicated. Choose a location that receives at least six hours of sunlight each day. While chives love full sun, parsley appreciates a little afternoon shade during periods of intense summer heat, especially in warmer climates. Plant both herbs in fertile, well-drained soil enriched with compost. Rich organic matter encourages vigorous growth while helping retain moisture between waterings. Water regularly, keeping the soil evenly moist without allowing it to become soggy. Applying a layer of mulch around the plants helps regulate soil temperature, conserve moisture, and reduce weed growth. With only a little routine care, both herbs will reward you with months of fresh harvests. Beautiful in Every Garden Style One of the joys of growing herbs is their versatility. Chives and parsley look equally at home in formal herb gardens, rustic cottage gardens, raised beds, decorative borders, and patio containers. The upright foliage and cheerful blossoms of chives create natural height, while parsley fills the surrounding space with rich green leaves. The contrast between soft purple flowers and vibrant green foliage creates a timeless combination that looks attractive from spring until frost. Many gardeners intentionally plant these herbs near walkways or seating areas where their fragrance and colorful blooms can be enjoyed every day. Other Plants That Thrive
Learn how to grow dill, discover its culinary uses, explore companion planting benefits, and find expert tips for harvesting and preserving this flavorful herb in your own garden. Dill is one of those herbs that seems to do it all. It adds fresh flavor to your favorite recipes, attracts pollinators to the garden, supports beneficial insects, and is remarkably easy to grow. Whether you have a large vegetable garden, a collection of raised beds, or a few containers on a sunny patio, dill is a rewarding herb that offers beauty and usefulness from the moment it sprouts until the last seeds are harvested. With its soft, feathery foliage, bright yellow flower clusters, and distinctive aroma, dill has earned its place in gardens around the world. Gardeners appreciate how quickly it grows, while home cooks value its ability to brighten everything from seafood and salads to homemade pickles. Best of all, nearly every part of the plant can be enjoyed, including the tender leaves, fragrant flowers, and flavorful seeds. If you are looking for an herb that is beautiful, practical, and beginner-friendly, dill is an excellent choice. Meet the Dill Plant Dill (Anethum graveolens) is an annual herb belonging to the carrot family, alongside parsley, fennel, cilantro, celery, and carrots. Native to the Mediterranean region and parts of western Asia, it has been cultivated for thousands of years for both its culinary and traditional herbal uses. One of dill’s most recognizable features is its delicate, fern-like blue-green foliage. As the plant matures, it produces tall, graceful stems topped with umbrella-shaped clusters of tiny yellow flowers known as umbels. These blooms eventually develop into aromatic seeds that are commonly used in cooking and pickling. Depending on the variety and growing conditions, dill typically reaches between 2 and 5 feet tall, creating a light, airy presence that blends beautifully into vegetable gardens, herb beds, and ornamental landscapes. Why Gardeners Love Growing Dill There are many reasons dill continues to be one of the most popular herbs in home gardens. It grows quickly from seed, making it an ideal choice for beginners. Fresh dill offers a bright flavor that is difficult to duplicate with dried herbs. Its flowers attract bees, butterflies, hoverflies, lacewings, and other beneficial insects that help create a healthy garden ecosystem. Dill also serves as a host plant for the beautiful Black Swallowtail butterfly, giving gardeners the opportunity to support local wildlife while growing delicious herbs. Since the leaves, flowers, and seeds are all edible, very little of the plant goes to waste. Popular Varieties to Consider Several varieties of dill are available, each with unique characteristics. Bouquet Dill is a favorite for making homemade pickles because it produces abundant flowers and seeds. Fernleaf Dill stays compact, making it perfect for containers and smaller gardens. Mammoth Dill lives up to its name by producing tall plants with large flower heads that yield plenty of seeds. Dukat Dill is prized for its lush foliage and rich flavor, making it an excellent choice for fresh cooking. No matter which variety you choose, all offer the same fresh fragrance and versatility that make dill such a rewarding herb to grow. Growing Dill Successfully One of the best things about dill is how little effort it requires. Give it sunshine, well-drained soil, and a little water, and it will reward you with weeks of fresh harvests. Choose a location that receives at least six to eight hours of direct sunlight each day. Dill grows best in fertile, well-draining soil with a slightly acidic to neutral pH between 6.0 and 7.5. Because dill develops a long taproot, it performs best when seeds are sown directly into the garden rather than transplanted. Plant the seeds about one-quarter inch deep and space them approximately 12 inches apart. Under warm conditions, seedlings usually emerge within one to two weeks. For a continuous supply of fresh dill throughout the season, sow new seeds every few weeks. Watering and Feeding Young dill plants appreciate consistently moist soil while they establish their roots. Once mature, they become fairly drought tolerant, although they still benefit from regular watering during extended dry periods. A layer of compost mixed into the soil before planting often provides all the nutrients dill needs. Too much fertilizer may encourage lush growth, but it can reduce the herb’s distinctive flavor, so less is often more. Companion Planting with Dill Dill is more than just a flavorful herb. It is also a valuable companion plant that attracts beneficial insects and encourages a healthier garden. It grows especially well alongside cucumbers, broccoli, cabbage, cauliflower, onions, asparagus, lettuce, and corn. Many gardeners intentionally plant dill near cucumbers because both are harvested together for homemade pickles. There are a few exceptions. Mature dill should be planted away from carrots because both belong to the same plant family and may cross-pollinate. Older dill plants may also slow the growth of nearby tomatoes, although young dill seedlings generally grow well together with tomato plants. A Pollinator Magnet Once dill begins to bloom, the garden becomes noticeably more active. The cheerful yellow flowers attract honeybees, native bees, butterflies, hoverflies, lady beetles, and parasitic wasps, many of which help control unwanted garden pests naturally. Dill is also one of the preferred host plants for Black Swallowtail butterflies. Their striking caterpillars feed on the foliage before transforming into beautiful butterflies. While they may nibble on a few leaves, many gardeners happily share part of their harvest to help support these important pollinators. Harvesting Fresh Dill One of the greatest rewards of growing dill is how quickly it can be harvested. Most plants are ready for their first harvest about six to eight weeks after planting. Snip the outer leaves first while allowing the center of the plant to continue producing fresh growth. Harvesting in the morning, after the dew has dried, often provides the best flavor and aroma. If you plan to make homemade pickles, harvest the flower heads shortly after they fully open. For dill seeds,
Chamomile is one of the most treasured herbs in gardens around the world, admired for its cheerful daisy-like flowers, sweet apple-like fragrance, and incredible versatility. Whether you grow it for calming herbal tea, beautiful pollinator-friendly blooms, or flavorful culinary creations, chamomile is a rewarding plant that offers beauty and usefulness throughout the growing season. For thousands of years, chamomile has been valued by cultures across Europe, Asia, and the Middle East. Today, it continues to be one of the most popular herbs for home gardeners because it is easy to grow, requires very little maintenance, and produces an abundance of fragrant blossoms. From cottage gardens and herb borders to raised beds and patio containers, chamomile adds charm while supporting a healthy garden ecosystem. If you are looking for a plant that is as practical as it is beautiful, chamomile deserves a place in your garden. What Is Chamomile? Chamomile is a flowering herb belonging to the Asteraceae family, which also includes daisies, sunflowers, asters, and chrysanthemums. Its delicate white petals surrounding bright golden centers make it instantly recognizable, while its feathery green foliage adds soft texture to the landscape. There are two primary types of chamomile grown by gardeners. German Chamomile (Matricaria chamomilla) is an annual that grows upright and produces hundreds of blossoms throughout the season. It is the most commonly cultivated variety for drying and making herbal tea because of its abundant flower production. Roman Chamomile (Chamaemelum nobile) is a perennial that grows lower to the ground and spreads gradually, creating a fragrant carpet of evergreen foliage in many climates. It is often used as an ornamental ground cover while still producing the familiar chamomile flowers. Although both varieties offer similar fragrance and flavor, each brings its own unique growing habit and ornamental appeal. Why Chamomile Is So Popular Few herbs are as versatile as chamomile. It is equally at home in ornamental flower beds, vegetable gardens, herb gardens, and containers. Gardeners appreciate chamomile because it attracts pollinators, improves biodiversity, and blooms for months with very little care. Home cooks love its delicate floral flavor, while herbal enthusiasts have treasured it for generations. Its ability to serve multiple purposes makes chamomile one of the hardest-working plants in any garden. Growing Chamomile Chamomile is an excellent choice for gardeners of every experience level. It germinates easily, grows quickly, and rewards even minimal care with an abundance of flowers. Choose a location that receives at least six to eight hours of sunlight each day. While chamomile appreciates full sun, it also tolerates light afternoon shade in regions with particularly hot summers. The plant grows best in loose, well-drained soil with moderate fertility. Rich soils tend to produce excessive leafy growth instead of flowers, so heavy fertilization is usually unnecessary. Chamomile seeds are extremely small and require light to germinate. Scatter them across the soil surface and gently press them into the soil without covering them deeply. Keep the soil lightly moist until seedlings emerge. Once established, chamomile develops into a resilient herb that tolerates short periods of drought and continues flowering for much of the growing season. Caring for Chamomile One of chamomile’s greatest advantages is how little maintenance it requires. Water deeply when the soil begins to dry, but avoid consistently wet conditions that can lead to root diseases. Mature plants become surprisingly drought tolerant and often require very little supplemental irrigation. Removing spent flowers encourages the plant to continue producing fresh blooms throughout the summer. Frequent harvesting also stimulates additional flowering, allowing gardeners to enjoy multiple harvests. Adding compost in early spring provides all the nutrients chamomile typically needs without encouraging excessive foliage growth. German chamomile often reseeds itself naturally, providing new plants the following year, while Roman chamomile slowly expands through creeping stems to form an attractive flowering ground cover. Harvesting Chamomile Flowers Harvesting chamomile is one of the most enjoyable parts of growing this herb. The blossoms should be collected once they are fully open but before the petals begin to droop. Morning is generally considered the ideal harvest time after the dew has evaporated but before the day’s heat becomes intense. Fresh flowers may be used immediately or dried for long-term storage. Spread the blossoms in a single layer on a screen or drying rack in a cool, dry location with good air circulation and away from direct sunlight. Once completely dry, store them in airtight glass jars in a cool pantry where they can retain much of their fragrance and flavor for up to one year. Culinary Uses of Chamomile Although chamomile is best known as a tea herb, its culinary possibilities extend far beyond the teacup. Its delicate floral flavor carries gentle notes of apple, honey, and wildflowers that complement a wide variety of recipes. Chamomile can be infused into honey to create a naturally floral sweetener for biscuits, yogurt, pancakes, and toast. The flowers make wonderful simple syrups that add elegance to lemonade, iced tea, sparkling water, cocktails, and mocktails. Home bakers frequently incorporate chamomile into cakes, cupcakes, cookies, muffins, scones, and shortbread, where its subtle floral aroma pairs beautifully with vanilla and citrus. The blossoms can also flavor custards, panna cotta, rice pudding, homemade ice cream, whipped cream, fruit compotes, jams, and jellies. Fresh flowers may be sprinkled over green salads, fruit salads, cheese boards, or used as edible garnishes for desserts. Chamomile pairs especially well with apples, pears, peaches, lemons, oranges, honey, vanilla, cinnamon, lavender, rosemary, mint, lemon balm, strawberries, blueberries, and blackberries. Herbal and Traditional Uses Chamomile has a long and fascinating history that spans thousands of years. Ancient civilizations valued the herb for its pleasant aroma and included it in everyday life for a variety of traditional purposes. Today, chamomile remains one of the most widely enjoyed herbal teas in the world. Beyond tea, the flowers are commonly used to prepare herbal infusions, facial steams, bath soaks, infused oils, soaps, lotions, and handcrafted skincare products. Chamomile naturally contains beneficial plant compounds, including antioxidants and flavonoids, that have
Originally published
March 2026
Updated
August 2026
Reviewed by
Culibloom