Orange Milkweed Growing Guide: How to Attract Monarch Butterflies with Butterfly Weed
Learn how to grow orange milkweed, care for butterfly weed, manage aphids safely, and create a welcoming monarch butterfly garden.
Orange milkweed brings brilliant color, native beauty, and valuable wildlife habitat to the garden. Also known as butterfly weed, Asclepias tuberosa produces clusters of vivid orange, yellow-orange, or occasionally reddish flowers above narrow green leaves. Its long-lasting blooms create a striking display in sunny borders, meadow gardens, cottage gardens, and naturalized landscapes.
This hardy herbaceous perennial is especially meaningful to gardeners who want to support monarch butterflies. Monarch caterpillars depend on milkweed plants for food, while adult monarchs visit many kinds of nectar-rich flowers. By growing orange milkweed alongside a succession of native flowering plants, you can provide resources for multiple stages of the monarch life cycle.
Orange milkweed is also attractive to bees, other butterflies, and beneficial insects. Once established in suitable conditions, it is relatively drought tolerant and requires little supplemental care. The key is selecting a sunny location with excellent drainage and allowing the plant time to develop its substantial root system.
What Is Orange Milkweed?
Orange milkweed is a North American native wildflower in the milkweed genus, Asclepias. It is commonly called butterfly weed, butterfly milkweed, orange milkweed, and pleurisy root. Unlike many familiar milkweed species, its stems contain watery sap rather than abundant milky latex.
Mature plants generally grow between 1 and 3 feet tall, depending on the local climate, soil, moisture, and growing conditions. Multiple upright stems form a tidy clump topped with rounded clusters of small, intricately shaped flowers.
After flowering, the plant may produce elongated seed pods filled with flat brown seeds attached to silky fibers. When the pods mature and open, the fibers help carry the seeds on the wind.
Orange milkweed is a perennial, but its aboveground growth dies back after the growing season. Established plants remain dormant through winter and return from their roots in spring. Because new growth can emerge later than that of many garden perennials, mark the planting location and avoid assuming the plant has died.
Why Butterfly Weed Is Important for Monarchs
Milkweeds are the essential host plants for monarch caterpillars. Female monarchs search for suitable milkweed foliage on which to lay their eggs. After hatching, the caterpillars eat the leaves as they grow and prepare to form their chrysalises.
Adult monarchs have different nutritional needs. They drink nectar from milkweed flowers as well as many other flowering plants. A successful monarch garden should therefore include both locally native milkweed and nectar plants that bloom at different times of the growing season.
Orange milkweed can contribute to this habitat, but its regional suitability should be confirmed before planting. Choose milkweed species native to your part of the country and, when possible, purchase plants or seeds originating from your region. Local native plant societies, conservation organizations, and extension offices can help identify the most appropriate species.
Planting several milkweed plants together can make them easier for monarchs to locate and provide more foliage for caterpillars. The exact number needed will depend on the garden’s available space and growing conditions, but a generous grouping is more useful than a single isolated plant.
Choosing the Best Location
Orange milkweed performs best in a location receiving at least six hours of direct sunlight each day. Abundant sunlight promotes sturdy growth, generous flowering, and the open conditions this prairie-associated plant naturally prefers.
Excellent drainage is equally important. Butterfly weed grows naturally in sunny prairies, open woodlands, roadsides, and other areas with sandy, loamy, rocky, or limestone-based soils. It generally struggles in persistently wet ground, particularly during winter dormancy.
Heavy clay can be challenging if it remains saturated. Instead of placing the plant in a low area, choose a slope, raised planting area, or naturally dry section of the garden. Avoid automatically enriching the soil with large amounts of compost, since overly fertile conditions may encourage weak, floppy growth.
Select the location carefully before planting. Orange milkweed develops an enlarged root system and may not respond well to unnecessary disturbance once established.
How to Plant Orange Milkweed
Container-grown butterfly weed can be planted in spring after severe freezing conditions have passed or in fall early enough for the roots to begin establishing before the ground freezes. Regional conditions vary, so gardeners in very cold or extremely hot climates should follow local native-plant guidance.
Dig a hole approximately as deep as the plant’s container and wide enough to position the roots without forcing them. Keep the crown near the existing soil level. Planting too deeply can expose the crown and roots to excessive moisture.
Fill the hole with the surrounding soil and water thoroughly to settle it around the roots. Avoid adding fertilizer to the planting hole. Space plants according to the mature width of the selected variety, usually leaving enough room for light and air to reach the stems.
Water regularly during the first growing season when rainfall is insufficient. The soil should not remain constantly soggy, but young plants need dependable moisture while developing their roots.
Growing Butterfly Weed from Seed
Growing orange milkweed from seed is economical, although it requires patience. Many milkweed seeds germinate more successfully after exposure to a period of cold, moist conditions.
Fall sowing allows winter weather to provide this natural conditioning. Prepare a weed-free area, place the seeds in contact with the soil, and press them gently into the surface. Avoid burying them deeply.
Seeds can also be cold stratified in a refrigerator before spring sowing. The appropriate treatment period can vary, so follow instructions from a reliable native-seed supplier. Once stratified seeds are planted, maintain consistent moisture during germination without saturating the soil.
Seedlings focus much of their early energy on root development. Plants grown from seed may not flower during their first year, and many bloom more fully during their second or third growing season. Even nonflowering milkweed foliage can still serve as a host for monarch eggs and caterpillars.
Watering and Fertilizing Orange Milkweed
New plants need regular attention until their roots are established. Water deeply when the upper soil begins to dry, adjusting the frequency for rainfall, temperature, and soil type. Deep, occasional watering is preferable to frequent shallow sprinkling.
Established orange milkweed is adapted to relatively dry conditions and usually requires little supplemental water. Prolonged drought or extreme heat may create a temporary need for irrigation, but constantly wet soil is more dangerous than brief dryness.
Butterfly weed rarely requires fertilizer in ordinary garden soil. Excess nitrogen may produce tall, soft foliage at the expense of flowers. If growth appears unusually poor, consider testing the soil before applying amendments.
Seasonal Care and Maintenance
Orange milkweed is naturally low maintenance. During the growing season, monitor the plants for monarch eggs and caterpillars before pruning, moving stems, or removing foliage.
Deadheading spent flowers may create a tidier appearance and can limit unwanted seedlings, but leaving some flowers in place allows decorative pods and seeds to develop. Collect mature pods just before they split if you want to save seeds. Store only thoroughly dried seeds to reduce the risk of mold.
After frost, the stems and leaves will naturally decline. Leave them standing temporarily if you enjoy their winter structure or want to provide shelter for insects. When cleanup becomes necessary, cut the dormant stems back carefully. Late fall maintenance after monarch migration has passed is generally less disruptive than cutting active plants during the growing season, although regional timing varies.
Managing Aphids Without Harming Monarchs
Clusters of bright yellow or orange oleander aphids sometimes gather on milkweed stems, buds, and leaves. A small population does not always cause serious damage, and natural predators may gradually reduce their numbers.
Before taking action, examine the entire plant for monarch eggs and caterpillars. Insecticides, including products described as natural or organic, can harm monarchs and other beneficial insects. Systemic insecticides are especially unsuitable because they are absorbed into plant tissues and may remain available to insects feeding on leaves, nectar, or pollen.
Small aphid colonies can sometimes be removed by hand or dislodged with water, but even these methods must be used cautiously around monarch eggs and larvae. Avoid blasting caterpillars from the plant or damaging delicate new growth.
When purchasing butterfly weed, ask the nursery whether systemic insecticides were used during production. Choosing untreated plants from a knowledgeable native-plant grower helps create safer habitat.
Designing a Complete Monarch Garden
Milkweed is essential for monarch caterpillars, but milkweed alone does not create a complete butterfly garden. Adult monarchs need nectar throughout the breeding and migration seasons. Pair orange milkweed with locally native flowers that provide overlapping bloom periods from spring through fall.
Depending on the region, suitable companions may include asters, blazing star, bee balm, coneflowers, goldenrod, mountain mint, native sunflowers, penstemon, phlox, and black-eyed Susans. Choose plants that share butterfly weed’s preference for sun and well-drained soil.
Create broad groups of flowers instead of scattering single plants throughout the landscape. Repeated clusters provide stronger color, make nectar sources easier for butterflies to find, and give the garden a more cohesive appearance.
Include a range of flower shapes and heights to accommodate different pollinators. A shallow source of clean water, a few sun-warmed stones, and protection from strong wind can make the space even more inviting. Avoid pesticide use and prevent spray drift from reaching milkweed or flowering plants.
Is Orange Milkweed Safe?
Milkweed plants contain compounds that can be toxic if consumed. Orange milkweed should not be treated as an edible garden plant or used as a home remedy. Keep curious children from tasting it, and place it thoughtfully around pets or livestock that may chew unfamiliar vegetation.
Wear gloves when cutting or handling the plant if you have sensitive skin, and wash your hands afterward. Although butterfly weed generally produces watery sap, plant material can still cause irritation in some individuals.
A Bright Native Plant with Lasting Value
Orange milkweed combines ornamental beauty with an important ecological purpose. Its fiery flower clusters brighten dry, sunny garden spaces while its leaves provide food for developing monarch caterpillars.
Success begins with choosing a regionally appropriate native milkweed, providing full sun and well-drained soil, and avoiding harmful pesticides. Give young plants time to establish, surround them with nectar-rich native flowers, and allow room for the seasonal rhythms of eggs, caterpillars, seed pods, and winter dormancy.
With thoughtful placement and patient care, butterfly weed can become a dependable feature in a vibrant garden that supports monarchs and many other pollinato
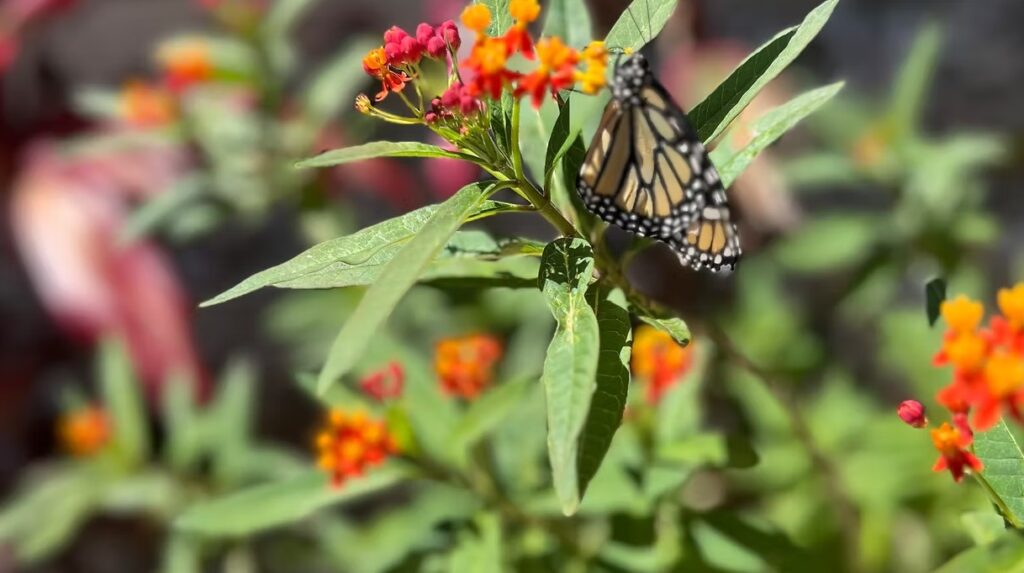
A monarch butterfly pauses among colorful milkweed flowers in the garden.
Learn how to grow orange cosmos with guidance on planting, sunlight, soil, watering, deadheading, containers, pests, seed saving, and companion plants. Orange cosmos bring brilliant color, delicate texture, and lively movement to sunny gardens. Their golden-orange flowers rise above airy green foliage, creating a cheerful display that feels equally at home in cottage gardens, pollinator beds, cutting gardens, and informal borders. Once established, these warm-season annuals provide months of flowers with relatively little maintenance. Often identified botanically as Cosmos sulphureus, orange cosmos are related to the familiar pink, white, and burgundy garden cosmos known as Cosmos bipinnatus. Orange cosmos generally have broader, more deeply divided foliage and produce flowers in vivid shades of yellow, gold, orange, and scarlet. Depending on the cultivar and growing conditions, plants may remain compact or reach several feet tall. One of the greatest advantages of growing orange cosmos is their adaptability. They tolerate heat, lean soil, and occasional dry conditions after their roots are established. They also attract butterflies and other visiting pollinators while producing flowers that can be enjoyed in both the garden and fresh arrangements. Why Grow Orange Cosmos? Orange cosmos offer impressive color without requiring rich soil or an elaborate care routine. Their daisy-like blooms complement many garden styles, from relaxed wildflower plantings to carefully planned color-themed borders. The fiery flowers are especially effective when planted in groups. A mass planting produces a glowing ribbon of color, while individual plants can be scattered among ornamental grasses and other annual flowers for a more natural appearance. Their open growth habit allows neighboring plants to remain visible, making orange cosmos useful for filling gaps without creating a heavy or crowded look. These flowers are also valuable for extending seasonal interest. In many climates, they begin blooming during summer and continue until cold weather or the first hard frost ends the display. Choosing the Right Orange Cosmos Orange cosmos cultivars vary considerably in height, flower form, and color. Some produce simple single flowers with open centers, while others have semi-double or double blooms. Colors may range from soft golden yellow to tangerine, deep orange, and reddish scarlet. Compact cultivars are well suited to containers, pathways, and the front of a flower bed. Taller varieties create an attractive backdrop and provide longer stems for cutting. Always check the seed packet or plant label for the expected mature height because some varieties stay under 2 feet while others can grow much taller. When planning a mixed planting, consider both the mature height and the intensity of the flower color. Bright orange cultivars create a dramatic focal point, while yellow-orange selections blend more gently with surrounding plants. The Best Location for Orange Cosmos Orange cosmos grow and flower best in full sun. Choose a location that receives at least six hours of direct sunlight each day. Plants may tolerate some light shade, but insufficient sunlight can result in fewer flowers and weaker, more elongated stems. Good air circulation is also helpful. Avoid crowding plants against dense shrubs or placing them where wet foliage remains enclosed for long periods. Taller varieties benefit from a location protected from strong wind, particularly in regions that experience frequent summer storms. Orange cosmos perform beautifully in flower beds, sunny borders, raised beds, cottage gardens, pollinator gardens, and dedicated cutting gardens. They can also be planted along fences or near vegetable gardens to add color and attract beneficial visitors. Soil Requirements Well-drained soil is more important than highly fertile soil when growing orange cosmos. These adaptable annuals can tolerate sandy, loamy, and moderately poor garden soils as long as water does not remain around their roots. Rich soil and excessive fertilizer can encourage abundant foliage at the expense of flowers. Overfed plants may also grow unusually tall and become more likely to lean or flop. In average garden soil, additional fertilizer is often unnecessary. If the planting area has heavy clay or drains slowly, improve the location before sowing by addressing compaction and drainage. Compost can help support soil structure, but it should be incorporated moderately rather than used to create an excessively rich planting bed. How to Grow Orange Cosmos From Seed Orange cosmos are easy to grow directly from seed. Wait until the danger of frost has passed and the soil has begun to warm. Cold, wet soil may delay germination and increase the chance of seeds deteriorating before they sprout. Prepare the site by loosening the surface and removing weeds, stones, and large clumps of soil. Scatter or space the seeds according to the information on the seed packet, then cover them lightly. Cosmos seeds should not be buried deeply because excessive planting depth may interfere with germination. Water the area gently so the seeds remain in place. Keep the upper layer of soil consistently moist while germination occurs, but do not leave it saturated. Seedlings commonly emerge within one to three weeks, depending on soil temperature, moisture, and the cultivar. Once the seedlings are large enough to handle, thin crowded plants to provide adequate space. Good spacing encourages stronger stems, better airflow, and a fuller display of flowers. Starting Seeds Indoors Gardeners with short growing seasons can start orange cosmos indoors several weeks before the expected final spring frost. Use a well-draining seed-starting mixture and provide strong, consistent light after the seedlings emerge. Insufficient light can cause young cosmos plants to become thin and stretched. If growing them beneath plant lights, position the lights according to the manufacturer’s recommendations and adjust them as the seedlings grow. Before moving indoor-grown seedlings into the garden, introduce them gradually to outdoor sunlight, wind, and temperature changes. This hardening process reduces transplant stress. Plant them outside only after frost danger has passed and conditions have warmed. Watering Orange Cosmos Newly planted seeds and young seedlings need consistent moisture while their root systems develop. Water carefully enough to moisten the soil without washing seeds away or flattening tender plants. Established orange cosmos tolerate occasional dry conditions, but they still benefit from water during extended
Learn how to plant, grow, and care for orange nasturtiums, including sunlight, soil, watering, container care, harvesting, and edible uses. Orange nasturtiums bring glowing color, rounded green leaves, and a relaxed cottage-garden appearance to beds, borders, containers, and edible landscapes. These cheerful flowers are especially attractive spilling over the side of a window box, filling an open space in a vegetable garden, or weaving through a sunny flower bed. Common garden nasturtiums belong to the genus Tropaeolum. The two types most often grown are trailing nasturtium, Tropaeolum majus, and compact bush nasturtium, Tropaeolum minus. Depending on the variety, the flowers may be soft apricot, golden orange, tangerine, salmon, or deep red-orange. Nasturtiums are valued for more than their beauty. Their flowers and leaves are edible and have a fresh, peppery flavor similar to watercress or arugula. The blossoms can add vivid color to salads, appetizers, pasta, and serving platters. Their easygoing nature also makes them an inviting choice for beginning gardeners. Are Orange Nasturtiums Annuals or Perennials? Nasturtiums are tender perennials in warm climates, but gardeners in colder regions usually grow them as annuals. They are sensitive to frost and generally continue growing and blooming until cold weather ends the season. In frost-free or very mild areas, nasturtiums may live longer and reseed readily. Gardeners in warm regions should monitor spreading plants and unwanted seedlings because nasturtiums can become vigorous under favorable conditions. Choosing the Right Orange Nasturtium Before purchasing seeds, decide whether a compact or trailing growth habit will work best in your garden. Compact varieties form tidy mounds that are well suited to garden borders, raised beds, small spaces, and patio containers. Many remain approximately 6 to 18 inches tall, although the final size depends on the cultivar and growing conditions. Trailing varieties produce longer stems that can spread across the ground or cascade from containers, window boxes, and retaining walls. They can also be guided onto a low support, but they do not have tendrils and may need help staying attached. For an especially colorful planting, look for named varieties with orange, apricot, peach, tangerine, or salmon-colored flowers. Check the seed packet for the plant’s mature size and habit rather than choosing by flower color alone. When to Plant Nasturtium Seeds Plant nasturtium seeds outdoors after the danger of frost has passed and the soil has begun to warm. In many regions, this means sowing them in late spring. Local frost dates and soil conditions are more useful than a fixed calendar date. Seeds can also be started indoors approximately four to six weeks before the expected final spring frost. Nasturtiums can be sensitive to root disturbance, so plantable paper or fiber pots may make it easier to move seedlings into the garden without disrupting their roots. Direct sowing is often the simplest option. The large seeds are easy to handle, and seedlings may emerge in approximately 7 to 10 days when temperature and moisture conditions are favorable. The University of Wisconsin recommends sowing seeds about ½ inch deep and placing plants approximately 10 to 12 inches apart, although spacing should also be adjusted for the selected variety. University of Wisconsin Horticulture Selecting the Best Location Nasturtiums generally flower best in full sun. A location receiving at least six hours of direct sunlight is a helpful starting point, but climate matters. Plants growing in regions with intense summer heat may benefit from protection during the hottest part of the afternoon. Partial shade can help reduce heat stress, but excessive shade may produce long, leafy plants with fewer blossoms. Watch how the plants respond and adjust container placement if flowering slows during extremely hot weather. Good air circulation is also beneficial. Avoid crowding plants tightly against one another, particularly in humid conditions. Soil and Fertilizer Requirements Nasturtiums prefer well-drained soil and often perform beautifully without rich amendments or frequent feeding. Highly fertile soil, especially soil containing abundant nitrogen, can encourage lush leaf production at the expense of flowers. Before planting, loosen compacted soil and correct serious drainage problems. Gardeners working with heavy clay or waterlogged ground may have better results growing nasturtiums in raised beds or containers. Routine fertilization is usually unnecessary unless the soil is extremely poor or a plant shows a confirmed nutrient deficiency. If a nasturtium produces many healthy leaves but very few flowers, excessive fertilizer may be part of the problem. Growing Orange Nasturtiums in Containers Orange nasturtiums make excellent container plants. Compact varieties create full mounds of foliage and flowers, while trailing varieties soften the edges of hanging baskets, window boxes, and tall planters. Choose a container with unobstructed drainage holes and fill it with a well-draining potting mix. Avoid using dense garden soil in containers because it may compact and hold too much water. Container-grown nasturtiums can dry more quickly than plants growing in the ground. Check the soil regularly, especially during hot or windy weather. Water when the upper portion of the potting mix begins to feel dry, then allow excess water to drain completely. Watering Nasturtiums Established nasturtiums tolerate some dryness, but regular watering supports stronger flowering. Water deeply enough to moisten the root zone, then allow the soil surface to begin drying before watering again. The goal is consistent but not saturated soil. Prolonged waterlogging can contribute to weak growth and root problems, while repeated severe wilting may reduce flowering. Direct water toward the soil instead of routinely soaking the foliage. Watering early in the day gives splashed leaves time to dry and may help limit disease problems in humid gardens. Encouraging More Orange Flowers Adequate sunlight, restrained fertilizer use, and regular moisture are the foundations of abundant nasturtium flowers. Harvesting blossoms or removing faded flowers can encourage the plant to continue producing buds rather than directing all its energy toward seed development. If a healthy plant has abundant foliage but few flowers, check its light and fertilizer conditions. Moving a container to a sunnier position or stopping unnecessary feeding may improve flower production. Very hot summer weather
Learn how to grow a healthy tangerine tree with practical guidance for planting, watering, fertilizing, pruning, container care, pest prevention, and harvesting sweet homegrown citrus. A healthy tangerine tree brings year-round beauty, fragrant spring blossoms, glossy evergreen foliage, and an abundant harvest of sweet citrus. Whether planted in the garden or grown in a container, tangerine trees can thrive for many years when they receive plenty of sunlight, well-draining soil, consistent moisture, and protection from extreme cold. Tangerines belong to the broader mandarin group of citrus. Depending on the variety, the fruit may be sweet, tangy, seedless, or especially easy to peel. Popular choices for home gardens include Satsuma, Clementine, Dancy, and various mandarin hybrids. Because climate requirements and mature tree size vary, choosing a variety and rootstock suited to your region is one of the most important steps toward successful citrus growing. Growing a tangerine tree does require patience. A young tree may take several years to produce a substantial crop, but proper planting and regular care encourage stronger growth, healthier foliage, and better fruit production. Choosing the Best Tangerine Tree Purchase a healthy grafted tree from a reputable local nursery whenever possible. Grafted trees usually produce fruit sooner and more predictably than trees grown from seed. They also retain the desirable flavor, size, and productivity of the named variety. A seed collected from a tangerine can germinate, but the resulting tree may not produce fruit identical to the original. Seed-grown citrus can also become large, thorny, and slow to bear fruit. It can be an enjoyable growing project, but it is not the most dependable method for establishing a productive home orchard. Before selecting a tree, consider its mature size, cold tolerance, harvest season, seed content, and suitability for container growing. A dwarf or semi-dwarf tree is usually the best choice for a patio, small garden, or indoor overwintering. Satsuma mandarins are particularly valued in regions with occasional frost because established, properly hardened trees are generally more cold tolerant than many other sweet citrus varieties. However, cold tolerance varies with the cultivar, rootstock, tree age, health, wind exposure, and duration of the freeze. Understanding the Ideal Climate Tangerine trees grow best in warm subtropical climates with mild winters and long, sunny growing seasons. In-ground planting is most successful where severe or prolonged freezes are uncommon. Gardeners in colder climates can grow dwarf tangerine trees in containers and move them into a protected space during winter. Cold tolerance should never be judged by a single temperature. A mature, healthy tree may survive a brief cold period that could seriously damage a young tree, blossoms, or ripening fruit. Tangerine and mandarin wood may tolerate temperatures in the low 20s under favorable conditions, but fruit can freeze at approximately 26°F to 28°F when the cold lasts for several hours. Satsumas are among the more cold-tolerant types of sweet citrus. University of Georgia Extension Planting near a south-facing wall can create a warmer microclimate in marginal areas. The site should also be protected from strong winds, which can damage foliage, dry the soil, and intensify cold stress. How Much Sun Does a Tangerine Tree Need? Tangerine trees need abundant sunlight for healthy foliage, flowering, and fruit development. Choose a location that receives at least six hours of direct sunlight each day. Eight or more hours is often beneficial where summer temperatures are not excessively hot. Insufficient sunlight may result in thin growth, fewer blossoms, and poorly developed fruit. Indoor trees should be positioned near a bright south-facing window or placed under an appropriate grow light when natural sunlight is limited. When moving a container-grown tree outdoors in spring, introduce it to brighter conditions gradually. A sudden transition from indoor light to intense outdoor sun can scorch the leaves. Reverse the process in autumn so the tree can adjust before being brought indoors. Selecting the Right Soil Good drainage is essential for tangerine trees. Citrus roots need moisture, but they also require oxygen and can decline in soil that remains waterlogged. For an in-ground tree, choose a location where water does not collect after heavy rain. If the soil drains poorly, planting on a raised mound may be more successful than placing the root ball in a deep amended hole. Avoid planting citrus in a lawn because grass and citrus trees have different watering and fertilizing requirements. Container trees need a loose, well-draining potting mix intended for citrus or other container-grown trees. Do not fill the container with ordinary garden soil because it may compact and hold too much water. How to Plant a Tangerine Tree Plant a tangerine tree after the danger of severe frost has passed. Spring planting allows the root system time to become established before the following winter. Choose a sunny, well-drained site with enough room for the tree’s expected mature width. Dig a hole approximately twice as wide as the root ball but no deeper than the root ball itself. Remove the tree carefully from its nursery pot and inspect the roots. Gently loosen roots that are tightly circling the outside of the root ball. Position the tree so the top of the root ball sits at or slightly above the surrounding soil level. Backfill the hole primarily with the native soil. Do not bury the trunk flare or graft union. Water thoroughly to settle the soil around the roots, adding more soil if necessary without packing it firmly against the trunk. Apply a layer of organic mulch over the root zone to help conserve moisture and moderate soil temperature. Keep the mulch several inches away from the trunk to discourage rot and pest problems. Growing a Tangerine Tree in a Container Container growing makes it possible to enjoy a tangerine tree on a patio, balcony, or in a cold-winter climate. Begin with a dwarf or semi-dwarf tree and a sturdy container with multiple drainage holes. The pot should provide room for root growth without being excessively large. Too much unused potting mix may remain wet for
Originally published
March 2026
Updated
August 2026
Reviewed by
Culibloom