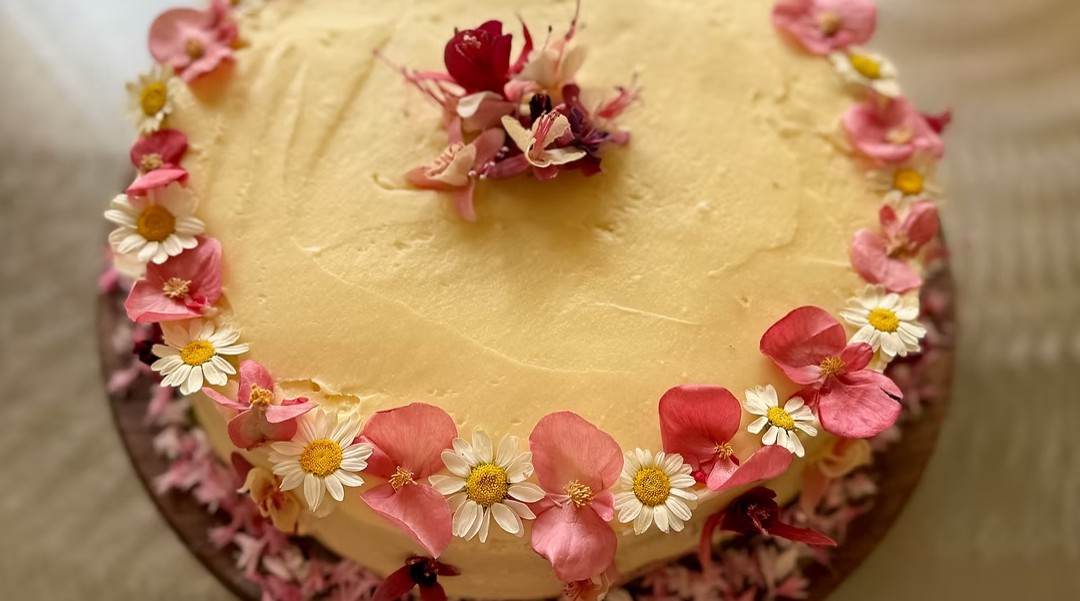
Make an elegant gluten-free vanilla rose garden party cake with tender floral layers, creamy rose buttercream, and beautiful edible flowers.
Delicate, fragrant, and beautifully decorated, this Elegant Gluten-Free Vanilla Rose Garden Party Cake Recipe makes a charming centerpiece for bridal showers, afternoon tea parties, birthdays, Mother’s Day celebrations, and garden-inspired gatherings. Two tender vanilla cake layers are infused with rose essence and covered with a light, creamy vanilla rose buttercream.
Sweet vanilla, tangy buttermilk, rich sour cream, and aromatic rose create a balanced floral flavor without making the cake overly perfumed. A combination of sweet rice flour, white rice flour, brown rice flour, and tapioca flour gives the cake a moist, fluffy crumb that pairs beautifully with the smooth buttercream.
Finish this elegant layer cake with edible roses, dried rose petals, fresh edible flowers, or decorative buttercream piping. The finished dessert looks sophisticated and festive while remaining approachable enough for a home baker to prepare.
Directions
Step 1: Prepare the Oven and Cake Pans
Preheat the oven to 350°F. Lightly grease two 6-inch round cake pans with cooking spray or oil. Line the bottoms with parchment paper, then lightly grease the parchment to help the baked cake layers release cleanly.
Step 2: Combine the Cake Ingredients
In the bowl of a stand mixer fitted with the paddle attachment, combine the sweet rice flour, white rice flour, tapioca flour, brown rice flour, xanthan gum, baking powder, baking soda, and kosher salt.
Add the butter or neutral oil, granulated sugar, eggs, vanilla extract, buttermilk, sour cream, and rose essence directly to the dry ingredients.
Step 3: Mix the Cake Batter
Mix on low speed until the ingredients are combined. Increase the mixer speed to medium and beat for 1 to 2 minutes, or until the batter is smooth and creamy.
Stop the mixer and scrape down the sides and bottom of the bowl as needed to ensure that all the ingredients are evenly incorporated.
Step 4: Fill the Cake Pans
Divide the batter evenly between the prepared cake pans. Use an offset spatula to spread the batter into smooth, even layers.
Gently tap each pan on the counter a few times to release any large air bubbles trapped in the batter.
Step 5: Bake the Cake Layers
Bake for 29 to 33 minutes, or until the tops spring back when lightly touched and a toothpick inserted into the center comes out clean or with only a few moist crumbs attached.
Avoid opening the oven door during the first 25 minutes of baking because a sudden temperature change may cause the cake layers to sink.
Step 6: Cool the Cake Layers
Remove the cakes from the oven and let them cool in their pans for 10 minutes.
Place a wire cooling rack over each pan and carefully invert the pans to release the cakes. Remove the parchment paper, then gently turn the cake layers right side up.
Allow the layers to cool completely before assembling the cake. Applying buttercream to warm cake layers may cause the frosting to melt or slide.
Step 7: Beat the Butter
Place the softened butter in the clean bowl of a stand mixer fitted with the paddle attachment. Beat on medium speed for 3 to 4 minutes, or until the butter is pale, smooth, and fluffy.
Step 8: Prepare the Vanilla Rose Buttercream
Gradually add the sifted powdered sugar in three additions, mixing well after each addition.
Add the vanilla extract, kosher salt, and rose essence. With the mixer running on low speed, slowly add 3 tablespoons of heavy cream.
Continue adding more heavy cream, 1 tablespoon at a time, until the buttercream reaches a smooth, spreadable consistency. Beat for another 2 to 3 minutes, or until the frosting is light and fluffy.
Step 9: Fill and Stack the Cake
Place one completely cooled cake layer on a serving plate or cake stand. Spread approximately 1/2 cup of vanilla rose buttercream evenly over the top.
Position the second cake layer over the frosting and gently press it into place.
Step 10: Apply the Crumb Coat
Spread a thin layer of buttercream over the top and sides of the entire cake. This crumb coat traps loose crumbs and creates a smooth foundation for the final layer of frosting.
Place the crumb-coated cake in the refrigerator for 15 minutes, or until the frosting is firm enough to hold the crumbs in place.
Step 11: Frost and Decorate the Cake
Spread the remaining buttercream over the top and sides of the chilled cake. Smooth the frosting with an offset spatula or cake scraper.
If desired, decorate the cake with fresh edible roses, dried edible rose petals, other edible flowers, or decorative buttercream piping.
Step 12: Chill and Serve
Refrigerate the finished cake until ready to serve. For the best flavor and texture, let the cake stand at room temperature for 20 to 30 minutes before slicing and serving.
Notes
Rose essence can vary significantly in strength between brands. Begin with the listed amount and taste the buttercream before adding more.
For a slightly stronger floral flavor, add another 2 to 3 drops of rose essence to the frosting. Add it gradually to avoid overpowering the vanilla flavor.
Bring the eggs, buttermilk, sour cream, and butter to room temperature before mixing. Room-temperature ingredients combine more evenly and help produce a tender cake crumb.
If using oil instead of butter in the cake batter, choose a neutral-flavored variety such as avocado, vegetable, or canola oil.
Only use flowers and rose petals that are specifically identified as edible and have not been treated with pesticides or other chemicals unsuitable for food.
Store the finished cake covered in the refrigerator for up to 4 days. Let refrigerated slices stand at room temperature for 20 to 30 minutes before serving for a softer texture and fuller flavor.
When preparing this cake for someone with celiac disease or gluten sensitivity, verify that all packaged ingredients, including the flours, xanthan gum, baking powder, extracts, rose essence, powdered sugar, and decorating ingredients, have appropriate gluten-free labeling. Prevent cross-contact by using clean equipment, pans, utensils, and preparation surfaces.