Pink and Yellow Snapdragons Growing Guide: Bright, Cheerful Blooms for Every Garden
Learn how to grow pink and yellow snapdragons with tips for planting, sunlight, watering, deadheading, containers, and colorful garden design.
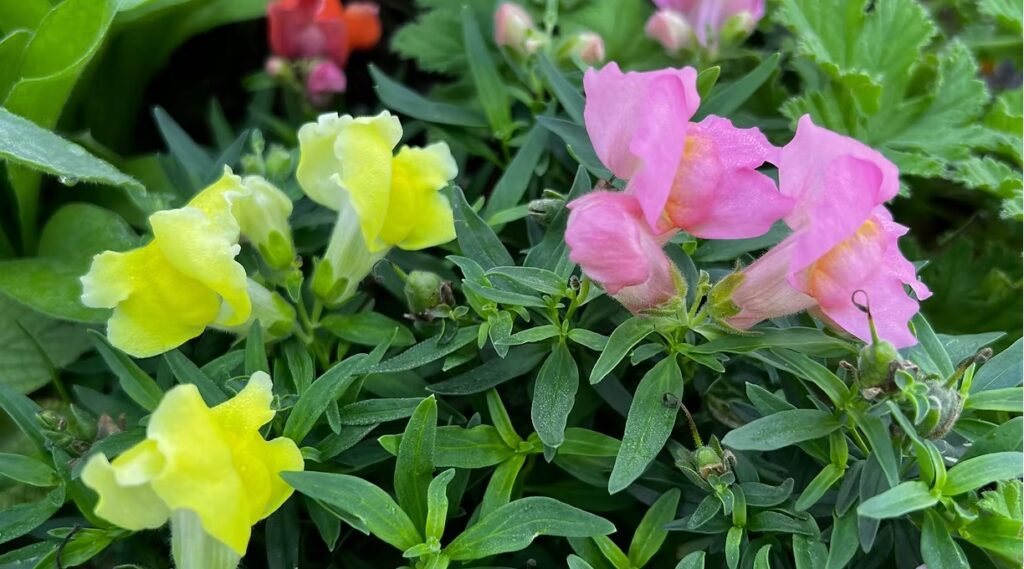
Pink and yellow snapdragons bring a joyful combination of color, height, and old-fashioned charm to garden beds and containers. Their tall flower spikes are covered with distinctive blossoms that resemble tiny dragon mouths, creating a playful display from spring into fall. When pink and yellow varieties are planted together, their warm colors brighten borders, pathways, patios, and cutting gardens.
Known botanically as Antirrhinum majus, snapdragons are cool-season flowers that perform especially well during mild spring and autumn weather. Depending on the cultivar, plants may remain compact at approximately 6 inches tall or grow into dramatic flower spikes reaching 3 feet. This range of sizes makes snapdragons remarkably versatile in garden design.
Although snapdragons are commonly grown as annuals, their behavior depends on the cultivar, climate, and winter conditions. In areas with mild winters, plants may survive longer or return for another season. Gardeners in colder climates typically enjoy them as colorful annual flowers.
Why Grow Pink and Yellow Snapdragons?
Pink snapdragons can give a garden a romantic, graceful appearance, while yellow snapdragons introduce warmth and sunshine. Planted together, the colors create a soft but lively display that complements cottage gardens, pollinator plantings, formal borders, and relaxed backyard landscapes.
Snapdragons also add valuable vertical interest. Their upright flowers provide contrast when placed beside rounded, trailing, or mounding plants. Tall varieties can create a colorful backdrop, medium varieties work beautifully throughout mixed borders, and dwarf snapdragons make attractive edging plants.
Their long stems and densely arranged blossoms are also excellent for cutting. A small group of pink and yellow snapdragons can provide enough flowers for cheerful seasonal arrangements without leaving the garden looking bare.
Choosing Pink and Yellow Snapdragon Varieties
Snapdragons are generally divided into dwarf, medium, and tall growing groups. The best choice depends on where the plants will grow and how you hope to use them.
Compact varieties are ideal for window boxes, patio containers, pathway edges, and the front of flower beds. Medium snapdragons blend well with other annuals and perennials. Tall cutting varieties produce dramatic flower spikes but may need support, especially in exposed locations.
Color can vary considerably between cultivars. Pink snapdragons range from pale blush and rose to coral and deep magenta. Yellow varieties may produce creamy lemon, golden yellow, or warm butter-colored flowers. Some bicolored selections combine pink and yellow within the same blossom.
Check the expected height, bloom period, and growing recommendations on the plant label or seed packet. Cultivars can differ in heat tolerance, flower form, and ideal growing season.
When to Plant Snapdragons
Snapdragons prefer cool weather and are traditionally planted for spring and autumn color. They are cold-tolerant compared with many warm-season annual flowers, although newly purchased plants should still be introduced gradually to outdoor conditions.
In regions with cold winters, start seeds indoors approximately 8 to 10 weeks before the expected last frost. Snapdragon seeds are very small and should be sown according to the directions provided for the particular cultivar. Give seedlings bright light so they develop sturdy growth instead of becoming thin and stretched.
Harden indoor-grown seedlings before transplanting them. This gradual adjustment helps young plants become accustomed to outdoor sunlight, wind, and temperature changes.
In mild climates, snapdragons may be planted during autumn for winter or early spring flowers. Gardeners can also plant another crop in late summer for an autumn display. Local weather patterns matter, so choose a planting window that gives the plants time to establish during mild conditions.
The Best Location for Snapdragons
Choose a location with full sun for the strongest flowering and most upright growth. Light afternoon shade may be helpful in regions where the weather becomes hot quickly, but too much shade can produce fewer flowers and weaker stems.
Snapdragons prefer moist, well-drained soil. Avoid areas where water remains around the roots after rain, since constantly saturated soil can contribute to root and disease problems. Improving heavy soil with finished compost may support better structure and drainage.
Allow enough space between plants for air to circulate. Exact spacing depends on the mature size of the cultivar. Compact snapdragons can be planted closer together than tall cutting varieties, so follow the recommendations on the seed packet or plant label.
How to Plant Pink and Yellow Snapdragons
Before planting, loosen the soil and remove weeds that could compete for moisture and nutrients. Incorporate a moderate amount of finished compost if the soil needs additional organic matter.
Dig a hole approximately as deep as the plant’s root ball. Position the snapdragon at the same soil level at which it was growing in its original container. Fill around the roots, press the soil gently into place, and water thoroughly.
Avoid burying the stem or setting the plant deeply into the ground. Mulch can be applied around the plants to help conserve moisture and reduce weeds, but leave a little open space around each stem.
For a balanced pink and yellow display, repeat the colors throughout the planting area. Alternating individual plants creates a playful pattern, while grouping several plants of each color produces stronger blocks of color that can be seen from a distance.
Watering Snapdragons
Keep the soil consistently moist while newly planted snapdragons establish their roots. Once established, water when the upper layer of soil begins to dry rather than following a rigid schedule.
Water deeply enough to moisten the root zone. Whenever possible, direct water toward the soil instead of routinely wetting the foliage and flowers. Morning watering gives any splashed leaves time to dry and can help discourage diseases favored by prolonged moisture and humidity.
Container-grown snapdragons usually dry more quickly than plants growing in the ground. Check their soil regularly, particularly during bright, windy, or unexpectedly warm weather. Containers must have drainage holes so excess water can escape.
Fertilizing for Healthy Flowers
Snapdragons generally benefit from reasonably fertile soil, but excessive fertilizer can encourage soft, leafy growth instead of abundant flowers. A soil test is the best way to understand the conditions in an established garden bed.
If the soil is poor, mix finished compost into the bed before planting. Container plants may need occasional feeding with a balanced fertilizer, used according to its label. Apply fertilizer to moist soil and avoid using more than the recommended amount.
Healthy color and steady growth are better guides than aggressive feeding. Plants that are growing and flowering well may not require frequent additional fertilizer.
Pinching, Deadheading, and Supporting the Plants
Pinching young snapdragons can encourage branching and create fuller plants, although the best approach depends on the variety and whether long, single stems are desired for cutting. Pinching removes the growing tip, which encourages the plant to produce more side shoots.
Remove fading flower spikes before the plants devote substantial energy to seed production. Regular deadheading keeps the planting tidy and may encourage another flush of flowers. Cut the spent spike just above healthy leaves or developing side shoots rather than removing random sections of the stem.
Tall varieties may need discreet stakes, plant supports, or netting. Wind and heavy rain can bend flower stems, especially when they are carrying large blooms. Position supports early so the plants can grow naturally through them.
Helping Snapdragons Through Summer Heat
Snapdragons usually flower most vigorously in cool conditions. When summer heat arrives, blooming may slow and plants can begin to look tired. This does not always mean they are finished for the season.
Continue watering appropriately, remove faded flowers, and trim back declining stems if the plants remain healthy. A renewed display may appear as temperatures moderate. In hot climates, gardeners may get better results by treating snapdragons primarily as autumn, winter, or early spring flowers.
Variety selection also matters. If summers arrive early in your region, look for cultivars described as having improved heat tolerance.
Growing Snapdragons in Containers
Pink and yellow snapdragons make beautiful container plants. Choose compact or medium varieties for traditional pots, railing planters, and window boxes. Tall cultivars can also grow in large, heavy containers that will not tip easily.
Use a quality container mix rather than dense garden soil. Make sure the container drains freely, and check the moisture regularly. Soil in pots can change from comfortably moist to dry much faster than soil in a garden bed.
For a simple display, combine several pink and yellow snapdragons in one generously sized pot. For a mixed arrangement, place an upright snapdragon near the center or back and surround it with lower-growing companion plants that enjoy similar light and moisture conditions.
Companion Plants for Pink and Yellow Snapdragons
Pink and yellow snapdragons pair beautifully with cool-season flowers such as pansies, violas, sweet alyssum, calendula, and dianthus. Their upright form also contrasts nicely with trailing plants around the edge of a container.
For a soft romantic palette, combine blush-pink snapdragons with white alyssum and silvery foliage. For a sunny display, mix golden snapdragons with purple violas or deep blue flowers. Green foliage helps unify pink and yellow combinations while allowing both colors to remain prominent.
Choose companions with compatible sunlight, soil, and watering requirements. Give every plant enough room to reach its expected mature size without becoming overcrowded.
Cutting Snapdragons for Bouquets
Harvest snapdragons in the cool part of the morning, using clean, sharp pruners. Select stems that have begun opening near the bottom while buds remain farther up the spike. Place the stems in clean water promptly.
Snapdragon stems respond to gravity and can bend when stored horizontally. Keep freshly cut stems upright whenever possible. Remove foliage that would sit below the waterline, use a clean vase, and replace the water regularly.
Frequent cutting can encourage branching varieties to produce additional stems. Avoid removing so much growth at once that the plants no longer have enough foliage to remain vigorous.
Common Snapdragon Problems
Aphids may gather around tender shoots and flower buds. Inspect plants regularly and begin with gentle controls, such as a firm stream of water, when appropriate. Avoid spraying open flowers when pollinators are active.
Snapdragon rust can cause yellow flecks on upper leaf surfaces and raised reddish-brown or brown pustules, particularly on the undersides of leaves. Humid conditions and wet foliage can encourage disease development. Improve air circulation, water near the soil, remove severely affected material, and consider rust-resistant varieties if the problem returns frequently.
Poor flowering may result from excessive heat, too much shade, overfertilization, or delayed deadheading. Weak stems can also develop when seedlings receive insufficient light or mature plants are exposed to strong wind and heavy rain.
Designing a Garden with Pink and Yellow Snapdragons
For an informal cottage garden, allow pink and yellow varieties to weave through other cool-season flowers. In a formal bed, plant them in repeated groups for a more orderly rhythm. Tall snapdragons can stand behind shorter flowers, while dwarf cultivars can define the edge of a path.
Repeating both colors in containers and nearby garden beds creates a coordinated landscape. Soft pink and pale yellow produce a delicate spring look, while vivid rose and golden yellow create a bolder display.
Snapdragons are also useful in transition areas. Their flowers can bridge the gap between spring bulbs and summer annuals, especially when weather remains mild enough for continued growth.
A Cheerful Flower for Every Garden
Pink and yellow snapdragons offer an inviting mixture of color, structure, and versatility. They can brighten a small patio pot, soften a cottage-style border, add height to a flower bed, or supply elegant stems for bouquets.
Plant them in well-drained soil with plenty of sunlight, provide consistent moisture without waterlogging the roots, and remove spent flower spikes to support repeat blooming. With thoughtful variety selection and seasonal timing, these cheerful flowers can become one of the most memorable features in the garden.
Pink and yellow snapdragons bring soft color and graceful beauty to the garden.
Few orchids capture attention quite like the pink and yellow Vanda orchid. With its brilliant tropical colors, intricate flower patterns, and long-lasting blooms, this stunning orchid transforms any growing space into a vibrant display of natural beauty. Whether suspended in hanging baskets, mounted on trees, or displayed in decorative wooden baskets, pink and yellow Vanda orchids create an unforgettable focal point that continues to impress season after season. This Pink and Yellow Vanda Orchid Growing Guide will help you understand everything you need to know about these spectacular orchids, from their unique growth habits to the conditions they need to thrive. Although they may appear exotic, Vanda orchids reward gardeners who provide the right balance of warmth, humidity, bright light, and excellent air circulation. Once established, they produce breathtaking flower spikes that often bloom several times each year. What Makes Pink and Yellow Vanda Orchids So Special? Pink and yellow Vanda orchids are admired for their cheerful combination of warm sunshine yellow petals accented with vibrant shades of pink, magenta, lavender, or rose. Many flowers feature intricate speckles, veining, or colorful lips that make every bloom appear hand painted. Unlike many other orchids that grow in bark-filled pots, Vanda orchids are epiphytes. In their natural tropical habitat, they attach themselves to tree branches where their thick aerial roots freely absorb moisture and nutrients from the surrounding air. This unique growing habit gives them an elegant, sculptural appearance even when they are not in bloom. Their flowers are among the largest produced by orchids and often remain fresh for six to eight weeks. Mature plants can produce multiple flower spikes throughout the year when grown under ideal conditions, making them one of the most rewarding orchids for collectors and home gardeners alike. Native Habitat Vanda orchids originate throughout tropical regions of Southeast Asia, including warm forests where temperatures remain consistently mild throughout the year. They naturally grow attached to tree trunks and branches, receiving bright filtered sunlight, warm temperatures, abundant humidity, and constant airflow. Their native environment explains many of their growing preferences. Instead of remaining in constantly wet soil, their exposed roots dry quickly after tropical rains while still absorbing plenty of moisture from the humid air. Recreating these conditions at home is the key to growing healthy, vigorous plants. Understanding Their Unique Root System One of the first things gardeners notice about a Vanda orchid is its impressive network of thick silver-green aerial roots. These roots are not a sign that the plant needs to be repotted. Instead, they are an essential part of the orchid’s survival. The roots serve several important functions. They absorb water during watering or rainfall, capture nutrients from the environment, anchor the orchid securely to its support, and perform photosynthesis thanks to their green inner tissue. Healthy roots appear firm and silvery when dry. After watering, they quickly turn bright green as they absorb moisture. This color change provides an easy way to determine when your orchid has received enough water. Choosing the Perfect Location Selecting the right growing location is one of the most important factors for success. Pink and yellow Vanda orchids thrive in bright locations where they receive abundant indirect sunlight throughout the day. Morning sunlight is especially beneficial because it encourages vigorous growth while reducing the risk of leaf burn. In warmer climates, filtered afternoon shade helps protect the leaves during the hottest hours. If grown indoors, place the orchid near a bright east-facing or south-facing window with filtered light. Outdoor growers in warm climates often achieve excellent results by hanging Vanda orchids beneath shade cloth, covered patios, pergolas, or open tree canopies that provide dappled sunlight. Light Requirements Light is one of the biggest influences on flowering. Vanda orchids require significantly more light than many common houseplant orchids. Plants receiving adequate light develop sturdy leaves with a healthy medium green color and produce flower spikes regularly. Insufficient light often results in lush foliage but few or no blooms. Excessively dark green leaves may indicate that the orchid needs more sunlight, while yellowing or scorched leaves can signal excessive direct afternoon sun. Finding the proper balance encourages both healthy growth and spectacular flowering. Temperature and Humidity Needs As tropical orchids, pink and yellow Vanda orchids flourish in consistently warm conditions. Daytime temperatures between 70 and 90°F encourage vigorous growth, while nighttime temperatures between 60 and 70°F support healthy development without causing stress. Humidity plays an equally important role. These orchids perform best when humidity remains between 60 and 80 percent. Higher humidity helps keep aerial roots active and hydrated while promoting larger flowers and stronger overall growth. In drier climates, regular misting, humidity trays, or greenhouse growing conditions can help maintain the moisture these orchids naturally enjoy. Air Circulation Is Essential One of the secrets to successful Vanda orchid care is excellent air movement. Because their roots remain exposed, they rely on steady airflow to dry after watering while preventing fungal diseases and root problems. Gentle circulating air also helps regulate temperature, reduces excess moisture around the roots, and strengthens plant growth. Whether growing indoors or outdoors, providing continuous but gentle airflow creates healthier plants and significantly improves long-term success. Why Gardeners Love Pink and Yellow Vanda Orchids Pink and yellow Vanda orchids offer far more than beautiful flowers. They combine dramatic tropical beauty with fascinating growth habits that make them enjoyable year-round. Gardeners appreciate their vibrant blooms, impressive aerial roots, extended flowering season, ability to bloom multiple times each year, and striking appearance in hanging displays or mounted on trees. Their colorful blossoms also attract admiration from visitors, making them one of the most rewarding orchids to grow for anyone who enjoys tropical gardening. With proper care, these remarkable orchids can thrive for many years, producing spectacular displays that become even more impressive as the plants mature. Growing a healthy pink and yellow Vanda orchid is all about recreating its tropical environment. Once you understand how these orchids naturally grow in the wild, caring for them becomes much
Learn how to grow a Vanda orchid on a tree with the right light, watering, mounting method, humidity, fertilizer, and tropical garden care. Growing a Vanda orchid on a tree creates a spectacular living display filled with cascading aerial roots, glossy foliage, and brilliantly colored flowers. This natural growing style closely resembles how Vanda orchids live in tropical and subtropical forests, where their roots cling to trees while remaining exposed to rain, humidity, and moving air. Unlike parasitic plants, Vanda orchids do not take water or nutrients from their host trees. They are epiphytes, which means they use trees for physical support. Their specialized aerial roots absorb moisture and dissolved nutrients from rain, humid air, and organic matter that washes across the bark. Mounting a Vanda orchid on a tree can be an excellent long-term growing method in a warm, humid climate. Choosing the right location, protecting the roots during attachment, and providing dependable moisture while the orchid becomes established will help create a healthy plant that looks as though it grew there naturally. Why Vanda Orchids Grow Well on Trees Vanda orchids are tropical plants with thick aerial roots adapted to open, airy conditions. These roots are covered by a spongy outer layer called velamen, which absorbs water quickly and helps protect the living tissue inside. When a Vanda is confined in a dense or poorly drained potting medium, its roots may remain wet for too long. A tree mount allows water to drain immediately while air circulates freely around the root system. This balance of moisture and ventilation is one of the reasons Vandas perform so well in baskets, on slabs, and directly on trees. A living tree can also create a favorable microclimate. Its canopy may provide filtered sunlight, protection from intense afternoon heat, and slightly higher humidity around the orchid. The best conditions will depend on the tree, the surrounding landscape, and the type of Vanda being grown. Choosing the Right Climate Permanent outdoor mounting is most successful in frost-free tropical and subtropical regions. Vandas generally prefer warm days, warm nights, high humidity, and dependable air circulation. Cold weather can damage the leaves, roots, buds, and flowers. If temperatures in your area regularly become cool, attaching the orchid permanently to a landscape tree may not be practical. A removable wood mount or hanging basket can provide a similar natural appearance while allowing the plant to be moved into a protected location during cold weather. Local conditions matter more than a general climate-zone recommendation. A sheltered urban garden, exposed coastal property, elevated inland landscape, and humid courtyard can produce very different growing environments. Observe the temperature, sunlight, wind, and moisture patterns around the chosen tree throughout the year. Selecting a Healthy Host Tree Choose a mature, healthy tree that is not scheduled for pruning, removal, or chemical treatment. Avoid attaching an orchid to a weak, diseased, heavily shedding, or unstable tree. Textured bark gives new roots a surface they can grip. Rough bark is usually easier for an orchid to colonize than extremely smooth or peeling bark. However, the tree must also provide the correct amount of light and protection. An evergreen tree often offers more consistent shade throughout the year. A deciduous tree may expose the orchid to dramatically stronger sunlight after its leaves fall. Before selecting a position, consider how the canopy changes with the seasons. The orchid should be placed where it can be reached safely for watering and maintenance. A visible location near a patio, walkway, or frequently used garden area also makes it easier to enjoy the flowers and notice developing problems. Finding the Best Light Vanda orchids need bright light to grow vigorously and flower well, but the correct intensity depends partly on their foliage. Strap-leaved Vandas, which have broad, flat leaves, generally perform best in bright filtered light or dappled sunlight. Terete and semi-terete types have narrower, more cylindrical leaves and may tolerate stronger sun when they have been gradually acclimated. Gentle morning sun followed by bright filtered light is often a good starting point. Harsh afternoon sun can overheat or scorch a plant that was previously grown in a shaded greenhouse or indoor environment. Healthy leaves are commonly medium green. Very dark green foliage may indicate that the orchid is not receiving enough light to flower well. Pale, yellowish, or scorched areas may indicate excessive light, heat stress, or another cultural problem. Make lighting changes gradually so the plant has time to adjust. When to Mount a Vanda Orchid Warm weather and active root growth provide the best conditions for mounting. Look for fresh root tips, which often appear green, glossy, and actively elongating. These new roots are more likely to attach to bark than older, inactive roots. Avoid mounting immediately before unusually cold, dry, or stormy weather. The orchid will need consistent care until enough roots have secured themselves to the tree. A newly purchased Vanda may also benefit from a short adjustment period before mounting. This gives you time to inspect the leaves, stem, and roots for pests or disease and to acclimate the plant gradually to its new light level. How to Attach a Vanda Orchid to a Tree Remove the orchid carefully from its basket or container if necessary. Take away loose or decomposed growing material without pulling forcefully on healthy roots. Vanda roots can crack when bent, especially when they are dry, so soaking or thoroughly watering them first can make them more flexible. Position the orchid upright against the trunk or a sturdy branch. Place the base of the plant close to the bark while allowing the roots to spread naturally. Do not bury the crown, pack soil around the roots, or force the roots into an unnatural arrangement. Secure the orchid with a soft, flexible material that will not cut into the stem or host tree. Biodegradable garden ties, strips of soft cloth, or other gentle supports can hold the plant firmly while the roots attach. Avoid bare wire, fishing line,
Here, you will learn all about chive blossoms and parsley, including how companion planting helps both herbs thrive, the many benefits they bring to your garden, and the delicious ways to use them in everyday cooking. Whether you are creating a thriving kitchen garden or looking for fresh inspiration in the kitchen, chive blossoms and parsley are a versatile pairing that offers beauty, flavor, and abundant harvests throughout the growing season. There is something incredibly satisfying about walking into your garden, brushing your hand across a patch of fragrant herbs, and gathering a handful of fresh parsley alongside a few vibrant purple chive blossoms. Moments like these remind us that a garden is more than a place to grow food. It is a space where beauty, nature, and fresh ingredients come together to inspire every meal. Among the many herbs you can grow, chives and parsley are one of the easiest and most rewarding companion planting combinations. They thrive under similar growing conditions, complement one another beautifully, and provide fresh harvests from spring through fall. Their partnership benefits not only your kitchen but your entire garden by attracting pollinators, supporting beneficial insects, and helping create a healthier growing environment. Whether you are planting a large kitchen garden, filling raised beds, or growing herbs in containers on your patio, chive blossoms and parsley are a pairing that delivers season after season. Their fresh flavors elevate everyday meals, while their graceful appearance adds charm and color to any outdoor space. A Perfect Partnership in the Herb Garden Companion planting is the practice of growing plants together that naturally benefit one another. Some companion plants improve soil conditions, others attract pollinators, while some help reduce pest problems or make better use of available growing space. Chives and parsley check nearly every one of those boxes. Parsley grows in lush, leafy mounds that remain attractive throughout much of the growing season. Chives produce slender green leaves that eventually give way to beautiful globe-shaped blossoms in shades of lavender and purple. Together they create layers of texture and color that look just as lovely in ornamental gardens as they do in vegetable beds. Their similar care requirements also make them easy companions. Both appreciate fertile soil, regular watering, and plenty of sunshine, allowing gardeners to care for both herbs using the same routine. For anyone just beginning an herb garden, this combination is an excellent place to start. Why Companion Planting Matters Healthy gardens are built on diversity. Instead of growing a single crop in isolation, companion planting encourages a balanced ecosystem where plants, pollinators, and beneficial insects work together. Every herb contributes something unique to the garden. Parsley provides dense foliage that helps shade the soil and reduce moisture loss. Chives contribute their distinctive onion aroma while producing nectar-rich flowers that become gathering places for pollinating insects. Together they create an environment where plants thrive naturally. Rather than viewing herbs simply as ingredients for cooking, companion planting reminds us that every plant plays an important role in supporting the health of the entire garden. Chives Help Naturally Discourage Garden Pests One reason gardeners have planted chives throughout vegetable gardens for generations is their reputation for helping reduce certain insect problems. As members of the onion family, chives contain sulfur compounds responsible for their mild onion fragrance. While people enjoy this familiar aroma, many insects do not. Growing chives near parsley may help discourage aphids, Japanese beetles, spider mites, and several other common garden pests. Although companion planting is not a replacement for good garden management, it can become an important part of an organic gardening strategy by encouraging healthier plants and reducing stress caused by insect activity. Many gardeners also plant chives near tomatoes, carrots, strawberries, roses, peppers, and apple trees for the very same reason. Chive Blossoms Bring Your Garden to Life If there is one reason never to cut every chive flower before it opens, it is the incredible number of beneficial insects they attract. As spring transitions into early summer, chives produce clusters of soft purple blossoms that quickly become one of the busiest places in the garden. Honeybees eagerly gather nectar from the flowers while native bees move from bloom to bloom collecting pollen. Butterflies drift through the blossoms, adding movement and beauty to the landscape, while hoverflies quietly perform double duty by feeding on nectar as adults and helping control aphids during their larval stage. Watching these visitors move through your herb garden is one of the simple pleasures of gardening. Their presence also benefits nearby vegetables, fruit trees, berry bushes, and flowering plants that depend on pollination for healthy harvests. Growing Chives and Parsley Together One of the reasons these herbs are so popular is because they are wonderfully uncomplicated. Choose a location that receives at least six hours of sunlight each day. While chives love full sun, parsley appreciates a little afternoon shade during periods of intense summer heat, especially in warmer climates. Plant both herbs in fertile, well-drained soil enriched with compost. Rich organic matter encourages vigorous growth while helping retain moisture between waterings. Water regularly, keeping the soil evenly moist without allowing it to become soggy. Applying a layer of mulch around the plants helps regulate soil temperature, conserve moisture, and reduce weed growth. With only a little routine care, both herbs will reward you with months of fresh harvests. Beautiful in Every Garden Style One of the joys of growing herbs is their versatility. Chives and parsley look equally at home in formal herb gardens, rustic cottage gardens, raised beds, decorative borders, and patio containers. The upright foliage and cheerful blossoms of chives create natural height, while parsley fills the surrounding space with rich green leaves. The contrast between soft purple flowers and vibrant green foliage creates a timeless combination that looks attractive from spring until frost. Many gardeners intentionally plant these herbs near walkways or seating areas where their fragrance and colorful blooms can be enjoyed every day. Other Plants That Thrive
Originally published
March 2026
Updated
August 2026
Reviewed by
Culibloom