Pink Dahlia Growing Guide: Everything You Need to Know About These Beautiful Garden Favorites
Discover how to plant, grow, pinch, support, and overwinter pink dahlias for beautiful summer flowers in garden beds, containers, and bouquets.
Pink dahlias bring an irresistible combination of color, texture, and elegance to the garden. Their flowers range from soft blush and creamy rose to vivid magenta, coral pink, and deep raspberry. Depending on the variety, the blooms may be small and perfectly rounded, broad and decorative, or dramatic with pointed, cactus-like petals.
These summer-flowering plants are beautiful in mixed borders, dedicated cutting gardens, containers, and seasonal displays. Compact varieties can brighten patios and small spaces, while taller dahlias create height and movement at the back of a flower bed. With thoughtful planting and regular care, many varieties bloom from midsummer until frost.
Although dahlias are often called bulbs, they grow from tuberous roots. The tubers store energy that supports new growth when warm weather returns. Dahlias are generally treated as tender perennials or warm-season annuals, depending on the local climate and whether the tubers are lifted for winter storage.
Choosing Pink Dahlia Varieties
One of the pleasures of growing pink dahlias is choosing from an extraordinary range of flower shapes, plant sizes, and shades. Pale pink dahlias create a romantic cottage-garden look, while hot pink varieties add bold color to contemporary beds and containers. Bicolor flowers may combine pink with white, cream, peach, yellow, or burgundy.
Decorative dahlias produce full, layered flowers that look especially striking in bouquets. Ball and pompon dahlias have rounded blooms with tightly arranged petals. Cactus and semi-cactus varieties feature narrow petals that give the flowers a spiky appearance. Anemone, collarette, waterlily, and single-flowered dahlias offer additional shapes for gardeners who prefer a lighter or more informal look.
Consider the mature height as well as the flower color when selecting a variety. Dwarf and border dahlias work well near the front of a planting area, while tall dinner-plate and decorative types may require staking. If you want flowers for indoor arrangements, look for varieties known for strong stems and steady bloom production.
When to Plant Dahlia Tubers
Plant pink dahlia tubers in spring after the danger of a hard frost has passed and the soil has begun to warm. Cold, wet soil can encourage an inactive tuber to rot, so waiting for suitable conditions is often more successful than planting too early.
Gardeners in colder regions can start tubers indoors in pots several weeks before the expected final frost. Place the pots in a warm location with bright light, and gradually introduce the plants to outdoor conditions before transplanting them into the garden.
Dahlias are tender plants. In cold climates, the tubers are normally lifted after frost and stored in a protected location for winter. Some gardeners in warmer regions can leave them in the ground, but successful overwintering depends on winter temperatures, soil drainage, rainfall, and the conditions of the individual planting site. The Missouri Botanical Garden generally lists dahlias as winter hardy in USDA Zones 7 through 10, although gardeners within this range may still lift the tubers to protect them from cold or wet conditions. Missouri Botanical Garden
Selecting the Best Planting Location
Pink dahlias flower best in a sunny location. In many gardens, a site receiving at least six hours of direct sunlight is a good starting point. In regions with very hot summers, some light afternoon shade may help protect the plants from intense heat.
Choose a location with fertile, well-drained soil. Dahlias need regular moisture once they are actively growing, but they do not perform well where water remains around the tubers. Raised beds can be helpful in gardens with heavy or poorly drained soil.
The site should also have reasonable protection from strong wind. Taller varieties can become top-heavy when covered with flowers, especially after rain. A sheltered location and early staking can reduce the risk of broken stems.
How to Plant Pink Dahlia Tubers
Prepare the planting area by loosening the soil and incorporating finished compost when the soil needs additional organic matter. Avoid working wet soil because compaction can interfere with drainage and root development.
Place each viable tuber horizontally with the eye or developing sprout facing upward. The eye is located near the crown where the tubers join the previous season’s stem. A detached tuber without part of the crown and a viable eye will not normally produce a new plant.
Planting depth and spacing can vary according to the cultivar, climate, and soil conditions, so follow the grower’s instructions when available. Many dahlias are planted approximately 4 to 6 inches deep and spaced according to their mature size. Large varieties often need considerably more room than compact border dahlias.
If a variety will require support, position the stake when planting. Installing it later increases the chance of accidentally piercing the expanding tuber clump.
Watering Dahlias Successfully
Dahlia tubers are particularly susceptible to rot before active growth begins. Unless the soil is unusually dry, avoid heavy watering immediately after planting. Begin watering more regularly once shoots and leaves appear.
Established dahlias appreciate consistent moisture, especially during hot weather and flower production. Water deeply enough to moisten the root zone, then allow excess water to drain. The correct schedule will depend on rainfall, temperature, soil texture, drainage, and whether the plants are growing in the ground or in containers.
Directing water toward the soil rather than frequently wetting the foliage may help limit the conditions that encourage foliar disease. A layer of organic mulch can moderate soil temperature and reduce moisture loss, but keep it from pressing directly against the stems.
Feeding Pink Dahlias
Dahlias growing in fertile soil may need less supplemental fertilizer than plants growing in poor soil or containers. Before adding amendments, consider having the soil tested through a local extension service. Excessive nitrogen can encourage abundant leafy growth at the expense of flowers.
If fertilizer is needed, use a product appropriate for flowering plants and follow the label directions carefully. Container-grown dahlias may require more frequent feeding because nutrients can wash from the potting mix during regular watering.
Staking and Supporting Tall Varieties
Tall pink dahlias often need support before they begin producing heavy flowers. Place a sturdy stake near the tuber at planting time and secure the developing stems with soft garden ties. Check the ties throughout the season to make sure they are not cutting into the stems.
Plant supports, grids, or discreet cages can also work well when several dahlias are grouped together. Supporting the plants early creates a more natural appearance than trying to repair leaning stems later in the season.
Pinching for Fuller Plants
Pinching can help certain dahlias develop a bushier shape with more flowering stems. When a healthy plant reaches approximately 12 to 16 inches tall and has several sets of leaves, remove the central growing tip just above a leaf node.
This technique redirects growth toward the side shoots. It may delay the first flowers slightly, but it can produce a fuller plant and more usable stems for cutting. Very compact varieties may not need pinching, so consider the natural growth habit before removing the tip. Oregon State University Extension
Encouraging More Dahlia Flowers
Regular deadheading keeps the garden looking tidy and encourages the plant to continue directing energy toward flower production. A developing dahlia bud is usually rounded, while a spent bloom often becomes pointed or cone-shaped.
Follow the stem of the faded flower down to a healthy leaf junction, side shoot, or new bud before making the cut. Cutting at this point produces a neater plant and avoids leaving an unattractive bare stem.
Harvesting flowers for arrangements also encourages continued production. Cut blooms with clean tools, preferably during the cool part of the morning or evening. Select flowers that are nearly or fully open because most dahlias do not continue opening significantly after cutting.
Growing Pink Dahlias in Containers
Compact pink dahlias are excellent choices for pots, window boxes, and patio gardens. Select a container large enough for the mature plant and make sure it has unobstructed drainage holes. Use a loose, high-quality potting mix rather than dense garden soil.
Container-grown dahlias can dry out more quickly than plants in the ground, particularly during hot or windy weather. Check the potting mix regularly and water when needed without leaving the roots in standing water.
Tall dahlias can also grow in containers, but they require substantial pots, sturdy support, and careful moisture management. Because a large plant may become top-heavy, choose a stable container that will not tip easily.
Companion Plants for Pink Dahlias
Pink dahlias pair beautifully with plants that enjoy similar sunlight and moisture conditions. Cosmos, zinnias, snapdragons, salvia, verbena, ornamental grasses, and many sun-loving annuals can create an abundant cutting-garden style.
For a romantic palette, combine blush dahlias with white cosmos, lavender salvia, silvery foliage, and pale ornamental grasses. Hot pink varieties look striking beside deep purple flowers, burgundy foliage, golden blooms, or chartreuse greenery.
Give every plant enough room to reach its mature size. Overcrowding reduces air movement and can make it easier for pests and foliar diseases to spread. Companion planting should create a balanced design without blocking sunlight or competing heavily for water and nutrients.
Common Dahlia Pests and Problems
Slugs and snails may damage young shoots, while aphids, spider mites, thrips, earwigs, and caterpillars can affect leaves or flowers. Inspect plants regularly, including the undersides of leaves, so small problems can be identified before they become severe.
Good sanitation, appropriate spacing, steady watering, and adequate air circulation support healthier growth. Remove badly damaged or diseased plant material and clean cutting tools between plants when disease is suspected.
Dahlias may experience powdery mildew, stem rot, tuber rot, or viral symptoms. Avoid saving tubers from plants showing suspicious mottling, distorted growth, unexplained streaking, or persistent decline. Because similar symptoms can have different causes, a local extension office or plant diagnostic service can help with identification.
Overwintering Dahlia Tubers
In regions where the ground freezes, wait until frost has blackened or killed the foliage before preparing to lift the tubers. Cut back the stems, then carefully loosen the soil around the plant with a garden fork or spade. Begin far enough from the crown to avoid slicing through the tuber clump.
Allow the tubers to dry in a protected, well-ventilated location before storage. Label each clump so the varieties remain identifiable in spring. Store them in a dark, frost-free place where they will remain dormant, and protect them from both complete dehydration and excessive moisture.
Storage recommendations vary because temperature and humidity differ from one location to another. Oregon State University Extension recommends a nonfreezing storage location ideally maintained around 34°F to 40°F, while the University of Minnesota describes cool, dry storage averaging approximately 40°F. Check stored tubers periodically and remove decaying material before rot spreads. Oregon State University ExtensionUniversity of Minnesota Extension
Where winters are mild enough for in-ground storage, excellent drainage remains essential. Cold temperatures are not the only concern because prolonged wetness can also cause tuber loss. Local climate and extension recommendations should guide the decision to lift or leave tubers in place.
Dividing Dahlia Tubers
Established dahlia clumps can be divided to maintain vigorous plants and create additional stock. Each division must contain at least one viable eye attached to part of the crown. A tuber by itself cannot grow if it has no eye.
Some gardeners divide tubers in fall, while others wait until spring when the eyes may be easier to see. Use a clean, sharp tool, discard damaged or diseased material, and allow fresh cuts to dry appropriately before planting or storage.
Are Pink Dahlias Safe Around Pets?
Flower color does not change a dahlia’s pet-safety status. The ASPCA lists Dahlia species as toxic to dogs, cats, and horses, with possible mild gastrointestinal signs and mild dermatitis. Grow dahlias where pets cannot chew them, and contact a veterinarian or animal poison-control service if exposure is suspected. ASPCA
Enjoying Pink Dahlias in the Garden
Pink dahlias reward attentive care with an impressive season of flowers. The keys to success are warm planting conditions, plenty of sunlight, fertile but well-drained soil, consistent moisture after growth begins, and support for taller plants.
Whether you prefer delicate blush blooms, cheerful bubblegum pink, or deep raspberry flowers, there is a pink dahlia to suit almost every sunny garden design. Plant several forms and shades together for a layered display, or feature one exceptional variety as the centerpiece of a container or cutting bed.
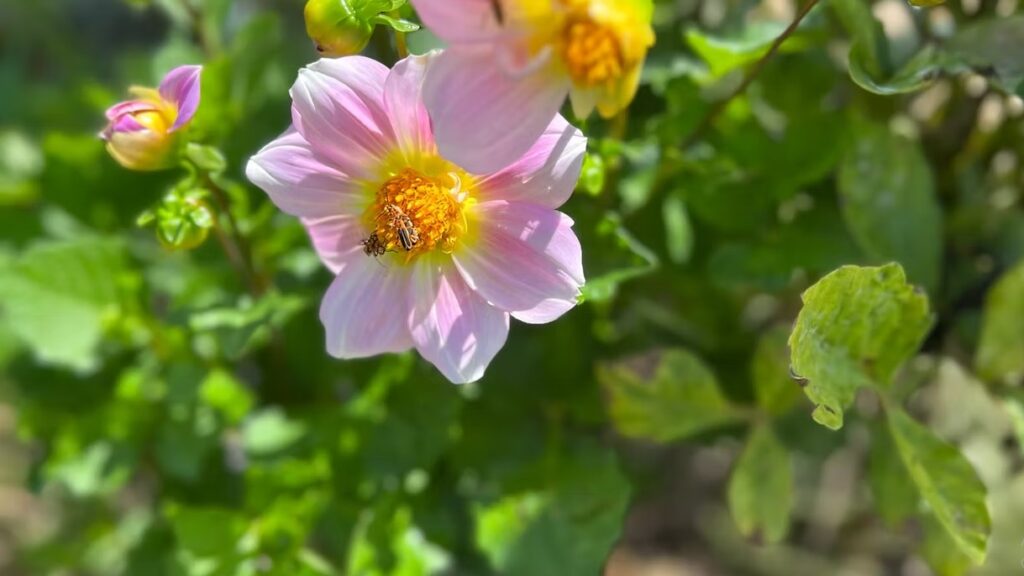
A bee gathers pollen from the sunny golden center of a delicate pink dahlia.
Learn how to grow pink and yellow snapdragons with tips for planting, sunlight, watering, deadheading, containers, and colorful garden design. Pink and yellow snapdragons bring a joyful combination of color, height, and old-fashioned charm to garden beds and containers. Their tall flower spikes are covered with distinctive blossoms that resemble tiny dragon mouths, creating a playful display from spring into fall. When pink and yellow varieties are planted together, their warm colors brighten borders, pathways, patios, and cutting gardens. Known botanically as Antirrhinum majus, snapdragons are cool-season flowers that perform especially well during mild spring and autumn weather. Depending on the cultivar, plants may remain compact at approximately 6 inches tall or grow into dramatic flower spikes reaching 3 feet. This range of sizes makes snapdragons remarkably versatile in garden design. Although snapdragons are commonly grown as annuals, their behavior depends on the cultivar, climate, and winter conditions. In areas with mild winters, plants may survive longer or return for another season. Gardeners in colder climates typically enjoy them as colorful annual flowers. Why Grow Pink and Yellow Snapdragons? Pink snapdragons can give a garden a romantic, graceful appearance, while yellow snapdragons introduce warmth and sunshine. Planted together, the colors create a soft but lively display that complements cottage gardens, pollinator plantings, formal borders, and relaxed backyard landscapes. Snapdragons also add valuable vertical interest. Their upright flowers provide contrast when placed beside rounded, trailing, or mounding plants. Tall varieties can create a colorful backdrop, medium varieties work beautifully throughout mixed borders, and dwarf snapdragons make attractive edging plants. Their long stems and densely arranged blossoms are also excellent for cutting. A small group of pink and yellow snapdragons can provide enough flowers for cheerful seasonal arrangements without leaving the garden looking bare. Choosing Pink and Yellow Snapdragon Varieties Snapdragons are generally divided into dwarf, medium, and tall growing groups. The best choice depends on where the plants will grow and how you hope to use them. Compact varieties are ideal for window boxes, patio containers, pathway edges, and the front of flower beds. Medium snapdragons blend well with other annuals and perennials. Tall cutting varieties produce dramatic flower spikes but may need support, especially in exposed locations. Color can vary considerably between cultivars. Pink snapdragons range from pale blush and rose to coral and deep magenta. Yellow varieties may produce creamy lemon, golden yellow, or warm butter-colored flowers. Some bicolored selections combine pink and yellow within the same blossom. Check the expected height, bloom period, and growing recommendations on the plant label or seed packet. Cultivars can differ in heat tolerance, flower form, and ideal growing season. When to Plant Snapdragons Snapdragons prefer cool weather and are traditionally planted for spring and autumn color. They are cold-tolerant compared with many warm-season annual flowers, although newly purchased plants should still be introduced gradually to outdoor conditions. In regions with cold winters, start seeds indoors approximately 8 to 10 weeks before the expected last frost. Snapdragon seeds are very small and should be sown according to the directions provided for the particular cultivar. Give seedlings bright light so they develop sturdy growth instead of becoming thin and stretched. Harden indoor-grown seedlings before transplanting them. This gradual adjustment helps young plants become accustomed to outdoor sunlight, wind, and temperature changes. In mild climates, snapdragons may be planted during autumn for winter or early spring flowers. Gardeners can also plant another crop in late summer for an autumn display. Local weather patterns matter, so choose a planting window that gives the plants time to establish during mild conditions. The Best Location for Snapdragons Choose a location with full sun for the strongest flowering and most upright growth. Light afternoon shade may be helpful in regions where the weather becomes hot quickly, but too much shade can produce fewer flowers and weaker stems. Snapdragons prefer moist, well-drained soil. Avoid areas where water remains around the roots after rain, since constantly saturated soil can contribute to root and disease problems. Improving heavy soil with finished compost may support better structure and drainage. Allow enough space between plants for air to circulate. Exact spacing depends on the mature size of the cultivar. Compact snapdragons can be planted closer together than tall cutting varieties, so follow the recommendations on the seed packet or plant label. How to Plant Pink and Yellow Snapdragons Before planting, loosen the soil and remove weeds that could compete for moisture and nutrients. Incorporate a moderate amount of finished compost if the soil needs additional organic matter. Dig a hole approximately as deep as the plant’s root ball. Position the snapdragon at the same soil level at which it was growing in its original container. Fill around the roots, press the soil gently into place, and water thoroughly. Avoid burying the stem or setting the plant deeply into the ground. Mulch can be applied around the plants to help conserve moisture and reduce weeds, but leave a little open space around each stem. For a balanced pink and yellow display, repeat the colors throughout the planting area. Alternating individual plants creates a playful pattern, while grouping several plants of each color produces stronger blocks of color that can be seen from a distance. Watering Snapdragons Keep the soil consistently moist while newly planted snapdragons establish their roots. Once established, water when the upper layer of soil begins to dry rather than following a rigid schedule. Water deeply enough to moisten the root zone. Whenever possible, direct water toward the soil instead of routinely wetting the foliage and flowers. Morning watering gives any splashed leaves time to dry and can help discourage diseases favored by prolonged moisture and humidity. Container-grown snapdragons usually dry more quickly than plants growing in the ground. Check their soil regularly, particularly during bright, windy, or unexpectedly warm weather. Containers must have drainage holes so excess water can escape. Fertilizing for Healthy Flowers Snapdragons generally benefit from reasonably fertile soil, but excessive fertilizer can encourage soft, leafy growth instead of
Learn how to grow pink tulips with tips for choosing bulbs, fall planting, watering, containers, post-bloom care, perennializing, and garden design. Pink tulips bring a soft, graceful beauty to the spring garden. Their colors range from the palest blush and creamy rose to vivid magenta, salmon pink, and deep raspberry. Whether planted in sweeping drifts, tucked into a cottage garden, or arranged in elegant containers, these classic spring flowers create an uplifting display after winter. Part of the genus Tulipa, tulips are true bulbs that store the energy needed to produce their foliage and flowers. Most garden tulips bloom from early to late spring, depending on the cultivar and local climate. By combining varieties with different flowering periods, gardeners can enjoy several weeks of pink color. Although tulips are botanically perennial, many modern hybrids do not return with the same vigor after their first year. Growing conditions, climate, cultivar, and summer moisture all influence whether the bulbs bloom again. Some gardeners treat tulips as annuals and plant fresh bulbs each fall, while others select dependable types and give the bulbs the conditions they need to perennialize. Why Grow Pink Tulips? Pink tulips are remarkably versatile. Soft pink flowers can create a romantic, peaceful atmosphere, while brighter shades make borders and containers feel cheerful and energetic. Their clean stems and sculptural blooms also introduce structure to informal planting schemes. Pink works beautifully with white, cream, lavender, blue, burgundy, and silver foliage. Pale pink tulips can brighten partially shaded corners beneath deciduous trees, while saturated pink cultivars stand out in sunny beds. Planting several shades together creates depth without making the garden look overly busy. Tulips are also excellent cut flowers. A small cutting garden can provide enough stems for simple spring arrangements while leaving plenty of blooms outdoors. Choosing the Right Pink Tulips Pink tulips are available in many shapes, heights, and flowering periods. The best choice depends on the location, desired appearance, and whether the bulbs are intended for a single display or possible repeat flowering. Single early tulips generally produce traditional cup-shaped flowers near the beginning of the tulip season. Double early cultivars have layered petals that resemble small peonies and usually grow on relatively short stems. Their compact form makes them especially attractive in containers and near the front of a border. Triumph tulips are popular for their classic shape, strong stems, and broad range of colors. Darwin hybrid tulips tend to be tall, substantial plants with large flowers. Under favorable conditions, some Darwin hybrids may return more reliably than many highly decorative hybrids. Lily-flowered tulips have narrow petals that curve outward at their tips, giving the flowers an elegant silhouette. Fringed tulips feature finely cut petal edges, while parrot tulips produce dramatic, ruffled flowers with irregular markings. Double late tulips offer full, peony-like blossoms toward the end of the tulip season. Species tulips and cultivars closely related to wild tulips are often shorter and less formal. Many are better suited to naturalizing and may multiply when planted in well-drained soil. When to Plant Pink Tulip Bulbs Plant pink tulip bulbs in fall after the soil has cooled but before it freezes solid. The exact timing depends on the region. In colder climates, planting often takes place from September through November. Gardeners in milder areas may plant later in fall or near the beginning of winter. Tulips need an extended period of cold to develop properly. In warm climates without a sufficiently cold winter, gardeners may need to purchase prechilled bulbs or chill suitable bulbs before planting. Chilling requirements vary, so follow the instructions provided by the bulb supplier and choose cultivars recommended for the local climate. Do not plant bulbs too early while the ground is still warm. Warm, damp soil can increase the risk of premature growth and bulb decay. At the same time, allow enough time for roots to begin developing before severe winter weather arrives. Selecting the Best Planting Location Pink tulips perform best in a sunny location with fertile, well-drained soil. Full sun generally supports sturdy stems and strong flowers. A location beneath deciduous trees may also work because tulips often bloom before the trees produce a dense canopy of leaves. Drainage is one of the most important considerations. Tulip bulbs can rot in soil that remains waterlogged, particularly during dormancy. Avoid low areas where rain collects or snowmelt drains slowly. If the garden has dense clay soil, improve the entire planting area with organic matter when appropriate or consider using raised beds and containers. Avoid creating a small planting hole filled with loose material inside compacted clay, since the hole may collect water rather than improve drainage. A sheltered site can help protect tall or heavy-flowered tulips from strong wind and damaging rain. This is particularly helpful for double, parrot, and other large-flowered varieties. How to Plant Pink Tulip Bulbs Choose large, firm bulbs without soft spots, extensive mold, or obvious damage. A loose, papery outer covering is normal and does not need to be removed. Plant each bulb with its pointed end facing upward and its flatter root end facing down. A useful guideline is to cover a bulb with soil equal to approximately two to three times the bulb’s height. Recommendations commonly range from about 4 to 8 inches deep, depending on bulb size, soil, climate, and supplier instructions. Space the bulbs approximately 2 to 5 inches apart, depending on the desired effect and the mature size of the cultivar. Wider spacing works well for bulbs expected to remain in the ground, while closer spacing creates a fuller seasonal display. For a natural appearance, arrange tulips in clusters, ribbons, or broad drifts instead of placing them in a single rigid row. Set the bulbs out before digging so the colors and spacing can be adjusted. Water the planting area after covering the bulbs. This settles the soil and provides moisture for initial root development. In cold regions, a light layer of mulch can help moderate soil-temperature fluctuations. Keep the
Discover how to grow pink and white zinnias with helpful advice on planting, sunlight, watering, containers, cutting, and preventing powdery mildew. Pink and white zinnias bring a fresh, cheerful beauty to summer gardens. Their soft colors look romantic without feeling overly formal, making them ideal for cottage gardens, cutting gardens, pollinator beds, containers, and sunny borders. When planted together, rosy pink and crisp white flowers create a harmonious display that complements nearly every garden color palette. Zinnias are warm-season annuals celebrated for their rapid growth and generous flowering. Depending on the variety, plants may remain compact and bushy or grow tall enough to produce long stems for bouquets. Flowers can be single, semidouble, or fully double, with forms ranging from simple daisy-like blooms to rounded pompons and dramatic cactus-style flowers. Although zinnias are relatively easy to grow, choosing the right location and providing good air circulation can make a noticeable difference. With abundant sunlight, well-drained soil, thoughtful watering, and regular harvesting, pink and white zinnias can brighten the garden from early summer until frost. Choosing Pink and White Zinnia Varieties Before purchasing seeds or transplants, consider how you want the flowers to function in your landscape. Compact varieties are well suited to containers, edging, and the front of a flower bed. Taller varieties work beautifully toward the middle or back of a border and usually provide longer stems for cutting. Look beyond flower color when comparing varieties. Check the seed packet or plant label for mature height, width, flower size, growth habit, and disease resistance. Zinnias can range from less than a foot tall to approximately four feet, so the recommended spacing and placement will vary considerably. For an elegant planting, combine several shades of blush, rose, coral pink, cream, and white. A single variety creates a polished, uniform display, while a carefully selected mixture gives the garden a softer and more natural appearance. In humid climates, disease-resistant varieties can be especially helpful. When to Plant Zinnias Zinnias love warmth and are sensitive to frost. Sow seeds outdoors after the danger of frost has passed and the soil has warmed. Gardeners in cooler climates can start seeds indoors several weeks before the expected final frost, but young plants should not be moved outside until conditions are reliably warm. Because zinnias grow quickly, direct sowing is often the simplest option. Seeds can also be sown in small batches every few weeks during the first part of the growing season. This succession planting may extend the cutting season and provide younger plants as older ones begin to decline. Local frost dates, soil temperature, and summer weather vary considerably, so regional extension guidance is more useful than relying on a single calendar date. Selecting the Best Growing Location Choose a site that receives full sun. Zinnias generally perform best with at least six hours of direct sunlight each day, although a longer period of sun can promote stronger growth and abundant flowering. Too much shade may produce weaker stems, fewer blooms, and foliage that dries slowly after rain. The soil should drain well because continually wet roots can contribute to poor growth and disease. Zinnias tolerate several soil types, but incorporating finished compost can improve the texture of sandy or heavy soil. Avoid adding excessive fertilizer or large amounts of rich organic material, since too much nitrogen may encourage leafy growth at the expense of flowers. Raised beds can be useful where native soil drains poorly. Containers should always have unobstructed drainage holes and enough depth to support the mature size of the selected variety. How to Plant Pink and White Zinnias Prepare the planting area by loosening the soil and removing weeds. Sow seeds at the depth recommended on the packet, then water gently so they remain in place. Keep the soil consistently moist, but not saturated, while the seeds germinate and the seedlings become established. Once the seedlings have developed, thin them according to the variety’s mature growth habit. Recommended spacing can range from approximately 8 to 24 inches. Compact or single-stem varieties may grow closer together, while vigorous, branching plants need more room. Adequate space allows light and air to reach the foliage, which can help reduce disease pressure. University of Minnesota Extension When transplanting nursery-grown zinnias, handle the roots carefully and place each plant at approximately the same depth at which it was growing in its container. Water thoroughly after planting to settle the soil around the roots. Watering Zinnias Properly Newly planted zinnias need dependable moisture while their root systems develop. Established plants can tolerate short dry periods, but they flower best when they receive consistent water during prolonged hot or dry weather. Water deeply at the base of each plant rather than sprinkling the foliage whenever possible. Early morning is generally the most practical time because any splashed leaves can dry quickly as the day warms. Allow the upper layer of soil to begin drying before watering again, since constantly soggy conditions are not beneficial. A thin layer of organic mulch can slow evaporation, moderate soil temperature, and reduce soil splashing onto the lower leaves. Keep mulch slightly away from the stems so moisture does not remain trapped against the plants. Feeding for Healthy Growth and Abundant Flowers Zinnias growing in reasonably fertile garden soil may need little supplemental fertilizer. Before adding anything, consider the soil’s existing condition. A soil test provides the most reliable guidance and helps prevent unnecessary fertilization. If the soil is poor, apply a balanced garden fertilizer according to the product label. Container-grown zinnias may require more frequent feeding because regular watering gradually removes nutrients from the potting mix. Excessive nitrogen should be avoided because it can produce large plants with fewer flowers. Pinching, Deadheading, and Supporting the Plants Tall, branching zinnias can be pinched when they are young to encourage a fuller plant with more flowering stems. This technique is most useful for cut-flower varieties. It may not be necessary for compact cultivars or plants being grown for one strong central
Originally published
March 2026
Updated
August 2026
Reviewed by
Culibloom