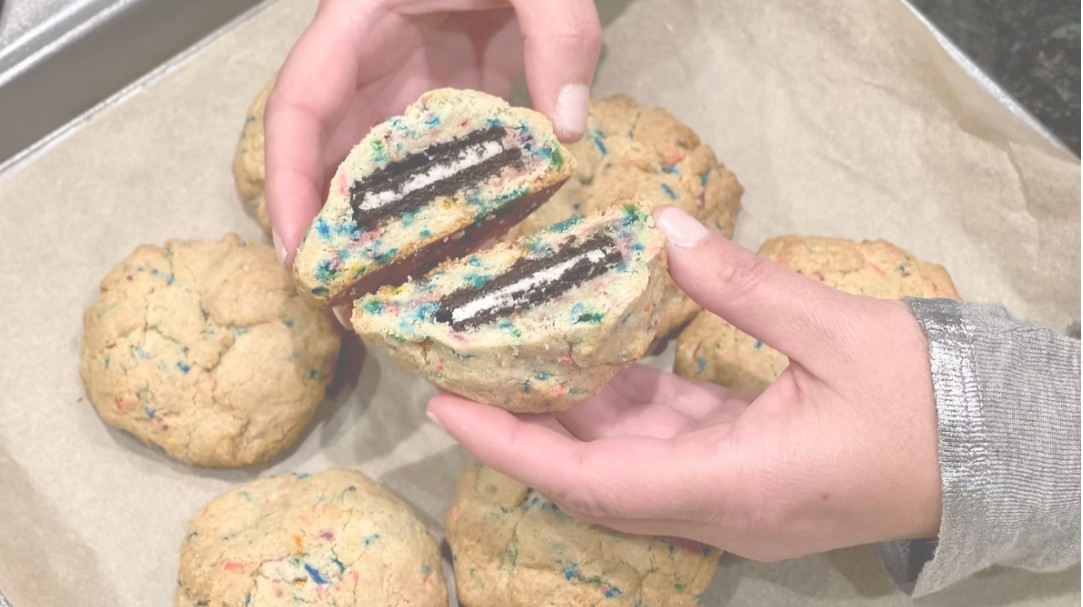
Make colorful gluten-free Oreo-stuffed confetti sugar cookies with soft sprinkle dough and a surprising cookies-and-cream center.
Soft, festive, and filled with a cookies-and-cream surprise, this Colorful Gluten-Free Oreo-Stuffed Confetti Sugar Cookies Recipe transforms classic sugar cookies into an irresistible celebration dessert. Each oversized cookie surrounds a whole gluten-free chocolate sandwich cookie with rich sugar cookie dough and cheerful rainbow sprinkles.
Two dough options are included. The original version combines oat flour, sweet rice flour, tapioca flour, and cornstarch for a tender, chewy texture. The alternative uses gluten-free measure-for-measure flour for easier preparation. Choose one complete dough option when making the cookies.
These colorful stuffed cookies are perfect for birthday parties, holiday cookie exchanges, bake sales, dessert platters, and other special occasions. Customize the sprinkles to match your celebration, or decorate the cooled cookies with melted white chocolate and additional sprinkles.
Directions
Original Gluten-Free Dough
Step 1: Combine the Dry Ingredients
Place the oat flour, sweet rice flour, tapioca flour, cornstarch, granulated sugar, xanthan gum, and kosher salt in the bowl of a stand mixer fitted with the paddle attachment. Mix on low speed until thoroughly combined.
Step 2: Incorporate the Butter
Add the diced butter and continue mixing on low speed for approximately 5 minutes. The mixture should become crumbly and resemble coarse sand as the butter is incorporated into the dry ingredients.
Step 3: Finish the Dough
Add the eggs, almond extract, vanilla extract, and rainbow sprinkles. Increase the mixer speed to medium and continue mixing until the dough forms a smooth ball and begins pulling away from the sides of the bowl.
Step 4: Adjust and Chill the Dough
Transfer the dough to a work surface lightly dusted with tapioca flour. If the dough feels sticky, gently knead in a small amount of additional tapioca flour until it is smooth and easy to handle.
Divide the dough into two equal portions and shape each portion into a disk. Wrap the disks tightly in plastic wrap and refrigerate for at least 3 hours or overnight.
Step 5: Prepare the Oven
Preheat the oven to 325°F. Line two baking sheets with parchment paper or silicone baking mats.
Remove the chilled dough from the refrigerator. If it is too firm to shape, allow it to stand at room temperature for several minutes.
Step 6: Stuff the Cookies
Roll portions of dough into balls approximately 1 1/2 inches in diameter. Flatten each ball slightly and place one gluten-free chocolate sandwich cookie in the center.
Carefully bring the dough around the sandwich cookie, completely enclosing it. Roll the stuffed dough gently between your palms to create a smooth ball.
Arrange the cookies on the prepared baking sheets, leaving space between them for slight spreading. Repeat until all the dough and sandwich cookies have been used.
Step 7: Bake the Original Cookies
Bake one sheet at a time for approximately 7 minutes. The cookies should remain pale with only a faint golden color around the edges.
Allow the cookies to cool on the baking sheet for 5 minutes. Carefully transfer them to a wire rack and let them cool completely.
Measure-for-Measure Flour Variation
Step 1: Cream the Butter and Sugar
Place the softened butter and granulated sugar in a large mixing bowl. Beat until the mixture is light and fluffy.
Step 2: Add the Egg and Vanilla
Add the egg and vanilla extract. Continue mixing until the ingredients are smooth and thoroughly combined.
Step 3: Complete the Dough
Add the gluten-free measure-for-measure flour, baking powder, salt, and xanthan gum. Mix until a soft dough forms. Stir in sprinkles if desired.
Step 4: Chill the Dough
Cover the dough and refrigerate it for 30 minutes. Chilling makes the dough easier to shape around the chocolate sandwich cookies.
Step 5: Prepare the Oven
Preheat the oven to 350°F. Line two baking sheets with parchment paper or silicone baking mats.
Step 6: Shape and Stuff the Cookies
Roll the chilled dough into balls approximately 1 1/2 inches in diameter. Flatten each ball and place one gluten-free chocolate sandwich cookie in the center.
Wrap the dough around the sandwich cookie until it is completely covered. Roll it gently between your palms to create a smooth ball, then place it on the prepared baking sheet. Repeat with the remaining dough and sandwich cookies.
Step 7: Bake the Cookies
Bake the cookies for 12 to 16 minutes, or until the edges are lightly golden.
Let the cookies cool on the baking sheet for 5 minutes before transferring them to a wire rack to cool completely.
Step 8: Decorate and Serve
Serve the cooled cookies as they are, or drizzle them with melted white chocolate and immediately add more sprinkles.
Pair the cookies with milk, coffee, or hot chocolate. For themed celebrations, select sprinkle colors that coordinate with the holiday, birthday, or special occasion.
Notes
Choose either the original gluten-free dough or the measure-for-measure flour variation. Do not combine the two ingredient formulas.
Sweet rice flour contributes to the soft, chewy texture of the original cookies. Do not replace it with regular white rice flour.
Chilling the dough allows the gluten-free flours to hydrate and makes the cookies easier to shape without sticking.
Check every packaged ingredient, including the oat flour, measure-for-measure flour, xanthan gum, sprinkles, extracts, baking powder, and chocolate sandwich cookies, for appropriate gluten-free labeling. Prevent cross-contact when baking for someone with celiac disease or gluten sensitivity.
Some measure-for-measure flour blends already contain xanthan gum. The supplied variation calls for additional xanthan gum, but results may vary depending on the particular flour blend used.
Store the cooled cookies in an airtight container at room temperature for up to 5 days.
For longer storage, freeze the baked cookies for up to 3 months. Thaw them at room temperature before serving.
To freeze the cookies before baking, shape and stuff them as directed. Arrange them on a baking sheet and freeze until solid, then transfer them to a freezer-safe container. Bake them directly from frozen and add approximately 1 to 2 minutes to the appropriate baking time.