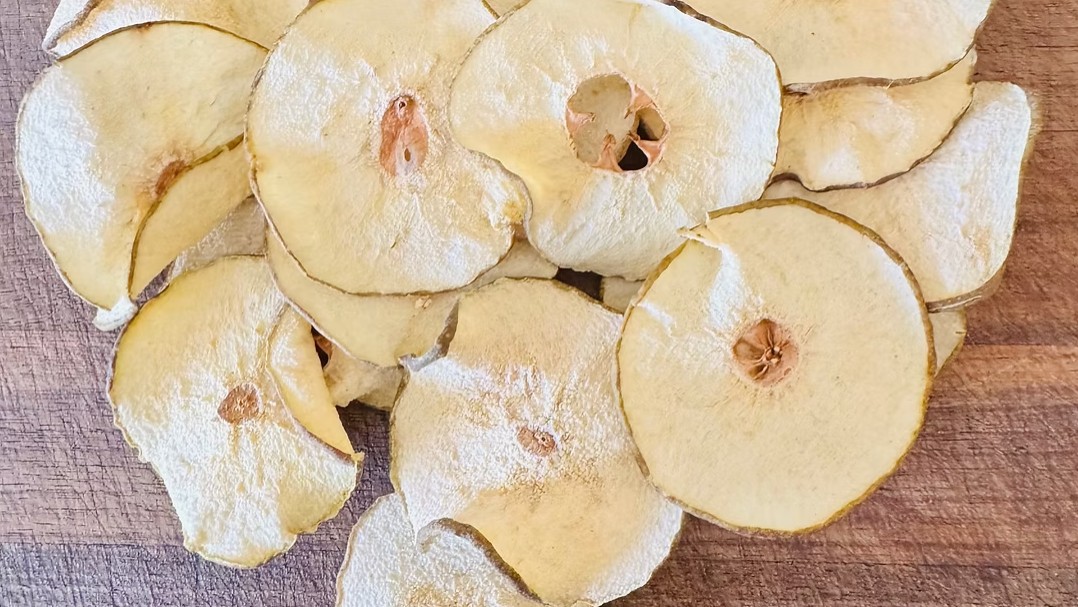
Make sweet homemade oven-dried pears using a quick method for crisp pear chips or a slow-drying method for deliciously chewy fruit.
Sweet, naturally delicious, and incredibly easy to prepare, this Sweet Homemade Oven-Dried Pear Recipe is a wonderful way to preserve fresh pears while creating a wholesome snack the entire family can enjoy.
Drying pears in the oven concentrates their natural sweetness without requiring added preservatives.
Choose the quick method for crisp, snackable pear chips or the traditional slow-drying method for soft, chewy dried pears. Both versions are delicious in lunchboxes, on charcuterie boards, or packed for hiking and road trips. You can also chop the dried pears and add them to oatmeal, yogurt, granola, salads, and baked goods.
A light sprinkle of cinnamon adds warmth without overwhelming the fruit. Cinnamon sugar creates a sweeter treat, while cardamom, ginger, nutmeg, and pumpkin pie spice offer other flavorful variations.
Directions
Choose One Method
Prepare the pears using either the Quick Oven-Dried Pear Chips method or the Traditional Slow-Dried Pears method. Drying time and finished texture will vary depending on the method selected.
Quick Oven-Dried Pear Chips
Step 1: Prepare the Oven
Preheat the oven to 200°F. Line large baking sheets with parchment paper.
Step 2: Slice the Pears
Wash the pears thoroughly. Using a mandoline or sharp knife, cut them into uniform 1/8-inch slices.
Thin, even slices will dry more consistently and are more likely to develop a crisp, chip-like texture.
Step 3: Prepare the Lemon Water
Combine the cold water and lemon juice in a large bowl. Place the pear slices in the lemon water and soak them for 5 to 10 minutes to help prevent browning.
Remove the pear slices and pat them completely dry with paper towels or a clean kitchen towel. Removing excess moisture helps the pears dry more efficiently.
Step 4: Arrange the Pear Slices
Place the pear slices in a single layer on the prepared baking sheets. Leave a little space between the slices and make sure they do not overlap.
If desired, lightly sprinkle the pears with cinnamon or cinnamon sugar.
Step 5: Bake the Pear Chips
Bake the pears for 1 hour. Carefully flip each slice, then continue baking for another 1 to 2 hours.
Check the pears frequently during the final hour because thinner slices may finish sooner than thicker ones. Remove individual slices as they become dry and slightly shriveled around the edges.
Step 6: Cool the Pear Chips
Transfer the dried pear slices to a wire rack and allow them to cool completely. The slices will continue to firm and develop their crisp texture as they cool.
If any slices remain soft after cooling, return them to the oven for another 15 to 30 minutes.
Traditional Slow-Dried Pears
Step 1: Prepare the Oven
Preheat the oven to its lowest setting, typically 170°F.
Place wire cooling racks inside rimmed baking sheets. The racks allow air to circulate around the fruit for more even drying.
Step 2: Slice the Pears
Wash the pears thoroughly. Using a mandoline or sharp knife, cut them into uniform 1/8-inch slices.
Step 3: Soak the Pear Slices
Combine the cold water and lemon juice in a large bowl. Soak the pear slices in the lemon water for 5 to 10 minutes to help prevent browning.
Remove the slices and pat them thoroughly dry with paper towels or a clean kitchen towel.
Step 4: Arrange the Pear Slices
Place the pear slices in a single layer on the wire racks, making sure they do not overlap.
If desired, lightly sprinkle the slices with cinnamon or cinnamon sugar.
Step 5: Slowly Dry the Pears
Dry the pears in the oven for 6 to 10 hours. Check them periodically and remove individual slices as they finish drying.
The pears are ready when they feel pliable and leathery without any noticeable surface moisture. The exact drying time will depend on the thickness of the slices, the moisture content of the pears, and the oven temperature.
Step 6: Cool and Store
Remove the pears from the oven and allow them to cool completely before transferring them to an airtight container.
Notes
Choose ripe but firm pears that can be sliced neatly. Bartlett, Anjou, Bosc, and Comice pears are all suitable options.
Cut the pears as evenly as possible so the slices finish drying at approximately the same time. A mandoline provides the most consistent results, but it should always be used carefully with the appropriate hand guard.
Thinner slices produce crisper pear chips. Slightly thicker slices generally remain softer and chewier.
Drying time may vary according to the pear variety, ripeness, slice thickness, moisture level, oven temperature, and local humidity.
If some slices dry more quickly than others, remove the finished pieces and return the remaining pears to the oven.
Allow the dried pears to cool completely before evaluating their texture. Quick-dried pear chips become firmer and crisper as they cool.
If any slices still feel moist or unusually soft after cooling, return them to the oven for another 15 to 30 minutes.
For additional flavor, sprinkle the pears lightly with nutmeg, ginger, cardamom, pumpkin pie spice, or another favorite warm spice before drying.
Store completely cooled dried pears in an airtight container at room temperature for up to 1 week. Refrigerate them for longer storage.
Discard the dried pears if they develop mold, excess moisture, an unusual odor, or other signs of spoilage.
Serve oven-dried pears as a snack or add them to oatmeal, yogurt, granola, trail mix, baked goods, salads, and charcuterie boards.