Marigolds: A Complete Guide to Growing Colorful, Easy-Care Flowers
Marigolds are among the most popular flowers in home gardens, and for good reason. Their brilliant blooms, dependable performance, and easy-going nature make them a favorite for gardeners of every experience level. Whether planted in flower beds, vegetable gardens, raised beds, borders, or decorative containers, marigolds provide months of vibrant color while attracting beneficial pollinators and adding life to the landscape.
Native to Mexico and Central America, marigolds have been cultivated for centuries and are prized not only for their beauty but also for their versatility. These cheerful annuals bloom continuously from late spring until the first frost, thriving in hot weather when many other flowers begin to fade. With shades ranging from bright yellow and golden orange to deep red and mahogany, marigolds create a stunning display throughout the growing season.
One of the greatest advantages of growing marigolds is how little maintenance they require. They are fast-growing, adaptable to a variety of soils, and reward gardeners with an abundance of blooms from a relatively small amount of care. Whether you are designing your first flower garden or adding seasonal color to an established landscape, marigolds are an excellent choice.
Why Grow Marigolds?
Marigolds offer much more than beautiful flowers. They are reliable performers that thrive in sunny gardens and adapt well to many growing conditions. Their long blooming season and compact growth habit make them suitable for almost any outdoor space.
Gardeners appreciate marigolds because they are easy to grow from seed, tolerate summer heat exceptionally well, bloom continuously for months, attract bees and butterflies, make excellent companion plants for vegetables, grow beautifully in containers and raised beds, require minimal maintenance, and produce long-lasting cut flowers.
Types of Marigolds
Although all marigolds belong to the Tagetes genus, several popular varieties offer different sizes, flower forms, and growing habits.
African Marigolds
African marigolds (Tagetes erecta) are the largest of the common marigold varieties. They produce large, globe-shaped blooms in brilliant shades of yellow, orange, cream, and gold. These impressive plants typically grow between 18 and 36 inches tall, making them perfect for the back of flower borders or as eye-catching focal points in the landscape.
French Marigolds
French marigolds (Tagetes patula) are compact, bushy plants covered with dozens of colorful flowers. Their blooms may be single or double and often feature striking combinations of yellow, orange, red, and mahogany. Growing only 8 to 15 inches tall, they are ideal for edging walkways, filling containers, and planting throughout vegetable gardens.
Signet Marigolds
Signet marigolds (Tagetes tenuifolia) have delicate, fern-like foliage and produce hundreds of small daisy-shaped flowers throughout the season. Unlike many other marigolds, their petals are edible and have a pleasant citrus flavor, making them a beautiful addition to salads, desserts, and herb gardens.
The Best Growing Conditions for Marigolds
Marigolds perform best when planted in locations that receive plenty of sunshine and have well-drained soil. They are remarkably adaptable but produce their most abundant flowers when their basic growing requirements are met.
Choose a location that receives at least six to eight hours of direct sunlight each day. Full sun encourages compact plants with continuous flowering and vibrant blooms.
Marigolds prefer well-drained soil that is moderately fertile. Sandy or loamy soils work especially well, although they will tolerate average garden soil. If your soil is heavy clay, incorporating compost before planting will improve drainage and promote healthier root development.
Water newly planted marigolds regularly until they become established. Mature plants are fairly drought tolerant, but they perform best when watered deeply whenever the top inch of soil becomes dry. Avoid allowing the soil to remain constantly wet, as excessive moisture may lead to root rot.
Planting Marigolds
Marigolds are among the easiest annual flowers to grow from seed. Seeds germinate quickly in warm soil, often sprouting within five to ten days.
Plant seeds about one-quarter inch deep after all danger of frost has passed. Once seedlings develop several sets of true leaves, thin them to provide adequate airflow and room for growth.
French marigolds should generally be spaced six to ten inches apart. African marigolds benefit from twelve to eighteen inches of spacing, while Signet marigolds grow well when planted eight to twelve inches apart.
Fertilizing Marigolds
Marigolds are not heavy feeders and usually perform exceptionally well with very little fertilizer. In many gardens, adding compost before planting provides all the nutrients they need throughout the growing season.
If fertilizer is desired, apply a balanced fertilizer sparingly once or twice during the summer. Excess nitrogen encourages leafy growth at the expense of flower production, resulting in fewer blooms.
Deadheading for Continuous Flowers
Removing faded blooms throughout the growing season encourages marigolds to continue producing flowers until frost. This simple maintenance task also keeps plants looking neat and healthy.
Regular deadheading redirects the plant’s energy toward developing new buds rather than producing seeds, extending the overall flowering season.
Marigolds as Companion Plants
Marigolds have long been valued in vegetable gardens as companion plants. Their bright flowers attract pollinators while also drawing beneficial insects that help maintain a healthy garden ecosystem.
Many gardeners enjoy planting marigolds alongside tomatoes, peppers, cucumbers, beans, squash, eggplants, basil, and herbs. While marigolds should not be viewed as a complete solution for pest management, they contribute to greater biodiversity and support beneficial insect populations that naturally help keep gardens balanced.
Pollinators Love Marigolds
The colorful blooms provide nectar and pollen for numerous pollinating insects throughout the growing season.
Common visitors include honeybees, native bees, butterflies, hoverflies, lady beetles, and parasitic wasps. These beneficial insects assist with pollination while helping control unwanted garden pests.
Growing Marigolds in Containers
Marigolds thrive in containers, making them an excellent choice for patios, balconies, porches, and small outdoor spaces.
Choose containers with drainage holes and fill them with a quality potting mix. Position containers where they will receive full sunlight for most of the day, and water whenever the soil begins to dry.
Container-grown marigolds often bloom just as abundantly as those planted directly in the garden.
Common Problems
Marigolds are generally resistant to most diseases and insect pests, making them one of the easiest flowering annuals to maintain.
Occasionally, gardeners may notice aphids, spider mites, slugs, powdery mildew, or root rot caused by excessive watering. Most of these issues can be minimized through proper spacing, good air circulation, and careful watering practices.
Harvesting Marigold Flowers
Fresh marigold flowers can be harvested throughout the growing season for bouquets and floral arrangements.
Harvest blooms during the cool morning hours using clean garden snips. Immediately place cut stems into fresh water to maximize vase life.
Edible Signet marigold petals may also be harvested for use in salads, desserts, teas, and as colorful garnishes.
Saving Seeds
Saving marigold seeds is both simple and economical.
Allow several flowers to remain on the plant until they dry completely. Once the seed heads have fully matured, remove them and separate the long, slender seeds from the dried flower parts.
Store seeds in a labeled envelope or airtight container in a cool, dry location until the following spring.
Are Marigolds Edible?
Certain varieties, particularly Signet marigolds, produce edible flowers with a light citrus flavor.
Their colorful petals can brighten fresh salads, rice dishes, herbal butters, teas, desserts, and beverage garnishes.
Only consume flowers that have been grown without pesticides or other chemicals, and always confirm that the variety is intended for culinary use.
Seasonal Care
Spring is the ideal time to sow seeds or transplant nursery-grown marigolds after the last frost.
Summer is when marigolds reach their peak, producing nonstop flowers with regular watering and occasional deadheading.
Autumn continues the colorful display until the first hard frost signals the end of the growing season.
Winter is an excellent opportunity to remove spent plants, enrich garden beds with compost, and store collected seeds for next year’s planting.
Interesting Facts About Marigolds
Marigolds have been cultivated for hundreds of years throughout the Americas and are now grown around the world. Their vivid blooms have long been associated with celebrations, festivals, and ornamental gardens.
The flowers have also been used to create natural dyes for fabrics and crafts, while their long blooming season makes them one of the most dependable annual flowers available for home landscapes.
Because they are easy to grow, marigolds are often recommended as one of the best flowers for children and first-time gardeners.
Frequently Asked Questions
Do marigolds return every year?
Most marigolds are annuals that complete their life cycle in one season. However, they often reseed naturally, allowing new plants to appear the following year.
How long do marigolds bloom?
Marigolds typically bloom continuously from late spring until the first frost when grown in full sun and deadheaded regularly.
Do marigolds need full sun?
Yes. They perform best with at least six to eight hours of direct sunlight each day.
Are marigolds drought tolerant?
Once established, marigolds tolerate short periods of dry weather, although consistent watering encourages healthier plants and more abundant flowers.
Can marigolds grow indoors?
Marigolds prefer outdoor conditions with abundant sunlight. They can be grown indoors under high-quality grow lights, but they generally perform better in the garden.
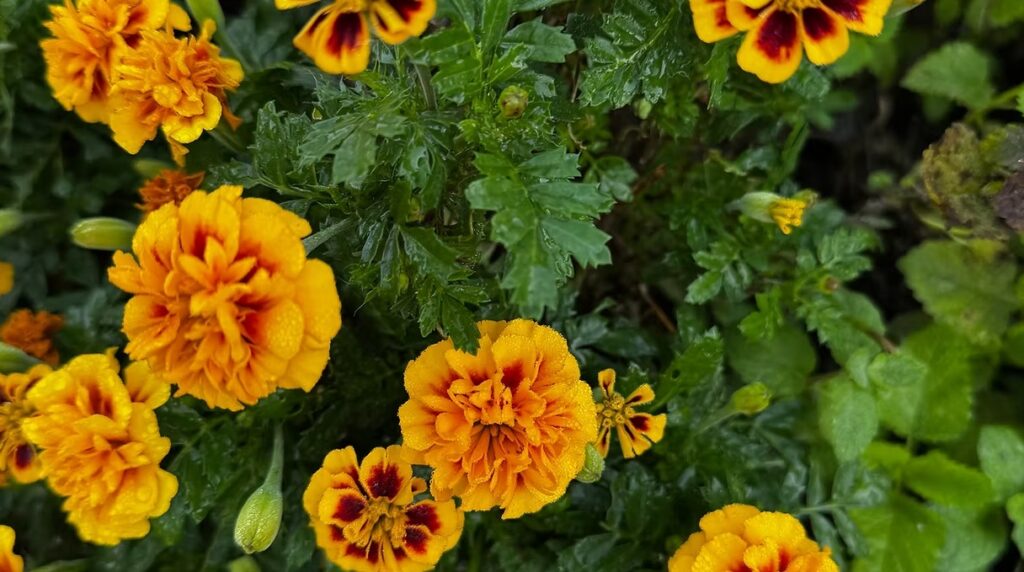
Bright golden marigolds sparkle with fresh raindrops in the garden.
Use this Mexican Marigold Growing Guide to learn how to grow, care for, harvest, dry, and overwinter aromatic Tagetes lucida. Mexican marigold is a beautiful and useful herb that brings fragrance, flavor, and brilliant golden color to the garden. Its glossy green leaves release a warm, anise-like aroma when crushed, while clusters of small yellow flowers brighten the landscape from late summer into fall. The plant is especially valuable when many other herbs and flowers are beginning to fade. This Mexican Marigold Growing Guide focuses on Tagetes lucida, the aromatic herb also known as Mexican tarragon, Mexican mint marigold, sweet mace, and Texas tarragon. The common name Mexican marigold is sometimes applied to other plants in the Tagetes genus, including Tagetes erecta and Tagetes minuta. Checking the botanical name before purchasing seeds or plants helps ensure you are growing the culinary herb described here. Native to Mexico and parts of Central America, Mexican marigold thrives in warm conditions and is relatively easy to maintain once established. It can be grown in herb gardens, pollinator gardens, ornamental borders, raised beds, and containers. Gardeners in warm climates may enjoy it as a perennial, while those in colder regions can grow it as an annual or overwinter it in a protected location. What Is Mexican Marigold? Mexican marigold, or Tagetes lucida, is an aromatic herbaceous perennial in the Asteraceae family. It is generally grown as a perennial in USDA Hardiness Zones 8 through 11, although winter survival can vary with local temperatures, soil drainage, exposure, and the severity of individual winters. In colder climates, it is normally treated as a warm-season annual. The plant typically develops an upright, branching habit and may reach approximately 18 to 30 inches tall under favorable conditions. Its narrow, glossy leaves have an aroma and flavor often compared to anise, licorice, or French tarragon. Small golden-yellow flowers appear in clusters near the ends of the stems, creating a cheerful display that attracts beneficial garden visitors. Mexican marigold is particularly appreciated in hot climates where French tarragon may struggle. Although the flavors are not identical, its leaves can provide a pleasantly sweet, tarragon-like note in suitable culinary applications. Choosing the Right Growing Location Mexican marigold performs best in a warm, sunny location. Choose a site that receives at least six hours of direct sunlight each day. Plants may tolerate some light afternoon shade, particularly in regions with extremely hot summers, but excessive shade can produce weak, elongated growth and fewer flowers. Good air circulation is also important. Allow enough room between plants and nearby vegetation for leaves to dry after rain or watering. Crowded, persistently damp conditions can increase the likelihood of fungal problems. Mexican marigold works well near a patio, garden path, or seating area where its fragrance can be enjoyed. It can also be placed toward the front or middle of a sunny ornamental border, depending on the mature height of the surrounding plants. Soil and Drainage Requirements This adaptable herb can grow in sandy, loamy, or clay-based soil, but good drainage is essential. Mexican marigold does not perform well when its roots remain in saturated ground for extended periods. Before planting, loosen compacted soil and incorporate finished compost if the soil is especially poor or difficult to work. Compost can improve structure and moisture management, but overly rich soil is unnecessary. Excessive fertility may encourage abundant foliage at the expense of sturdy growth and flowering. If the planting area stays wet after rain, consider using a raised bed or container. A quality potting mix designed for outdoor containers generally provides better drainage than ordinary garden soil. How to Start Mexican Marigold From Seed Mexican marigold can be propagated from seed. In colder climates, seeds may be started indoors several weeks before the expected final spring frost. Use clean containers filled with a lightweight seed-starting mix, and keep the medium evenly moist but not waterlogged. Provide warmth and bright light while the seedlings develop. Once they have produced several sets of true leaves, begin acclimating them to outdoor conditions. This gradual process, known as hardening off, helps reduce stress caused by sudden exposure to direct sun, wind, and changing temperatures. Transplant seedlings outdoors after the danger of frost has passed and the weather has warmed. Mexican marigold is sensitive to cold, so planting too early may slow its growth or damage tender foliage. Seeds can also be sown directly in prepared garden soil after frost danger has passed. Keep the seedbed consistently moist during germination and early growth. Thin crowded seedlings so the remaining plants have adequate access to light, air, water, and nutrients. Planting Mexican Marigold in the Garden Plant Mexican marigold at approximately the same depth it was growing in its nursery container. Dig a hole wide enough to accommodate the root system without bending or crowding the roots. After planting, gently firm the soil and water thoroughly to settle it around the root ball. Spacing of approximately 12 to 18 inches works well for many plants, although final spacing should reflect the variety, growing conditions, and desired garden effect. Wider spacing can improve air circulation in humid climates. A light layer of organic mulch can help retain moisture and limit weed growth. Keep mulch away from the base of the stems to reduce the possibility of excess moisture collecting around the crown. Growing Mexican Marigold in Containers Container growing is a convenient choice for patios, balconies, small gardens, and cold-climate gardeners who want to move plants indoors before frost. Choose a container with unrestricted drainage holes and enough space to support the plant’s mature root system. Fill the container with a loose, well-draining potting mix. Garden soil is usually too dense for containers and may remain wet around the roots. Place the pot where the plant will receive plenty of sunlight. Container-grown Mexican marigold generally requires more frequent watering than plants growing in the ground. Check the potting mix regularly, especially during hot, dry, or windy weather. Water thoroughly when the upper layer
Lavender and chamomile companion planting is one of the easiest and most rewarding ways to create a beautiful, fragrant, and productive herb garden. These two beloved herbs have been cultivated for centuries for their ornamental beauty, calming aromas, culinary uses, and medicinal properties. Together, they form a stunning combination that not only enhances your landscape but also supports pollinators, attracts beneficial insects, and contributes to a healthier garden ecosystem. Whether you are planning a cottage garden, designing a pollinator-friendly landscape, or creating an edible herb garden, lavender and chamomile companion planting offers countless benefits. Their complementary growth habits, similar cultural requirements, and long-lasting blooms make them an ideal pairing for gardeners of all skill levels. What Is Lavender and Chamomile Companion Planting? Lavender and chamomile companion planting is the practice of growing these two herbs together because they thrive under similar growing conditions and provide mutual benefits within the garden. While companion planting cannot eliminate every gardening challenge, it encourages biodiversity, supports beneficial insects, and creates a balanced growing environment. Lavender adds striking vertical spikes of fragrant purple flowers, while chamomile produces delicate white blossoms with cheerful yellow centers. Together they create a classic cottage garden display that is both elegant and functional. Their flowers bloom over an extended period, providing a continuous source of nectar for pollinators while filling the garden with color and fragrance. Benefits of Lavender and Chamomile Companion Planting One of the greatest advantages of lavender and chamomile companion planting is the abundance of pollinators it attracts. Honeybees, native bees, butterflies, hoverflies, and other beneficial insects are drawn to their nectar-rich flowers throughout the growing season. As pollinators visit these herbs, they also improve the pollination of nearby vegetables, fruit trees, berry bushes, and flowering ornamentals. A garden filled with pollinators is often healthier, more productive, and more resilient. Lavender and chamomile also attract beneficial insects such as ladybugs, lacewings, parasitic wasps, and hoverflies. These natural predators help control aphids, whiteflies, spider mites, and other common garden pests, reducing the need for chemical pesticides. Lavender’s aromatic foliage contains naturally fragrant essential oils that may help discourage mosquitoes, moths, fleas, and certain flying insects. While no single plant completely prevents pests, incorporating aromatic herbs into your landscape contributes to a more balanced garden ecosystem. Another advantage of lavender and chamomile companion planting is its simplicity. Since both herbs enjoy similar growing conditions, caring for them together is easy and efficient. Growing Conditions for Lavender and Chamomile Successful lavender and chamomile companion planting begins with choosing the right location. Both herbs grow best in full sun and require at least six to eight hours of direct sunlight each day. Plenty of sunshine encourages compact growth, abundant blooms, and stronger fragrance. Well-drained soil is essential for healthy plants. Lavender thrives in sandy or gravelly soil that drains quickly, while chamomile prefers fertile, loose soil with good drainage. Incorporating compost before planting improves soil structure without sacrificing drainage. Lavender becomes highly drought tolerant once established and prefers the soil to dry slightly between waterings. Chamomile appreciates moderate moisture during dry periods but should never remain in waterlogged soil. Providing adequate spacing between plants encourages good airflow, reduces humidity around the foliage, and minimizes the risk of fungal diseases. The Best Companion Plants for Lavender and Chamomile Although lavender and chamomile thrive together, they also pair beautifully with many other herbs, vegetables, flowers, and fruit-producing plants. Excellent companion plants include rosemary, thyme, sage, oregano, basil, calendula, borage, yarrow, echinacea, roses, strawberries, blueberries, tomatoes, peppers, eggplant, broccoli, cabbage, cauliflower, and many drought-tolerant flowering perennials. These companions benefit from increased pollinator activity while creating a diverse and visually appealing garden. Plants to Avoid To ensure successful lavender and chamomile companion planting, avoid placing lavender near plants that require constantly moist soil. Mint, celery, hostas, watercress, and other moisture-loving plants have watering requirements that differ significantly from lavender. Excess moisture around lavender roots can lead to root rot and poor plant performance. Grouping plants with similar moisture needs simplifies watering and promotes healthier growth throughout the garden. Culinary Uses of Lavender and Chamomile Lavender and chamomile companion planting provides more than ornamental beauty. Both herbs are edible and offer a variety of culinary possibilities. Lavender flowers add delicate floral notes to teas, shortbread cookies, cakes, muffins, scones, ice cream, custards, infused honey, lemonade, simple syrups, sugar blends, and Herbes de Provence seasoning. Lavender also complements roasted vegetables, poultry, lamb, seafood, and grilled dishes. Chamomile flowers are widely enjoyed in herbal teas, infused honey, syrups, jellies, cakes, cookies, fruit salads, custards, smoothies, and homemade desserts. Their mild apple-like flavor makes them a versatile ingredient for both sweet and savory recipes. Growing both herbs together provides a convenient harvest of fresh flowers throughout the growing season. Harvesting Lavender and Chamomile Harvest lavender stems when approximately one-third to one-half of the flowers have opened. At this stage, the blossoms contain the highest concentration of aromatic oils and dry exceptionally well. Chamomile flowers should be harvested once they are fully open. Frequent harvesting encourages additional blooms, providing a continuous supply throughout the season. Dry the flowers in a cool, shaded location with good air circulation before storing them in airtight containers away from direct sunlight. Growing Lavender and Chamomile in Containers Lavender and chamomile companion planting is not limited to garden beds. These herbs also thrive in containers, making them excellent choices for patios, balconies, porches, and small-space gardens. Select containers with drainage holes and fill them with a high-quality, well-draining potting mix. Place containers where they receive plenty of sunlight, and water carefully, allowing the soil to dry slightly between waterings. Container-grown herbs bring fragrance, beauty, and fresh culinary ingredients within easy reach. Why Lavender and Chamomile Companion Planting Belongs in Every Garden Lavender and chamomile companion planting combines ornamental beauty with practical gardening benefits. Their shared growing requirements make them easy to cultivate together, while their abundant flowers support pollinators, attract beneficial insects, and enhance biodiversity throughout the landscape. Whether you are growing herbs for
Learn how to grow orange cosmos with guidance on planting, sunlight, soil, watering, deadheading, containers, pests, seed saving, and companion plants. Orange cosmos bring brilliant color, delicate texture, and lively movement to sunny gardens. Their golden-orange flowers rise above airy green foliage, creating a cheerful display that feels equally at home in cottage gardens, pollinator beds, cutting gardens, and informal borders. Once established, these warm-season annuals provide months of flowers with relatively little maintenance. Often identified botanically as Cosmos sulphureus, orange cosmos are related to the familiar pink, white, and burgundy garden cosmos known as Cosmos bipinnatus. Orange cosmos generally have broader, more deeply divided foliage and produce flowers in vivid shades of yellow, gold, orange, and scarlet. Depending on the cultivar and growing conditions, plants may remain compact or reach several feet tall. One of the greatest advantages of growing orange cosmos is their adaptability. They tolerate heat, lean soil, and occasional dry conditions after their roots are established. They also attract butterflies and other visiting pollinators while producing flowers that can be enjoyed in both the garden and fresh arrangements. Why Grow Orange Cosmos? Orange cosmos offer impressive color without requiring rich soil or an elaborate care routine. Their daisy-like blooms complement many garden styles, from relaxed wildflower plantings to carefully planned color-themed borders. The fiery flowers are especially effective when planted in groups. A mass planting produces a glowing ribbon of color, while individual plants can be scattered among ornamental grasses and other annual flowers for a more natural appearance. Their open growth habit allows neighboring plants to remain visible, making orange cosmos useful for filling gaps without creating a heavy or crowded look. These flowers are also valuable for extending seasonal interest. In many climates, they begin blooming during summer and continue until cold weather or the first hard frost ends the display. Choosing the Right Orange Cosmos Orange cosmos cultivars vary considerably in height, flower form, and color. Some produce simple single flowers with open centers, while others have semi-double or double blooms. Colors may range from soft golden yellow to tangerine, deep orange, and reddish scarlet. Compact cultivars are well suited to containers, pathways, and the front of a flower bed. Taller varieties create an attractive backdrop and provide longer stems for cutting. Always check the seed packet or plant label for the expected mature height because some varieties stay under 2 feet while others can grow much taller. When planning a mixed planting, consider both the mature height and the intensity of the flower color. Bright orange cultivars create a dramatic focal point, while yellow-orange selections blend more gently with surrounding plants. The Best Location for Orange Cosmos Orange cosmos grow and flower best in full sun. Choose a location that receives at least six hours of direct sunlight each day. Plants may tolerate some light shade, but insufficient sunlight can result in fewer flowers and weaker, more elongated stems. Good air circulation is also helpful. Avoid crowding plants against dense shrubs or placing them where wet foliage remains enclosed for long periods. Taller varieties benefit from a location protected from strong wind, particularly in regions that experience frequent summer storms. Orange cosmos perform beautifully in flower beds, sunny borders, raised beds, cottage gardens, pollinator gardens, and dedicated cutting gardens. They can also be planted along fences or near vegetable gardens to add color and attract beneficial visitors. Soil Requirements Well-drained soil is more important than highly fertile soil when growing orange cosmos. These adaptable annuals can tolerate sandy, loamy, and moderately poor garden soils as long as water does not remain around their roots. Rich soil and excessive fertilizer can encourage abundant foliage at the expense of flowers. Overfed plants may also grow unusually tall and become more likely to lean or flop. In average garden soil, additional fertilizer is often unnecessary. If the planting area has heavy clay or drains slowly, improve the location before sowing by addressing compaction and drainage. Compost can help support soil structure, but it should be incorporated moderately rather than used to create an excessively rich planting bed. How to Grow Orange Cosmos From Seed Orange cosmos are easy to grow directly from seed. Wait until the danger of frost has passed and the soil has begun to warm. Cold, wet soil may delay germination and increase the chance of seeds deteriorating before they sprout. Prepare the site by loosening the surface and removing weeds, stones, and large clumps of soil. Scatter or space the seeds according to the information on the seed packet, then cover them lightly. Cosmos seeds should not be buried deeply because excessive planting depth may interfere with germination. Water the area gently so the seeds remain in place. Keep the upper layer of soil consistently moist while germination occurs, but do not leave it saturated. Seedlings commonly emerge within one to three weeks, depending on soil temperature, moisture, and the cultivar. Once the seedlings are large enough to handle, thin crowded plants to provide adequate space. Good spacing encourages stronger stems, better airflow, and a fuller display of flowers. Starting Seeds Indoors Gardeners with short growing seasons can start orange cosmos indoors several weeks before the expected final spring frost. Use a well-draining seed-starting mixture and provide strong, consistent light after the seedlings emerge. Insufficient light can cause young cosmos plants to become thin and stretched. If growing them beneath plant lights, position the lights according to the manufacturer’s recommendations and adjust them as the seedlings grow. Before moving indoor-grown seedlings into the garden, introduce them gradually to outdoor sunlight, wind, and temperature changes. This hardening process reduces transplant stress. Plant them outside only after frost danger has passed and conditions have warmed. Watering Orange Cosmos Newly planted seeds and young seedlings need consistent moisture while their root systems develop. Water carefully enough to moisten the soil without washing seeds away or flattening tender plants. Established orange cosmos tolerate occasional dry conditions, but they still benefit from water during extended
Originally published
March 2026
Updated
August 2026
Reviewed by
Culibloom