Tulips, Mint, and Cosmos Harvest: A Celebration of Color, Fragrance, and Garden Fresh Beauty
Celebrate a tulips, mint, and cosmos harvest with practical gathering tips, seasonal garden inspiration, and ideas for colorful floral arrangements.
A garden harvest is not limited to fruits, vegetables, and culinary herbs. Flowers and fragrant foliage can be gathered throughout the growing season to create colorful bouquets, fresh arrangements, and meaningful moments that reflect the beauty of the garden. Tulips, mint, and cosmos each contribute something special, from the sculptural elegance of spring tulips to the refreshing fragrance of mint and the airy charm of summer cosmos.
Although these plants usually reach their peak at different times, together they tell the story of a garden moving through the seasons. Tulips announce the arrival of spring, mint fills the warmer months with vigorous green growth, and cosmos carries the cutting garden into summer and fall. Photographing, arranging, or preserving each harvest creates a lovely seasonal record.
The Tulips, Mint, and Cosmos Harvest celebrates more than beautiful plants. It represents the simple pleasure of stepping outdoors, choosing a few carefully grown stems, and bringing the colors and fragrances of the garden inside.
The Elegant Beauty of Fresh Tulips
Tulips are among the most anticipated flowers of spring. Their smooth petals, graceful stems, and remarkable range of colors make them natural focal points in seasonal bouquets. Depending on the variety, tulips may bloom in soft pastels, bright jewel tones, warm sunset shades, or dramatic near-black hues.
For indoor arrangements, tulips are generally best harvested when the buds have developed their full color but remain mostly closed. Flowers gathered at this stage can continue opening in the vase, allowing their beauty to unfold over several days.
Use clean, sharp garden snips or a floral knife to cut the stems. When tulips are grown as returning garden bulbs, avoid removing too much foliage with the flower. The remaining leaves need time to gather energy for the bulb. Allow the foliage to stay in the garden until it naturally yellows and declines.
Place harvested tulips in clean, cool water as soon as possible. Tulip stems may continue to grow and curve after cutting, giving arrangements a relaxed, changing appearance. Refreshing the water and trimming the stem ends can help keep the flowers looking their best.
Fragrant Mint From the Herb Garden
Mint brings an entirely different sensory quality to a garden harvest. Its vibrant green leaves and refreshing fragrance make it valuable in the kitchen, in homemade beverages, and as greenery in informal floral arrangements.
Harvest mint after the morning dew has dried but before the strongest heat of the day. Use clean snips to cut several inches down the stem, making the cut just above a healthy set of leaves. This encourages branching and can help the plant develop fuller growth.
Regular harvesting also keeps mint from becoming overly tall and unruly. Because mint spreads aggressively in many gardens, it is often grown in a large container or another contained area. Even in a pot, it can provide an abundant supply of fragrant stems throughout the growing season.
Fresh mint may be added to water, lemonade, iced tea, fruit salads, sauces, and many other dishes. It can also be dried or frozen for later use. When placing mint in a bouquet, keep in mind that its stems may wilt more quickly than some flowers. Condition freshly cut stems in cool water before arranging them.
Only use mint in food or drinks when the plant has been positively identified and grown without products that are unsuitable for edible crops. Mint from florist arrangements should be treated as decorative unless its source and growing practices are known.
The Airy Charm of Cosmos
Cosmos brings movement, softness, and an unmistakable cottage-garden character to summer arrangements. The slender stems and delicate flowers appear to float above their fine, feathery foliage. Common colors include white, pink, rose, burgundy, orange, and yellow, depending on the species and variety.
For the longest possible vase life, harvest cosmos when the flower is beginning to open but has not fully expanded. Choose healthy stems with fresh petals and no signs of damage. Cut deeply into the plant when possible, selecting long stems while leaving enough healthy growth to support continued flowering.
Cosmos is a productive cut flower because regular harvesting and deadheading can encourage the plant to keep producing blooms. Flowers that are allowed to remain on the plant will eventually form seeds, which may reduce new flower production as the season progresses.
Place the stems in clean water immediately after cutting. Remove any foliage that would sit below the waterline, since submerged leaves can deteriorate and reduce water quality. Cosmos looks beautiful on its own, but it also combines naturally with herbs, grasses, zinnias, dahlias, and other garden flowers.
Bringing Different Garden Seasons Together
In many climates, tulips and cosmos will not bloom at the same time. Tulips are cool-season spring flowers, while cosmos usually begins blooming during the warmer months. Mint may be available between these periods and continue producing until cold weather arrives.
Rather than viewing this seasonal difference as a limitation, consider it part of the garden’s story. A collection of photographs, pressed flowers, dried petals, or individual seasonal arrangements can connect the three harvests. Spring tulips may be photographed beside the first emerging mint, while summer cosmos can be arranged with mature mint foliage later in the year.
Garden journals are another beautiful way to preserve the experience. Record bloom dates, colors, fragrance, weather conditions, and the performance of different varieties. These observations can help with future planting decisions while creating a personal record of the season.
Creating a Garden Fresh Arrangement
Tulips create a bold foundation for spring arrangements, while mint adds texture and a clean herbal fragrance. During summer, cosmos can replace tulips as the primary flower, with mint continuing to provide greenery and contrast.
Begin with a clean vase filled with fresh water. Remove leaves that would fall below the waterline, trim the stems with clean tools, and arrange the flowers loosely so their natural forms remain visible. Tulips often bend and move toward the light, while cosmos contributes delicate movement and mint fills open spaces with lush foliage.
Keep the finished arrangement away from strong sunlight, heating vents, and ripening fruit. Change the water regularly and remove fading plant material promptly. Because different stems may age at different rates, the arrangement can be refreshed by removing spent flowers and adding newly harvested material.
Growing Beauty for Future Harvests
A garden planned for harvesting can provide flowers and foliage from spring through fall. Planting tulips in autumn creates the foundation for an early display. Mint supplies fragrant greenery during the warmer months, while cosmos can be started from seed for abundant summer flowers.
Choose planting locations based on the needs of each plant. Tulips generally benefit from well-drained soil and adequate sunlight during their active growth. Mint prefers consistent moisture and can tolerate some shade, although growing conditions vary by climate. Cosmos typically performs best in a sunny location with well-drained soil and may produce fewer flowers when given excessive fertilizer.
Local climate, soil conditions, plant variety, and weather will influence growth and bloom times. Regional extension guidance can provide planting recommendations suited to your area.
Celebrating a Garden Through the Seasons
Harvesting tulips, mint, and cosmos invites you to notice how the garden changes. Each plant has its own season, texture, fragrance, and personality. Together, they create a layered celebration of spring renewal, summer abundance, and the quiet satisfaction of growing something beautiful.
A harvest does not need to be large to feel meaningful. A few tulips in a favorite vase, a fragrant handful of mint, or several dancing cosmos stems can capture the spirit of the garden. These small collections bring nature indoors and turn an ordinary day into a celebration of color, fragrance, and garden fresh beauty.
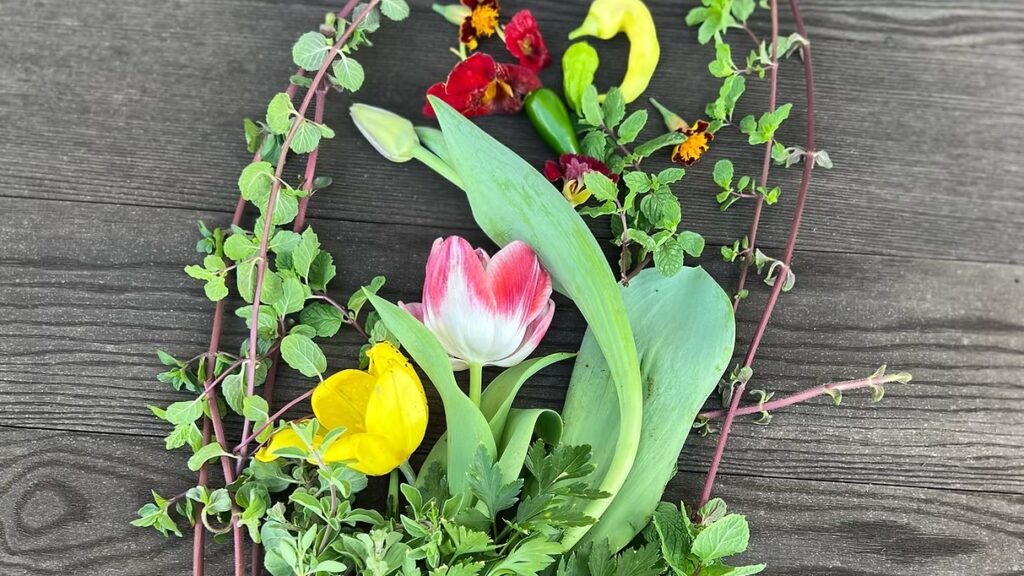
Bright tulips, fragrant mint, fresh herbs, and colorful garden accents create a beautiful seasonal harvest.
How to grow mint successfully starts with choosing one of the easiest and most rewarding herbs you can grow. There is something truly satisfying about stepping outside, harvesting a handful of fresh mint leaves, and enjoying their cool, refreshing aroma. Whether you are making a soothing cup of herbal tea, adding a burst of flavor to homemade lemonade, or garnishing your favorite desserts, fresh mint brings a taste of the garden to every meal. Best of all, it is an herb that grows quickly, asks for very little care, and rewards you with an abundant harvest throughout the growing season. Mint has earned its place as one of the most popular herbs in home gardens around the world. Its vibrant green foliage, refreshing fragrance, and endless culinary uses make it a favorite for gardeners of every skill level. If you are planting your very first herb garden or looking to expand an established one, mint is an excellent choice because it is forgiving, productive, and incredibly versatile. One of the first things experienced gardeners will tell you about mint is that it loves to grow. In fact, it grows so enthusiastically that many people recommend planting it in a container rather than directly in the garden. While its underground runners allow it to spread quickly, keeping mint in a pot makes it easy to manage while still providing a steady supply of fresh leaves all season long. Beyond the kitchen, mint is a wonderful addition to the garden itself. Its fragrant leaves release a refreshing scent whenever you brush past them, and its delicate flowers attract bees, butterflies, and other important pollinators. From classic spearmint and peppermint to unique varieties like chocolate mint and pineapple mint, there is a type of mint to suit every taste and every garden style. Whether your goal is to grow fresh herbs for cooking, create a beautiful container garden, or simply enjoy the satisfaction of harvesting your own ingredients, learning how to grow mint is a skill that will reward you for years to come. This complete guide will show you everything you need to know, from selecting the best variety and planting it correctly to caring for your plants and enjoying a plentiful harvest season after season. Why Grow Mint? It is easy to see why mint has remained one of the world’s favorite herbs for centuries. Not only is it incredibly easy to grow, but it is also one of the most useful plants you can have in your garden. From refreshing summer drinks to flavorful dinners and homemade desserts, fresh mint has a way of elevating everyday recipes with its bright, cooling flavor. One of the greatest advantages of growing your own mint is convenience. Instead of purchasing packaged herbs that lose their freshness after a few days, you can simply step outside and harvest exactly what you need. Freshly picked mint has a stronger aroma and richer flavor than store-bought leaves, making every recipe taste even better. Mint is also an excellent herb for gardeners who are just getting started. Unlike some plants that require constant attention, mint is remarkably forgiving. Give it sunlight, consistently moist soil, and occasional pruning, and it will reward you with lush growth throughout the growing season. Beyond its culinary value, mint brings life to your garden. During the summer months, its delicate flowers attract bees, butterflies, and other beneficial pollinators that help support nearby vegetables, fruits, and flowering plants. Its dense green foliage also adds beautiful texture to herb gardens, patios, and decorative containers. Perhaps the best part of all is its generous nature. A single healthy mint plant often produces far more leaves than one household can use fresh, giving you plenty to dry, freeze, or share with friends and family. Benefits of Growing Mint Once you begin growing mint, it quickly becomes one of those herbs you wonder how you ever lived without. Some of the many benefits include: Fresh herbs available whenever you need them. Easy to grow for gardeners of all experience levels. Perfect for containers, raised beds, and indoor gardens. Fast-growing and highly productive. Beautiful fragrant foliage that smells wonderful throughout the garden. Flowers that attract bees, butterflies, and other beneficial insects. Excellent for teas, desserts, beverages, salads, sauces, marinades, and savory recipes. Simple to propagate from cuttings or divisions. Returns year after year in many climates. Adds beauty and fragrance to patios, balconies, and outdoor living spaces. Popular Types of Mint Many people are surprised to discover that there are hundreds of varieties of mint, each with its own unique flavor and personality. Exploring different types of mint is part of the fun, and you may find yourself growing several varieties once you experience how different each one tastes. Spearmint Spearmint is the classic variety most gardeners grow. With its sweet, refreshing flavor and bright green leaves, it is perfect for teas, mojitos, mint jelly, fruit salads, yogurt sauces, and countless everyday recipes. If you are wondering which variety to plant first, spearmint is always an excellent choice. Peppermint Peppermint contains more menthol than spearmint, giving it a stronger cooling flavor that instantly refreshes the palate. It is commonly used in herbal teas, candies, chocolates, desserts, and holiday treats. Many gardeners also enjoy growing peppermint for its invigorating fragrance. Chocolate Mint Chocolate mint offers one of the most unique flavor profiles in the mint family. Alongside its refreshing mint taste is a subtle hint of chocolate that makes it perfect for brownies, cakes, cookies, hot chocolate, coffee drinks, and homemade ice cream. Its darker stems and attractive foliage also make it an eye-catching addition to herb gardens. Apple Mint Apple mint features soft, fuzzy leaves and a delicate fruity flavor that is milder than many other mint varieties. It is wonderful for fresh herbal teas, fruit salads, infused water, and decorative herb gardens. Pineapple Mint Pineapple mint is loved as much for its appearance as its flavor. Its beautiful cream-edged variegated leaves brighten containers and herb beds
Learn how to grow orange cosmos with guidance on planting, sunlight, soil, watering, deadheading, containers, pests, seed saving, and companion plants. Orange cosmos bring brilliant color, delicate texture, and lively movement to sunny gardens. Their golden-orange flowers rise above airy green foliage, creating a cheerful display that feels equally at home in cottage gardens, pollinator beds, cutting gardens, and informal borders. Once established, these warm-season annuals provide months of flowers with relatively little maintenance. Often identified botanically as Cosmos sulphureus, orange cosmos are related to the familiar pink, white, and burgundy garden cosmos known as Cosmos bipinnatus. Orange cosmos generally have broader, more deeply divided foliage and produce flowers in vivid shades of yellow, gold, orange, and scarlet. Depending on the cultivar and growing conditions, plants may remain compact or reach several feet tall. One of the greatest advantages of growing orange cosmos is their adaptability. They tolerate heat, lean soil, and occasional dry conditions after their roots are established. They also attract butterflies and other visiting pollinators while producing flowers that can be enjoyed in both the garden and fresh arrangements. Why Grow Orange Cosmos? Orange cosmos offer impressive color without requiring rich soil or an elaborate care routine. Their daisy-like blooms complement many garden styles, from relaxed wildflower plantings to carefully planned color-themed borders. The fiery flowers are especially effective when planted in groups. A mass planting produces a glowing ribbon of color, while individual plants can be scattered among ornamental grasses and other annual flowers for a more natural appearance. Their open growth habit allows neighboring plants to remain visible, making orange cosmos useful for filling gaps without creating a heavy or crowded look. These flowers are also valuable for extending seasonal interest. In many climates, they begin blooming during summer and continue until cold weather or the first hard frost ends the display. Choosing the Right Orange Cosmos Orange cosmos cultivars vary considerably in height, flower form, and color. Some produce simple single flowers with open centers, while others have semi-double or double blooms. Colors may range from soft golden yellow to tangerine, deep orange, and reddish scarlet. Compact cultivars are well suited to containers, pathways, and the front of a flower bed. Taller varieties create an attractive backdrop and provide longer stems for cutting. Always check the seed packet or plant label for the expected mature height because some varieties stay under 2 feet while others can grow much taller. When planning a mixed planting, consider both the mature height and the intensity of the flower color. Bright orange cultivars create a dramatic focal point, while yellow-orange selections blend more gently with surrounding plants. The Best Location for Orange Cosmos Orange cosmos grow and flower best in full sun. Choose a location that receives at least six hours of direct sunlight each day. Plants may tolerate some light shade, but insufficient sunlight can result in fewer flowers and weaker, more elongated stems. Good air circulation is also helpful. Avoid crowding plants against dense shrubs or placing them where wet foliage remains enclosed for long periods. Taller varieties benefit from a location protected from strong wind, particularly in regions that experience frequent summer storms. Orange cosmos perform beautifully in flower beds, sunny borders, raised beds, cottage gardens, pollinator gardens, and dedicated cutting gardens. They can also be planted along fences or near vegetable gardens to add color and attract beneficial visitors. Soil Requirements Well-drained soil is more important than highly fertile soil when growing orange cosmos. These adaptable annuals can tolerate sandy, loamy, and moderately poor garden soils as long as water does not remain around their roots. Rich soil and excessive fertilizer can encourage abundant foliage at the expense of flowers. Overfed plants may also grow unusually tall and become more likely to lean or flop. In average garden soil, additional fertilizer is often unnecessary. If the planting area has heavy clay or drains slowly, improve the location before sowing by addressing compaction and drainage. Compost can help support soil structure, but it should be incorporated moderately rather than used to create an excessively rich planting bed. How to Grow Orange Cosmos From Seed Orange cosmos are easy to grow directly from seed. Wait until the danger of frost has passed and the soil has begun to warm. Cold, wet soil may delay germination and increase the chance of seeds deteriorating before they sprout. Prepare the site by loosening the surface and removing weeds, stones, and large clumps of soil. Scatter or space the seeds according to the information on the seed packet, then cover them lightly. Cosmos seeds should not be buried deeply because excessive planting depth may interfere with germination. Water the area gently so the seeds remain in place. Keep the upper layer of soil consistently moist while germination occurs, but do not leave it saturated. Seedlings commonly emerge within one to three weeks, depending on soil temperature, moisture, and the cultivar. Once the seedlings are large enough to handle, thin crowded plants to provide adequate space. Good spacing encourages stronger stems, better airflow, and a fuller display of flowers. Starting Seeds Indoors Gardeners with short growing seasons can start orange cosmos indoors several weeks before the expected final spring frost. Use a well-draining seed-starting mixture and provide strong, consistent light after the seedlings emerge. Insufficient light can cause young cosmos plants to become thin and stretched. If growing them beneath plant lights, position the lights according to the manufacturer’s recommendations and adjust them as the seedlings grow. Before moving indoor-grown seedlings into the garden, introduce them gradually to outdoor sunlight, wind, and temperature changes. This hardening process reduces transplant stress. Plant them outside only after frost danger has passed and conditions have warmed. Watering Orange Cosmos Newly planted seeds and young seedlings need consistent moisture while their root systems develop. Water carefully enough to moisten the soil without washing seeds away or flattening tender plants. Established orange cosmos tolerate occasional dry conditions, but they still benefit from water during extended
Discover how to plant, grow, and care for orange tulips, including fall planting, watering, sunlight, containers, post-bloom care, and design ideas. Orange tulips bring warmth, energy, and unforgettable color to the spring garden. Their glowing shades range from soft apricot and peach to vivid tangerine, copper, and fiery orange-red. Whether planted in sweeping drifts, tucked into a mixed border, or arranged in containers near an entrance, these cheerful flowers create a striking display after the quiet colors of winter. Tulips belong to the genus Tulipa and grow from true bulbs planted in the fall. Most bloom sometime between early and late spring, although the precise timing depends on the variety, local climate, and seasonal weather. Orange tulips are available in several flower forms, including classic cup-shaped blooms, elegant lily-flowered varieties, dramatic parrot tulips, ruffled double tulips, and sturdy Darwin hybrids. Successful tulip growing begins with healthy bulbs, cool fall planting conditions, sufficient sunlight, and excellent drainage. Once established, the bulbs require relatively little attention during their spring display. Thoughtful post-bloom care may encourage some varieties to return, although many modern hybrid tulips produce their finest flowers during the first season. Choosing Orange Tulip Varieties The best orange tulip variety depends on the desired bloom time, flower shape, height, and garden style. Early-flowering tulips provide welcome color near the beginning of spring, while midseason and late-flowering selections extend the display. Triumph tulips are popular for their traditional shape, strong stems, and broad color range. Darwin hybrids generally produce large flowers on tall, sturdy stems and are among the better modern tulips for repeat flowering under favorable conditions. Lily-flowered varieties have slender blossoms with gracefully pointed petals, while parrot tulips feature textured, feathered petals that create a more dramatic appearance. Double tulips resemble peonies with their layers of densely arranged petals. Some open early in the season, while others bloom later. Species tulips are usually shorter and have smaller flowers, but they can be more dependable perennial performers than highly bred hybrids. When purchasing bulbs, choose large, firm specimens that feel heavy for their size. Avoid bulbs that are soft, shriveled, moldy, deeply cut, or visibly damaged. A papery outer covering that is loose or partially missing is usually less concerning than damage to the firm bulb underneath. When to Plant Orange Tulips Plant orange tulip bulbs in the fall after the soil has begun to cool but before it freezes solid. In colder regions, this may mean September through October. Gardeners in moderate climates may plant during October or November, while those in milder areas may wait until November or December. Tulips need an extended period of cold temperatures to develop and bloom correctly. In regions with consistently warm winters, gardeners may need to purchase prechilled bulbs or chill suitable bulbs before planting. The exact chilling requirements and proper planting schedule vary by cultivar and climate, so local extension guidance and the grower’s instructions are valuable. Do not plant tulips too early while the soil remains warm. Premature planting can encourage early growth and may expose the bulbs to disease or weather damage. At the same time, bulbs need enough time in cool soil to begin producing roots before severe winter conditions arrive. Selecting the Best Planting Location Orange tulips grow best in a location that receives abundant sunlight during their active spring growing period. Full sun encourages strong stems, healthy foliage, and well-developed flowers. A site beneath deciduous trees may also work because the tulips often receive plenty of sunlight before the trees develop a dense canopy. Good drainage is essential. Tulip bulbs are vulnerable to decay in saturated soil, particularly during winter dormancy. Avoid low areas where rain collects or snowmelt drains slowly. Raised beds, slopes, and containers can provide alternatives when the native soil remains wet. Tulips generally prefer fertile, moderately moist soil while actively growing, followed by drier conditions after the foliage dies back. Heavy clay may need improvement before planting. Work in well-finished compost to improve the soil’s structure, but avoid creating a small amended pocket surrounded by compacted soil, since that can hold water around the bulbs. How Deep to Plant Tulip Bulbs Planting recommendations vary according to bulb size, soil type, climate, and supplier instructions. A useful general guideline is to position a bulb at a depth approximately two to three times its height. Large tulip bulbs are commonly planted about 5 to 8 inches deep, measured from the bulb’s base to the soil surface. Follow the package directions when they differ from general advice. Place each bulb with its pointed end facing upward and its broad, flatter root plate resting at the bottom. Space tulips approximately 2 to 5 inches apart, depending on the variety and the fullness desired. Bulbs can be positioned relatively close together for a lush seasonal display, but they should not touch. Cover the bulbs with soil and water the planting area thoroughly. This settles the soil and supplies moisture for initial root development. A 2- to 3-inch layer of organic mulch can moderate soil-temperature changes and help conserve moisture, particularly in colder climates. University and botanical-garden guidance generally recommends planting spring bulbs two to three times as deep as their size while adjusting for soil conditions. University of Minnesota Extension, Missouri Botanical Garden Creating a Natural Garden Display Orange tulips usually make the strongest impression when planted in groups rather than isolated in straight, widely spaced rows. Arrange bulbs in broad drifts, informal clusters, or repeating pockets that lead the eye through the garden. For a natural effect, vary the spacing slightly while keeping enough bulbs together to create a noticeable block of color. Repeating orange tulips in several parts of a border helps connect the planting visually. Consider mature height when positioning bulbs. Shorter varieties work well along paths, at the front of borders, and in rock gardens. Taller Triumph, Darwin hybrid, and lily-flowered tulips can rise through lower spring plants or create a colorful middle layer in a mixed bed. Watering Orange Tulips Water the
Originally published
March 2026
Updated
August 2026
Reviewed by
Culibloom