Make an easy gluten-free graham cracker crust with four simple ingredients. Bake it for pies and cheesecakes or chill it for no-bake desserts.
This Easy Gluten-Free Graham Cracker Crust Recipe creates a sweet, buttery base for cheesecakes, cream pies, frozen desserts, and other gluten-free treats. The crust has the familiar graham cracker flavor of a traditional crumb crust, with a firm texture that supports creamy fillings and slices neatly after chilling.
Making a graham cracker crust from scratch is simple and requires only four ingredients. Gluten-free graham cracker crumbs provide the foundation, while granulated sugar and brown sugar add sweetness and a subtle caramel flavor. Melted butter coats and binds the crumbs so they can be pressed firmly into the pan.
This versatile crust can be baked for a lightly toasted flavor and crisp texture or chilled for a convenient no-bake dessert. Use a pie plate for traditional pies or a springform pan when preparing cheesecake. It is a dependable homemade alternative when prepared gluten-free crusts are expensive, difficult to find, or unavailable.
For the best results, crush the graham crackers into fine, evenly sized crumbs and press the mixture firmly into the pan. A measuring cup or flat-bottomed glass makes it easy to create a compact, even layer. Once baked or chilled, the crust is ready for your favorite cheesecake, key lime pie, chocolate cream pie, or no-bake filling.
Directions
Step 1: Preheat the Oven
For a baked crust, preheat the oven to 350°F. Have a 9-inch pie plate or springform pan ready.
If you are making a crust for a no-bake dessert, you do not need to preheat the oven. The assembled crust will be chilled instead of baked.
Step 2: Make the Graham Cracker Crumbs
If using whole gluten-free graham crackers, place them in a food processor and pulse until they form fine, evenly sized crumbs. Continue processing until no large pieces remain. The finished crumbs should have a texture similar to coarse sand.
If you are using prepared gluten-free graham cracker crumbs, measure 1 1/2 cups and proceed with the recipe.
Step 3: Combine the Dry Ingredients
Transfer the gluten-free graham cracker crumbs to a medium mixing bowl. Add the granulated sugar and packed brown sugar.
Stir until both sugars are evenly distributed throughout the crumbs. The granulated sugar helps the baked crust become crisp, while the brown sugar contributes a subtle caramel flavor.
Step 4: Add the Melted Butter
Pour the melted unsalted butter over the crumb mixture. Stir with a fork, spoon, or spatula until all the crumbs are evenly coated.
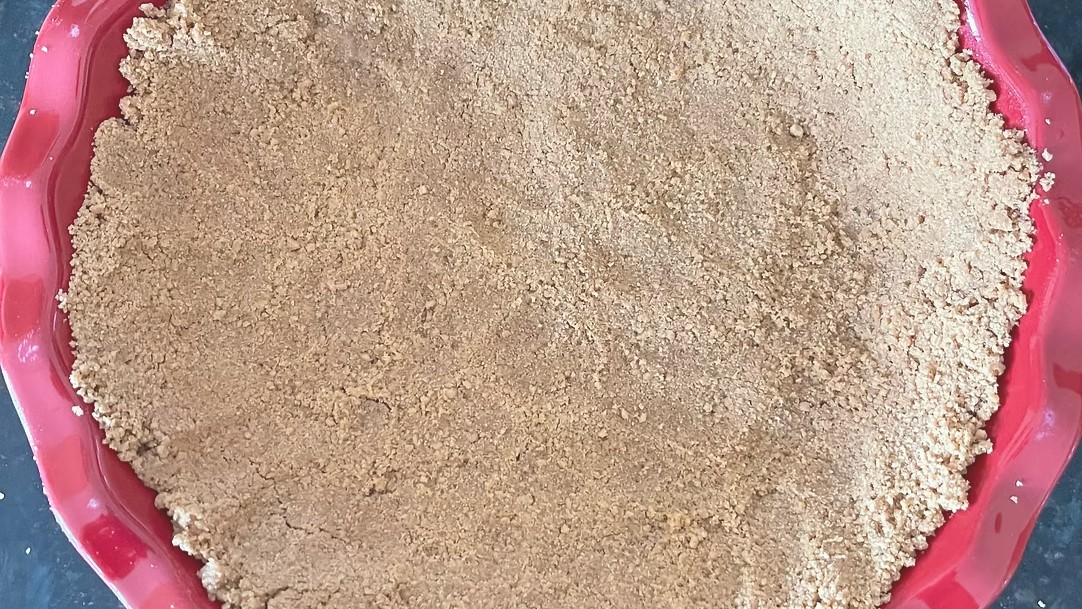
The mixture should resemble damp sand and hold together when squeezed between your fingers.
Properly coating the crumbs helps the finished crust maintain its shape after it has been baked or chilled.
Step 5: Press the Crust Into the Pan
Transfer the crumb mixture to a 9-inch pie plate or springform pan. Spread the mixture evenly across the bottom of the pan.
Use the bottom of a measuring cup or a flat-bottomed glass to press the crumbs firmly into an even, compact layer. If making a pie crust, press the mixture up the sides of the pie plate as well.
Smooth the edges with your fingertips and keep the thickness as even as possible.
Pressing the crumbs firmly is important because a well-packed crust is less likely to crumble when the finished dessert is sliced.
Step 6: Bake the Crust
For cheesecakes, baked pies, bars, and other baked desserts, place the crust in the preheated oven. Bake for 10 to 13 minutes, or until it is lightly golden and fragrant.
Remove the crust from the oven and place it on a wire rack. Allow it to cool completely before adding the filling. Cooling helps the crust become firm and prevents the filling from softening a warm crust.
Step 7: Chill the Crust for a No-Bake Dessert
For a no-bake cheesecake, cream pie, mousse pie, frozen pie, or ice cream dessert, refrigerate or freeze the assembled crust for 10 to 20 minutes instead of baking it.
Chilling allows the melted butter to solidify, helping the crumbs bind together. Once the crust feels firm, add the filling according to the instructions for your chosen dessert.
Step 8: Fill the Crust
Fill the cooled or chilled crust with your desired pie, cheesecake, mousse, or frozen dessert filling.
For the cleanest slices, chill the completed dessert thoroughly before cutting. Use a sharp knife and wipe the blade between slices when serving a rich or creamy filling.
Notes
Check the packaging on the graham crackers to make sure they are appropriately labeled gluten-free. When preparing the crust for someone with celiac disease or gluten sensitivity, verify all packaged ingredients and prevent cross-contact with gluten-containing crumbs, utensils, equipment, and work surfaces.
For additional flavor, stir 1/2 teaspoon ground cinnamon into the graham cracker crumb mixture before adding the melted butter.
Different gluten-free graham crackers can vary in texture and moisture. If the crumbs seem particularly dry and do not hold together when squeezed, add up to 1 additional tablespoon of melted butter.
For a deeper caramel flavor, use dark brown sugar in place of light brown sugar.
A pie plate works well for key lime pie, chocolate cream pie, banana cream pie, strawberry pie, peanut butter pie, and other traditional pie fillings.
A springform pan is especially useful for cheesecake because the sides of the pan can be removed without damaging the crust.
To prepare a thicker crust for a deep-dish pie or tall cheesecake, increase every ingredient by 50 percent. Make sure the larger quantity is pressed evenly across the bottom and up the sides of the pan as needed.
This crust pairs well with cheesecake, key lime pie, chocolate cream pie, banana cream pie, strawberry pie, pumpkin cheesecake, lemon icebox pie, peanut butter pie, no-bake mousse desserts, and frozen ice cream pies.
A prepared crust can be covered and refrigerated for up to 5 days before it is filled.
The baked or unbaked crust can be frozen for up to 3 months. Wrap it tightly before freezing and allow it to thaw before adding the filling.